Category: Home & Garden

  • Hollyhock Plant: Growing & Care Of Hollyhock Flowers (Alcea Rosea)

    Hollyhock Plant: Growing & Care Of Hollyhock Flowers (Alcea Rosea)

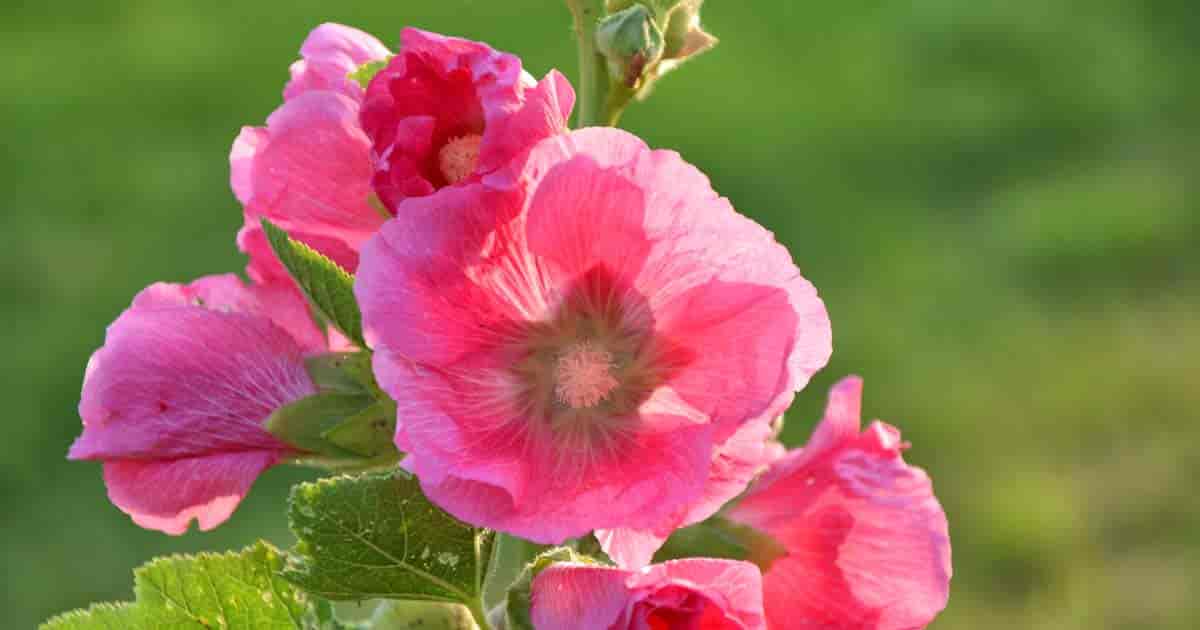
    Alcea Rosea [al-KEE-uh, ROH-see-uh] the hollyhock plant is a genus of about 60 species of flowering plants in the Mallow (Malvaceae) family originating from southwestern China and exported to Europe in the 15th century.

    When it became popular in Europe, William Turner, a renowned herbalist of the time, named the plant.

    The Hollyhock plant fits the definition of old-fashioned garden plants.

    They’re closely related to okra, cotton, and hibiscus.

    The plant comes in a wide variety of colors: red, white, blue, pink, yellow, purple, and even black.

    Common Hollyhock Plant Care

    Size and Growth

    Common Hollyhock grows tall with an average height of 6′ – 8′ feet tall.

    It spreads around 1′ – 2′ feet, allow ample room for it to grow properly in your garden.

    The hairy leaves of the Hollyhock are borne in clumps reaching 6″ – 8” inches across.

    Blooms start at the base of the stem and continue to move upward 1′ – 2′ feet.

    This ensures the entire stem is covered in bloom when the growing season starts.

    Hollyhock flowers grow 2″ – 4″ inches in width.

    Flowering and Fragrance

    The Alcea rosea has a two-year life cycle, known as biennial plants.

    Many of the available hollyhock varieties are biennials.

    Depending on the soil and care, it will be annual or a short-lived perennial.

    The first year is spent growing foliage and storing energy.

    The second year or last year flowers bloom in late summer, seeds form, and flower stalks shoot up.

    This species is a hermaphrodite (having both female and male organs).

    It can have spires of single flowers and double flowers.

    They have numerous stamens, and the stalks grow together.

    The large, showy blooms attract hummingbirds, butterflies, and bees.

    They have no particular scent.

    Light and Temperature

    Hollyhock plants need full sun and cannot grow in the shade.

    A warm sunny location sheltered from the wind is ideal.

    The plant is tolerant of the cold, but their flowers can become damaged by frost.

    Seeds of the Hollyhock plant need to be sown from March-June in well-drained soil.

    They should plant in large plug cells, and a pH level of 5.8-6.0 should be maintained.

    For optimum germination, you need 55° – 60° degrees Fahrenheit (13° C – 16° C).

    Germination can take place in up to 8 – 10 days.

    After this occurs, you need a day temperature of about 65° – 70° degrees Fahrenheit (18° C – 21° C) while the night temperature should be 55° – 60° degrees Fahrenheit (13° C – 16° C).

    Watering and Feeding

    Alceas Roseas are heavy feeders and need high maintenance.

    You will need to apply potassium nitrate and calcium at a rate of 75-100 ppm constant feed.

    Don’t allow the soil to dry out since Hollyhocks need the ground to be evenly moist.

    Soil and Transplanting

    Hollyhocks are hardy to USDA Hardiness Zone 6.

    They’re temperamental plants so transplanting is often discouraged.

    They have large tap roots making them a challenge to dig up.

    However, you may be able to do it successfully if you are careful enough.

    Hollyhock seeds shouldn’t be moved until they have at least 4 leaves and the day temperature is more than 50° degrees Fahrenheit (10° C).

    The soil where you plant Hollyhocks should be mixed with clay, sand, and plenty of compost.

    Remove the seedling from its pot gently and crumble the soil from the root ball.

    If it was growing in the ground, use a trowel to dig it out gently.

    Plant Hollyhock seeds in a hole prepared with composted soil and slide the roots of the seedling into it.

    Press the soil down with your hands but don’t cover the crown where the stem meets the roots.

    If you do, the plant will rot.

    Hollyhocks will readily self-seed new plants if not maintained.

    While planting Hollyhock locate them where this won’t be a nuisance.

    Growing Hollyhocks Grooming and Maintenance

    The foliage of the plant needs to be kept trimmed and free from insects.

    Remove any yellow leaves by hand.

    High fertilizer levels also need to be maintained to prevent yellowing of lower leaves.

    Do not use ammonium nitrate, it will produce cabbage-like leaves.

    If proper maintenance isn’t conducted, the foliage becomes unkempt and tattered.

    How to Propagate Alcea Rosea

    Hollyhocks propagate by seed and by division.

    Sow seeds outdoors about a week before the last frost.

    For same year growth, sow throughout the growing season until 2 months before the first expected fall frost.

    In non-blooming seasons, loosen the ground around full-grown plants and pull out the stalks.

    Retain their long roots and place them in water.

    Grow new plants in early spring, they need 4 months to mature, this is key to their summer colors.

    If you missed this year’s spring it may be worth waiting until next spring.

    Pests and Diseases of Hollyhocks

    Anthracnose can damage the foliage, leaf spot, and rust.

    Hollyhock rust is treated with proper ventilation and fungicide.

    Prevent rust by watering from below, providing good air circulation and giving a thorough late fall cleanup.

    Japanese beetles and spider mites feast on the leaves.

    If unprotected from the wind, it needs staking.

    Suggested Alcea Rosea Uses

    Common Hollyhocks provide great architectural height which looks great against old cottage gardens.

    They grow well against fences and walls.

    In herbal medicine, the Alcea Rosea is used as a laxative and emollient.

    It’s often used to control inflammation and bedwetting.

    Some cultures use it as a mouthwash to prevent bleeding gums.

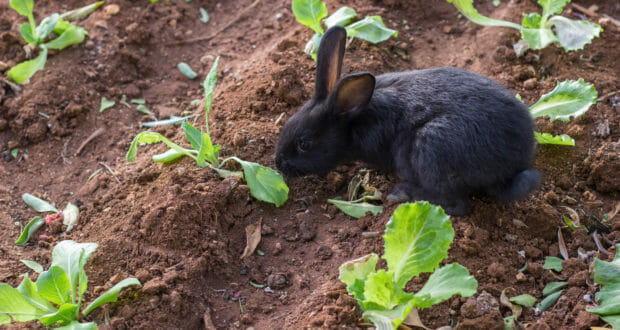
    The young leaves can be eaten raw or cooked.

    They have a mild flavor and textured leaves are desirable.

    Chop them up and throw them in your salad.

    The root has a nutritious starch which is good for your health.

    The petals are often used to make a refreshing tea or extract oil.

    This content was originally published here.

  • Cat walkway: How to make space for your furkids

    Cat walkway: How to make space for your furkids

    We made a simple cat walkway out of LACK tables.

    The view is meowellous from up here!

    IKEA LACK tables are strong enough to support cats, even if they are mounted upside down. So to give our cats more room in our house, we mounted tables hanging from the ceiling.

    Materials:

    • Wood screws (25 – 35mm)
    • Plastic wall plugs (5 mm) and matching screws

    Materials

    Want a Cat Walkway on the Ceiling? Here’s how

    Firstly, I assembled the tables as intended in the IKEA instructions.

    Lack side table assembly

    Then, I screwed angle brackets on the legs of the table with at least two screws per leg. The bracket and the base of the feet should be flush so it can sit properly on the ceiling.

    fastening bracket to legs

    The angle brackets I used were far larger than necessary, but I had them lying around.

    Repeat this step for as many LACK tables as you need for your cat walkway.

    • Fastening brackets to legs
    • Attach brackets to ceiling for cat walkway

    Since our ceiling is made of concrete, I had no problems mounting the angle brackets to it with plastic wall plugs and screws.

    In our case, one plastic fixing per leg was more than sufficient to secure the table to the ceiling.

    Metal braces

    For get additional security, I connected adjacent tables with metal bars that I screwed to the upper (so now lower) part of the legs to distribute the load over more fixings.

    After that, it was a matter of making it comfortable for my cats. We added cushions and pillows. Also some vinyl stickers on the LACK table tops to decorate them.

    Cat walkway IKEA LACK hack

    Cat walkway IKEA LACK hack

    To get to the cat walkway, we have a set of cat steps on the wall for them.

    The cats seem to love the extra elevated space they have to roam and watch us humans from up there.

    ~ by Tanja


    The post Cat walkway: How to make space for your furkids appeared first on IKEA Hackers.

    This content was originally published here.

  • DIY green lawn care tips : 10 detailed tips to get you the best looking lawn in the neighborhood

    DIY green lawn care tips : 10 detailed tips to get you the best looking lawn in the neighborhood

    Yesterday, Mickey opened his e-mail inbox to this question… ” I saw a picture of your house on your blog.  How do you always get your yard to look nice?”    I laughed because a green lawn is his pride and joy, so that reader just made his day!

    Mickey and I have lived in three houses since our marriage in 2004.  In each house, he has surprised me by taking our grass from awful to amazing.  I’m sharing a few ideas below, with affiliate links, to help you find what you are looking for.  Our latest yard does throw a few ‘stones’ into the mix, literally… our yard is filled with stones, but he is doing great with it, nonetheless.

    Here are my husband’s tips for having a great yard…

    1-  First, you are going to Aerate, but before you do this, you need to locate your sprinkler heads and mark them with yard flags (or use plastic hangers to mark them).

    2- Aerate your yard in mid-September.   He suggests core or plugs aerating.  He doesn’t like the pull behind ones but said that you have more control with the walk-behind.    He also said that you need to do a double pass (doing each area twice), but he does three or four passes in areas that need it more.    He will go horizontal and then does the second round vertical (to your yard pattern).

    2- Over-seed.  Use a good starter fertilizer.   By over-seed, he means that you put a LOT of seed down, even more in the areas that you did your extra aerating.

    3-  With your starter fertilizer, you will want to go over and add fast-acting lime on top of the fertilizer (on the same night).

    4- It is best to do all of this either right after it has rained when the ground is soft.

    5- In the winter, you want to put down a winterizer, to help control the weed growth that will occur in the spring.

    6- Keep your grass tall, about 2-3 inches.  This prevents it from burning (looking white) and it keeps the roots healthy.   Cutting it too short will kill the roots and allows weeds to grow.  (You can even get a robot lawnmower like this one from Husqvarna.)

    7- In the spring, you will want to use pre-emergent fertilizers, with herbicide.  This will prevent weeds.

    8- Go over the pre-emergent fertilizer with lime.

    9- Water early morning, before the sun rises.  We set our irrigation timer to run at 3:00 am.   Do not do this at night, because the water will sit all night and mold can grow (mushrooms and fungus).  In the day, the sun will dry the grass.   Plus, if you use it during the day or evening when the sun is up, it will just cause the water to steam and cause damage to your grass (plus, it wastes water because it is evaporating so quickly)

    10- Ensure that your grass is cut with a SHARP lawnmower blade.  You can tell that the blade is getting dull because the tips of the grass will turn white within a day of being cut (so even the best-looking yards will look dried out and not “clean-cut” all because of the blade).

    I hope this helps! 🙂

    Success! Now check your email to confirm your subscription.

    There was an error submitting your subscription. Please try again.

    This content was originally published here.

  • Buyer Beware: Used Nest Cams Can Let People Spy on You

    Buyer Beware: Used Nest Cams Can Let People Spy on You

    Buyer Beware: Used Nest Cams Can Let People Spy on You

    We’ve explained before that when you’re selling or giving away your old smart-home devices, it’s critical to do a factory reset on them first in order to protect your data and privacy. We’ve recently learned, however, that even performing a factory reset may not be enough to protect privacy for owners of the popular Nest Cam Indoor. And in a twist, this time the risk is on the side of the person receiving the device, not the person disposing of it.

    A member of the Facebook Wink Users Group discovered that after selling his Nest cam, he was still able to access images from his old camera—except it wasn’t a feed of his property. Instead, he was tapping into the feed of the new owner, via his Wink account. As the original owner, he had connected the Nest Cam to his Wink smart-home hub, and somehow, even after he reset it, the connection continued.

    We decided to test this ourselves and found that, as it happened for the person on Facebook, images from our decommissioned Nest Cam Indoor were still viewable via a previously linked Wink hub account—although instead of a video stream, it was a series of still images snapped every several seconds.

    Here’s the process we used to confirm it:

    Our Nest cam had recently been signed up to Nest Aware, but the subscription was canceled in the past week. That Nest account was also linked to a Wink Hub 2. Per Nest’s instructions, we confirmed that our Aware subscription was not active, after which we removed our Nest cam from our Nest account—this is Nest’s guidance for a “factory reset” of this particular camera.

    A screenshot on the Nest website with instructions for factory-resetting Nest Cams and Dropcams.
    Nest’s instructions for doing a factory reset on the Nest Cam indicate that there is no factory reset button, a common feature on smart-home devices.

    After that, we were unable to access the live stream with either the mobile Nest app or the desktop Nest app, as expected. We also couldn’t access the camera using the Wink app, because the camera was not online. We then created a new Nest account on a new (Android) device that had a new data connection. We followed the steps for adding the Nest Cam Indoor to that new Nest account, and we were able to view a live stream successfully through the Nest mobile app. However, going back to our Wink app, we were also able to view a stream of still images from the Nest cam, despite its being associated with a new Nest account.

    In simpler terms: If you buy and set up a used Nest indoor camera that has been paired with a Wink hub, the previous owner may have unfettered access to images from that camera. And we currently don’t know of any cure for this problem.

    We are unsure what further implications there may be regarding Nest’s video service, including whether it may be vulnerable to other methods or through other smart-home device integrations. We’re also unsure whether this problem affects the entire Nest lineup, including the Nest Cam Outdoor, Nest Cam IQ Outdoor, and Nest Hello video doorbell.

    We reached out to Nest for comment about why this is happening, which devices are involved, and what the company plans to do about it, but we haven’t received an official response yet—we’ll update this post when we do.

    For now, our advice is to avoid buying a second-hand Nest device and to unplug any used ones you may have already purchased.

    Sources

    1. How to restart or factory reset your Nest camera or Nest Hello, Google Nest Help

    This content was originally published here.

  • How to Build a Spiral Herb Garden

    How to Build a Spiral Herb Garden

    A herb spiral is one of the most clever permaculture techniques for utilizing space and allowing plants to work together in the garden. Usually located just outside the kitchen door, a herb spiral provides a menagerie of culinary and medicinal herbs, while saving space and helping with pest management in the garden.

    Easy to build and fun to work with, herb spirals allow for herbal experimentation, based on some very simple principles.

    The Benefits of Herb Spirals

    Architecturally, the herb spiral is an example of excellent design and nature-forward engineering. While a long, thin garden bed provides ample space for a range of herbs, herb spirals play with multiple levels to take advantage of the sun’s path, water channels, and plant companions.

    GET THE STEP-BY-STEP DIRECTIONS – New Life On a Homestead

    This content was originally published here.

  • A Garden for Frogs, Toads, Bees, and Butterflies

    A Garden for Frogs, Toads, Bees, and Butterflies

    Kimberly Hennelly is sharing photos today of her garden and the various nonhuman visitors she welcomes into the space.

    I wanted to share some photos of the frogs and pollinators from my backyard. I am in Zone 6 in Vernon, New Jersey. I actually plant specifically for pollinators. Bee balm (Monarda sp.), butterfly weed (Asclepiastuberosa, Zones 3–9), fennel, buddleia, echinacea, hummingbird mint (Agastache sp.), black and blue salvia (Salviaguaranitica ‘Black and Blue’, Zones 7–10 or as annual), etc. I grow lots and lots of flowers. I also have habitats for monarch larvae and hatch them.

    An adorable toad (I think an American toad, Anaxyrus americanus) hanging out on a group of rose blossoms. Seeing amphibians like frogs and toads in your garden is always a good sign. Not only do they have a voracious appetite for pests like slugs, but amphibians are also very sensitive to pollutants and many insecticides because they easily absorb many chemicals through their skin. So seeing amphibians in the garden is a good sign you’ve made a safe space for many animals to thrive.

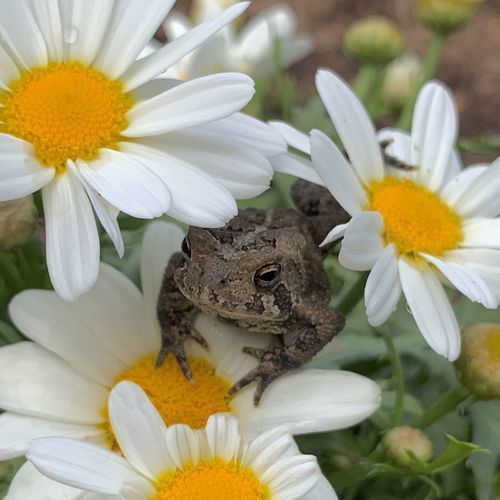
    Another happy little toad, this time hanging out on some daisies. When toads first switch from tadpole to their adult form, the young toads, sometimes called toadlets, often leave the water in a large group, so you may see lots of tiny toads in the garden all at once.

    A female ruby-throated hummingbird. Plants with long, tubular, red flowers are often adapted to be pollinated by hummingbirds. But hummingbirds don’t just feed on nectar; they also eat insects and spiders as a large part of their diet and an important source of protein, particularly for females preparing to lay eggs. So to keep your hummingbirds happy, provide lots of nectar, but also avoid using insecticides that will kill off the insects they, and many other birds, depend on.

    The iconic monarch butterfly

    Black swallowtail butterfly

    A gray tree frog. These tiny frogs are common over a wide swath of eastern North America. Avoid insecticidal sprays to make sure they have plenty of food in your garden.

    Have a garden you’d like to share?

    Have photos to share? We’d love to see your garden, a particular collection of plants you love, or a wonderful garden you had the chance to visit!

    To submit, send 5-10 photos to GPOD@finegardening.com along with some information about the plants in the pictures and where you took the photos. We’d love to hear where you are located, how long you’ve been gardening, successes you are proud of, failures you learned from, hopes for the future, favorite plants, or funny stories from your garden.

    If you want to send photos in separate emails to the GPOD email box that is just fine.

    Have a mobile phone? Tag your photos on Facebook, Instagram or Twitter with #FineGardening!

    You don’t have to be a professional garden photographer – check out our garden photography tips!

    Do you receive the GPOD by email yet? Sign up here.

    Get our latest tips, how-to articles, and instructional videos sent to your inbox.

    This content was originally published here.

  • A Guide to Concrete Floor Finishes

    A Guide to Concrete Floor Finishes

    Many people think of concrete of a material that is used outdoors on driveways and walkways. Concrete is primarily found outdoors, but it’s quickly becoming one of the most popular indoor flooring options as well.

    Why? Not only is concrete an eco-friendly flooring material, it can work well in practically any room thanks to the wide selection of concrete floor finishes.

    The finish can have a huge impact on the way the flooring looks, so make sure you choose wisely. Here’s an overview of your options:

    Acid-Based Stain

    The chemicals in an acid-based stain will react with the concrete to create a unique, slightly transparent color on the flooring. This color will not look consistent across the flooring since it is reacting with the variations in the concrete below it. As a result, acid-based stains create a more natural and rustic look than other concrete floor finishes.

    Water-Based Stains

    If you want a consistent and opaque color, choose a water-based stain. There are dozens of different colors to choose from, so you shouldn’t have any trouble finding the right hue for your home. Water-based stains are less toxic than acid-based stains, too. This makes a water-based stain a perfect option for eco-conscious homeowners.

    Polished Finish

    A polished finish is perfect for homeowners who love the natural look of concrete and don’t want to cover it up with a colored stain. To get this finish, you will need to hire a professional who has the proper floor polishing machinery.

    A professional can then buff the floors down until the concrete is smooth and shiny. The flooring will retain its sparkle and shine forever, so you won’t need to apply any wax or polisher to it in the future.  

    Epoxy stain applied to concrete floors

    Metallic Epoxy

    Metallic epoxy is a resin that features metallic pigments. As the finish is applied, the metallic pigments begin to separate, twist, and turn into subtle patterns on the floor.

    The metallic pigments contrast beautifully with the solid color of the finish, creating a unique three-dimensional appearance. A metallic epoxy finish in silver, bronze, copper, or gold can instantly make your concrete flooring look more modern and luxurious.

    Quartz Sand Epoxy

    Your concrete flooring will look like high-end quartz if you choose a quartz sand epoxy. This finish is applied with a base layer of standard epoxy paint. Then, colored sand is poured over the epoxy until it is completely covered. Loose sand is brushed away after the epoxy has dried, and the sand is sealed in place with a topcoat. The result is a smooth and shiny concrete floor that looks just like natural stone!

    Acrylic Sealer

    Applying an acrylic sealer will add an extra layer of protection to your concrete floors. Most concrete sealers will provide a subtle shine, but there are some sealers that provide a more high-gloss finish as well. This is a great option for homeowners who want to protect their concrete from water damage. But, it is not nearly as durable as other finishes, so keep this in mind when choosing which one is right for your home.

    Spruce Up Your Home Sleek and Sophisticated Concrete Flooring

    Installing a concrete floor can completely transform the inside of your home. Hire a professional to add this sleek and sophisticated material to your home so you can start enjoying the many benefits of concrete flooring!

    The post A Guide to Concrete Floor Finishes appeared first on HomeSelfe.

    This content was originally published here.

  • A Secret Garden Behind the Hedge – FineGardening

    A Secret Garden Behind the Hedge – FineGardening

    Welcome to Judy Boyle’s garden!

    Hemlocks (Tsuga canadensis, Zones 3–7), Leyland cypress (× Cupressocyparis leylandii, Zones 6–10), and green giants (Thuja ‘Green Giant’, Zones 5–8) create a privacy border for the backdrop of my half acre. As proud as I am of my lawn and gardens in front of this backdrop, seen from the entire back of the house, I am even more proud of what I’ve accomplished (along with glorious Mother Nature!) behind the backdrop of my Zone 7A garden.

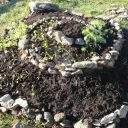
    Three years ago, this was a forgotten section of property behind the wall of evergreens. Fallen branches, dead trees, poison ivy, and discarded stone were strewn everywhere. Little by little, I began clearing the space of all the debris.

    My hubby built this adorable shed, and it’s now in the process of getting landscaped.

    I have mostly planted astilbe, ferns, hydrangeas, rhododendrons, tiger lilies, ajuga, ivy, creeping Jenny, and hostas. There are very few annuals in my garden. For the past few years, I have only planted perennials; otherwise, I’d go totally bankrupt.

    More of the new landscape behind the evergreen wall.

    This is one of the openings from the woods to the main part of the backyard, which is in front of the evergreen wall.

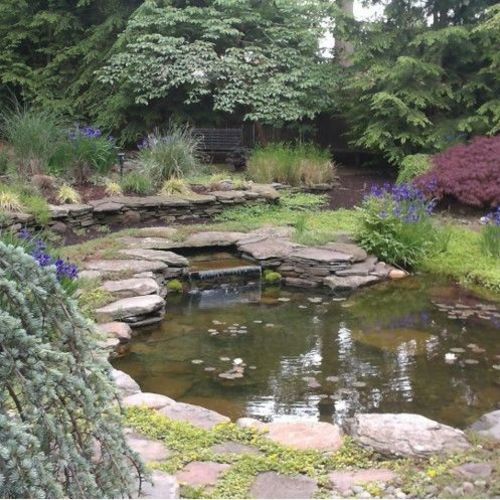
    My hubby built this pond about 20 years ago. It had an abundance of koi for many years, but sadly they perished during a particularly frigid winter, and now we use the pond as a water garden.

    In front of the evergreen wall is a garden filled with grasses, sedum, peonies, iris, and on and on.

    I have been smitten with gardening for 40 years. Every Mother’s Day since my daughter was born more than 30 years ago, I’ve received something special to plant in honor of all moms. I don’t know how I will ever leave my garden. (Here is a weeping blue cedar, Cedrus atlantica ‘Glauca pendula’, Zones 6–9.)

    Have a garden you’d like to share?

    Have photos to share? We’d love to see your garden, a particular collection of plants you love, or a wonderful garden you had the chance to visit!

    To submit, send 5-10 photos to GPOD@finegardening.com along with some information about the plants in the pictures and where you took the photos. We’d love to hear where you are located, how long you’ve been gardening, successes you are proud of, failures you learned from, hopes for the future, favorite plants, or funny stories from your garden.

    If you want to send photos in separate emails to the GPOD email box that is just fine.

    Have a mobile phone? Tag your photos on Facebook, Instagram or Twitter with #FineGardening!

    You don’t have to be a professional garden photographer – check out our garden photography tips!

    Do you receive the GPOD by email yet? Sign up here.

    Get our latest tips, how-to articles, and instructional videos sent to your inbox.

    This content was originally published here.

  • How to keep your home cool without using air conditioning

    How to keep your home cool without using air conditioning

    We all want a cool home when the hot summer months arrive, but using the air-conditioning wastes a lot of energy. Not to mention it can cost a fortune to keep the air-conditioning on. To save yourself some money and the planet, here are a few ways to keep your home chill without flipping on the AC.

    First, open the windows. Creating a cross-breeze is one of the most effective ways to cool a home. The key to effective breeze cooling is figuring out which direction the wind blows. In some areas, it’s fairly consistent, commonly coming from the same direction during the same times each day (most often in the afternoon). Open up windows during that “window” of a breeze to encourage the flow through your home.

    Using blinds is another way to keep your home cool. When your windows are closed, blinds can help stop heat from entering the home through your windows.

    Another effective strategy to keep the sun from injecting blistering heat into a room is to keep it dark. Completely close off rooms when they are not being used. If you don’t mind being left in the dark, install blackout curtains, which effectively block the heat from entering the room through the window. Both ceiling fans and box fans are useful for cooling space without cranking up the energy bill. To create even cooler air, place a container of ice directly in front of the fan. The air from the fan will bounce off the ice and direct the cool air across the room.

    If you’re keen to learn more ways to chill your house without using air-conditioning, have a look right here.

    This content was originally published here.

  • How To Keep Rabbits From Eating Everything In Your Garden

    How To Keep Rabbits From Eating Everything In Your Garden

    Rabbits are voracious eaters and they can wipe out an entire area of new growth overnight.

    How to keep rabbits from eating everything in your garden even if nothing else you’ve tried has worked.

    Have you had the unpleasant experience of visiting your garden in the morning only to find that your tender young shoots have been cut off overnight, as if with a pair of shears?

    If so, you may have had a nighttime visit from a rabbit or two. Rabbits are cute to look at, but they can be a real nuisance to gardeners. Known to be voracious eaters, they can wipe out an entire area of new growth overnight.

    Because they have both upper and lower incisors, rabbits tend to make a clean cut on a stalk when they eat. However, other telltale signs of rabbits in your garden are pea-sized droppings in and around the garden, and chewed tree bark close to ground level. Moreover, tufts of fur on branches and areas that reveal digging activity or even bedding down also can be signs of rabbits.

    Rabbits are timid animals and do not like to stray far from cover. Therefore, one way to discourage them from getting into your garden is to eliminate hiding places such as areas with tall grass and piles of stone or brush.

    Another idea is to plant alfalfa or clover outside your garden area. Rabbits are particularly fond of these two plants and may remain there for their meal– especially if it feels safer — instead of bothering your other plants.

    One more plan of action to deter rabbits is to add some plants to your garden that rabbits dislike. Rabbits tend to go for tender shoots and tender woody plants that have a thin bark, so your young plants are at the highest risk of being eaten. However, if you place some less attractive plants among the ones that the long-eared guys like, they may stay away from your garden.

    How To Keep Rabbits From Eating Everything In Your Garden

    Generally, rabbits dislike plants that have a strong fragrance or have fuzzy leaves. A determined rabbit may simply graze around the plants he does not like, but here are seven garden plants that repel rabbits.

    Plant lavender to keep rabbits from eating everything in your garden.

    1. Veronica –

    With its pretty flowering spikes of blue, pink or white, veronica adds some height (one to two feet) and texture to your garden. Veronica prefers full or part sun and well-drained soil. In addition, the bunnies don’t like it.

    2. Lavender

    You may love the fragrance of lavender, but rabbits do not. This tough beauty can withstand both heat and drought. You can plant it as single plants or form a hedge with many plants to deter pesky bunnies. Lavender prefers full sun and well-drained, slightly alkaline soil.

    3. Siberian Iris

    This elegant iris variety has gorgeous purple, rose, blue or white blooms and big, grassy foliage. It adds beauty to your garden while potentially deterring rabbits. The Siberian iris grows from one to three feet tall and prefers full or part sun and well-drained soil.

    4. Salvia –

    With a wide variety of bold colors to choose from, salvia is a colorful addition to your garden. Try it as a border plant to keep rabbits from entering your vegetable garden. Salvia likes full sun and well-drained soil. Furthermore, it can grow from one to even five feet tall, depending on the variety you choose.

    5. Peony

    They take a while to establish themselves from new roots, but when they do, peonies are a joy to behold. With large, late, springtime flowers and a beautiful variety of colors, peonies are an attractive addition to your garden. What’s even better is that rabbits do not like their tough foliage. Peonies like full sun and well-drained soil and can grow up to seven feet, depending on the variety of plant.

    6. Verbena

    Lovely verbena can grow from a mere six inches to three feet in height. It produces delicate pink, red, white or blue flowers, depending on the variety you select. Surprisingly, rabbits do not like the way verbena smells and usually will steer clear of the plant. Also, verbena prefers full sun and well-drained soil.

    7. Daylily

    Easy to grow and maintain, daylilies come in a rainbow variety of shades. They like full sun and well-drained soil and can grow up to six feet tall. Rabbits do not like their thick stalks.

    Keep in mind that if your long-eared nighttime visitors are hungry enough, they will eat almost anything green in your garden. However, your plants are particularly attractive to rabbits when they are young and tender. Once your plants are established, they are less tempting, and, as a result, other plants may more easily discourage rabbits. We’ll. I hope you’ve learned how to keep rabbits from eating everything in your garden. If you have any tips you would like to share with other readers, please leave them below. Thanks!

    Deer Hate These 7 Plants (So Plant Them Around Your Garden)


    This content was originally published here.