Category: Home & Garden

  • Pineberry: The Strawberry That Tastes Like Pineapple (Easy to Grow It)

    Pineberry: The Strawberry That Tastes Like Pineapple (Easy to Grow It)

    Have you ever seen pineberries? If you haven’t tried any, look for white strawberries with red seeds. The tiny fruits have a similar taste to pineapples. Yes, they are also known as pineapple strawberries. The plant is a result of the crossing between two varieties of strawberries.

    Pineberries are a cross between Fragaria virginiana and Fragaria chiloensis varieties. Some like to call it albino strawberries.

    White strawberries were cultivated by the native people of Chile.  Pineberries may grow between 0.6″ to 0.9″ (1.5 to 2.3 cm). That’s pretty much the same size as the smallest variety of “regular” strawberries.

    Experts from the University of Missouri say that pineberries shouldn’t be confused with the true “albino strawberry.” Red strawberries are affected by some disorders, and don’t taste really good.

    Pineberries are really soft when ripe, and spoil fast. That’s why you should try growing your own. Keep in mind that pineberries aren’t GMO fruits.

    Nutritional value

    Given that pineberries are a cross between strawberry varieties, they share similar nutritional value. Red strawberries are packed with vitamin C and fiber. A 2018 study found that the Chilean white strawberry is high in polyphenols and antioxidants.

    Health benefits

    Pineberries are as good as red strawberries. They contain a lot of fiber and water, and that’s good for your digestive tract. Fiber adds bulk to your stool and prevents/relieves constipation. Water eases bowel movement.

    A 2017 study on rats confirmed that pineberries reduce inflammatory response. These strawberries are also viewed as a good source of phenolic antioxidants.

    Pineberry varieties

    White Carolina pineberry

    It tastes like pineapple and becomes pink when exposed to sunlight. This variety is susceptible to diseases and you need to use organic fungicides.

    Natural Albino pineberry

    It’s delicious and produces smaller fruits. This variety requires cross-pollination with regular strawberries.

    White D pineberry

    It has larger fruits with great taste. This plant produces fruits several times throughout the growing season.

    White Pine pineberry

    It doesn’t produce big yield. The White Pine pineberry is a hardy variety that produces a lot of runners.

    Grow your own pineberries

    Can you grow red strawberries? Yes? Well, you can grow pineberries, too.

    Use a couple of starters in the first year. Pineberry plants are self-pollinating plants, and you can plant them near regular red strawberries. Don’t worry, this won’t change their color or taste.

    For optimal results, consider planting Natural Albino pineberry cultivars next to Sonata strawberries. Pineberry plants need 6-10 hours of sun and well-draining soil that stays moist.

    Plant your pineberries in spring as the soil needs to be warm. If you plant your pineberries in fall, use a lot of mulch over the starts to protect them. Don’t plant your pineberries near eggplants, potatoes and tomatoes.

    The holes should be 30 cm apart.  Pineberries like moist but not overly wet soil. You can use a drip system. When it comes to fertilizers, use organic product every 2-4 weeks.

    Harvest your pineberries when they turn white or pinkish-white.

    Common problems

    Pineberry plants are usually affected by diseases that destroy their leaves and roots. Irregular watering will make the leaves brown. Prune, water and feed your plants to prevent leaf scorch.

    Install a mesh over your pineberries to keep garden bests away from your fruits. You can also use diatomaceous earth. It’s safe for use. Reapply it after rainfall, because it doesn’t work when it gets damp.
     

    This content was originally published here.

  • Is Your Air Conditioner Freezing? Does It Need Repaired?

    Is Your Air Conditioner Freezing? Does It Need Repaired?

    Cooling problems can affect your comfort and your utility bills. If you are experiencing ice formation on your air conditioning unit and suspect it may be due to the outdoor temperature, try turning off the AC at night to see if this solves the problem—if so, good news, you don’t need to call for an AC repair.

    Does your home have poor airflow?

    One of the most common causes of air conditioner freeze-ups is poor airflow over the evaporator coils. Insufficient airflow reduces your air conditioner’s effectiveness, so you may also notice a drop in cooling efficiency and a corresponding rise in temperature inside your home. Restricted airflow over the coils may be caused by many things, including dirt accumulation inside the air conditioner, dirty HVAC ducts, or issues with the HVAC blower fan. Such problems are more likely to occur if it’s been over a year since your air conditioner last received professional maintenance. If you think your air conditioner is forming ice because of a problem with airflow over the coils, it’s best to call in an HVAC professional to assess the condition of your AC unit and perform any cleaning or repairs that may be needed.

    Does the A/C have a refrigerant leak?

    Air conditioners use a liquid refrigerant to transfer heat from inside your home to outside. This refrigerant is recirculated through your system, which is closed—this means that any loss of refrigerant is due to a leak in your system. Refrigerant leaks can cause a drop in refrigerant volume large enough to affect your air conditioner’s function, causing it to form ice on the coils. Such leaks are AC repairs that should always be handled by a professional, as most air conditioners today still use a refrigerant called R-22 (Freon) that can harm the environment if released. As soon as you suspect you may have a refrigerant leak, call in a professional to check your system and repair the leak, as well as replace any refrigerant that may have been lost to restore your AC’s cooling efficiency and prevent further ice formation.

    Air conditioners are designed to provide cool air for your home on hot summer days. Keeping your air conditioner in good repair means enjoying more than a decade of efficient, effective cooling and low energy bills. By contrast, poor air conditioner function will consume more energy without cooling your home properly, leading to discomfort, higher bills, and more frequent breakdowns that require professional AC repair. If you notice frost or ice on your air conditioner, it’s important to take steps to correct the situation. Ice that is allowed to persist can cause damage to your air conditioner and the surrounding area.

    This content was originally published here.

  • How to create a moonlight garden

    How to create a moonlight garden

    Do you know how to make your garden light up at night? The answer is to create a moonlight garden.

    But what is a moonlight garden, and what type of plants shine at night?

    “Moonlight gardening relates to plants that show off their textures, colors and sometimes their silhouettes from dusk into the moonlight hours,” said Irene Barber, who coordinates the Adult Horticulture Education Program for the Coastal Maine Botanical Gardens in Boothbay, Maine.

    Flowers in a moonlight garden can also be open during the day, she notes. It’s a common myth that flowers that bloom at night never bloom during the day.

    Another myth is that the flowers in a moonlight garden are only white. “The colors that show off well at night are the cool colors,” Barber said. “In addition to white, those include light blues, lavenders, chartreuse and even buttery yellow.”

    Cool colors are often seen best at dusk and at night because in the soft evening light and under the light of the moon, they don’t have to compete with flowers that sport warm colors. Vibrant tropical colors such as reds, purples, pinks, oranges, and bright yellows stand out so strongly in the brilliant light of the summer sun that they overpower cooler colors, and we can actually overlook cool colors during the day, Barber said.

    Choosing the plants

    Athyrium niponicum pictum Japanese painted fernJapanese painted ferns (Athyrium niponicum pictum) come to life in the evening, making them a good choice for your moonlight garden. (Photo: Ryan Somma/Flickr)

    Moonlight gardens begin at dusk because that’s the time of day when the texture and form of foliage with white and silver tones will contrast with and show up well against companion plants, Barber said. Dusk is also when these types of plants begin casting subtle shadows that add interest to the garden, Barber said. Brunnera macrophylla ‘Jack Frost’ is example of a plant that does that, she said. To highlight its broad, heart-shaped leaves with their white and silver patterns, she suggested planting it with Euphorbia ‘Diamond Frost,’ a spreading and mounding plant with lacy white flowers, or any of the toad lilies, which have an added attraction of being fragrant in the evening.

    Other plants with variegated foliage that Barber said would start to shine beginning at dusk include Japanese painted fern (Athyrium niponicum pictum – ‘Ghost’ has the most amount of white on its foliage), variegated Jacob’s ladder, deadnettle (Lamium maculatum), grasses and sedges such as Carex ‘silver’ and Carex morrowii ‘Ice Dance,’ variegated Solomon’s Seal (Polygonatum variegata) and groundcovers such as Dichondra argentea ‘Silver Falls’ and Stachys byzantinia ‘Silver Carpet.’

    As the moon rises and dusk fades into night, the larger and more prominent plants in the garden begin putting on a show. Lobelia siphilitica, the blue form of lobelia, is one of those plants. In late summer, it produces an upright three-foot stem encircled with light blue flowers with a white throat that twinkle in the moonlight because of both their color and texture, Barber said. The hard-to-find alba, or white form of Lobelia siphilitica also works well in a moonlight garden

    Planning the garden

    The Nymphaea Red Flare water lilyThe Nymphaea ‘Red Flare’ water lily gives a burst of color to your moonlight garden. (Photo: pzAxe/Shutterstock)

    When people think about plants for a moonlight garden, they should think more than just the low-growing foliage plants and flowers, Barber emphasized. They should also think about adding trees with white or light-colored bark. River birch (Betula nigra) is an example of a tree with light bark that will show up well at night. Its exfoliating bark would add an extra element of interest.

    If you want to add moonlight interest to your garden, don’t attempt to establish one part of the garden as the “moonlit” section. Instead, spread your “moonlight” plants throughout the planted area, advised Barber. This is not only necessary because plants for moonlight gardens have widely differing daytime light requirements, but this planting method increases the effectiveness of your nighttime display by spreading moonlight interest throughout the garden.

    Besides the aesthetic interest, there’s also a functional reason to create a moonlight garden. Some of these flowers — such as those of Campions, flowers in the Datura genus, four o’clocks and morning glories — attract night pollinators.

    And, if you’re lucky enough to have a pond, you can even add water lilies to the nighttime display, said Amanda Bennett, manager of Display Gardens at the Atlanta Botanical Garden. ‘Red Flare’ and ‘Charles Tricker’ are two examples of excellent night-blooming water lilies, especially for people who work during the day and would miss seeing their day-blooming water lilies.

    The flowers on ‘Red Flare’ begin opening in the early evening and remain open until as late as 11 a.m. the next day. The plants are extremely prolific and can produce up to seven blooms at a time. The lily pads are large, so you will need a medium or large pond to accommodate the plants.

    ‘Charles Tricker’ is an old-time favorite among water lily enthusiasts. Developed in 1893, it also produces large magenta red flowers in great profusion. The red pads also help to add beauty to this lily.

    5 annuals for a moonlight garden anywhere

    Moonflower (Ipomoea alba)The moonflower grows as a vine with an eye-catching white blossom. (Photo: Jebulon/Wikimedia Commons)

    1. Moonflower (Ipomoea alba) – Moon flower is of tropical original and in most places is grown as an annual vine (note that it’s listed as a perennial in the Southwestern United States).

    Angelonia Serena WhiteWhite summer snapdragons, as its name suggests, stays in bloom all summer. (Photo: Skyprayer2005/Shutterstock)

    2. White summer snapdragons such as Angelonia ‘Serena White’ – This variety of Angelonia forms a mounding plant that grows to about a foot tall, is covered in white flowers and stays in bloom all summer.

    White New Guinea impatiensWhite New Guinea impatiens produce large switches of white flowers during the summer. (Photo: Zed66/Flickr)

    3. New Guinea impatiens such as Infinity White – This variety of impatiens can be easily grown in garden beds or containers and produces large, brilliant white flowers throughout the summer.

    Dichondra argentea 'Silver falls'Dichondra argentea, or Silver falls, offer a potted but flowing opportunity for your moonlight garden. (Photo: Derek Ramsey/Wikimedia Commons)

    4. Dichondra argentea ‘Silver Falls’ – As its name implies, has silver foliage and can be grown as a ground cover or in a pot or hanging baskets from which its quarter-inch silver leaves will spill over the sides.

    Euphorbia 'Diamond Frost'The lacy look of the Euphorbia ‘Diamond Frost’ will add an elegant touch to your garden. (Photo: Serres Fortier/Flickr)

    5. Euphorbia ‘Diamond Frost’ – This spreading and mounding plant has lace-like white flowers and blooms continuously all summer.

    This content was originally published here.

  • Homemade Garlic-Mint Garden Insect Spray (that really works!!) | An Oregon Cottage

    Homemade Garlic-Mint Garden Insect Spray (that really works!!) | An Oregon Cottage

    Easy to make and use, homemade garlic-mint garden insect spray was tested on badly attacked basil plants & a flowering vine and worked with only 2 applications! This bug spray has continued to work in my garden as well as many reader’s gardens, too.

    Welcome to one of AOC’s popular gardening DIYs: how to make a natural garlic-mint insect spray easily from pantry ingredients- that actually works! Be sure to check out these other resources for more information on this spray:

    Okay guys, I’m excited to finally share with you the results of the get-rid-of-nasty-garden-bug experiment I’ve been conducting on my poor, bug-eaten basil plants and trumpet vine that I’ve shared a bit about before. I know I’ve teased you with my testing for long enough – we all deal with bugs, so I know you’ll be as happy to see the results as I was!

    The background to this experiment is a tale known to many organic gardeners (and maybe even would-be gardeners who gave up when faced with seemingly destroyed plants?): years of either ignoring it (and losing plants or living with damaged plants) or trying many different remedies from diatomaceous earth (works on many things though tedious to apply, sometimes hard to find, needs a lot of reapplication, may kill good bugs) to soap and water (this never really did much in my garden).

    And for some reason, while I don’t have much of a problem beyond cucumber beetles in our large, main garden (and most years I don’t lose plants to them), our herb garden hosts something(s) that have eaten the basil every year since we added it to our backyard. I created this spray last year (adapted from a Keeper of the Home article) to use on them, but didn’t really keep track of it, although I do remember that it worked.

    So this year when our basil was hit particularly hard as well as some marigolds I planted among the herbs and the trumpet vine growing up the gazebo across the path, I mixed up a new batch, wrote it down and documented in pictures so if it really did work, I could share it with you.

    And you’re not going to believe how well it worked – in fact, as I was putting this together I was thinking I was going to have to add disclaimers on the photos like “I promise these really are the same plants” or something, so you’ll believe me!

    The Natural DIY Garden Insect Spray Experiment

    So I’m pinky-swearing or whatever you need from me: the three photos in the collage above really, honestly are the same plant from beginning to four weeks later. I know, can you believe it?

    And also honestly: even after 20 years of growing things, seeing stunted, bug-eaten plants like my poor basil makes me want to throw in the towel sometimes. It’s just…ugh. These were three basil plants that I grew from seed, nurturing them along and to see them look like this in just a few weeks after planting out? It’s hard.

    And so I sprayed my homemade garlic-mint spray all over that poor plant, but I didn’t really think it was much for this world. It had only one growing tip left, but seriously, look at it (above left) – who would give that guy a chance?

    Well, I started seeing results within days – new growth! After a week I still was a bit skeptical – was that old bug-bitten leaves or new? But by week 2, I knew we had a winner and I snapped a picture before applying one more light spraying and then waiting another 2 weeks.

    Look at this beautiful, healthy basil plant! There’s a bug-bite here and there, but I can live with that (and we organic gardeners do, often, a-hem), but most of the new growth is blemish-free and I’ve started harvesting and making our not-so-secret-ingredient frugal pesto to freeze.

    Now, I had to share this with you as well, even though the photos were not taken in great light. This plant on the left was the worst of the three basils – stunted beyond anything I had seen with every growing tip eaten off and the remaining leaves were hard and leathery.

    It was so bad I did dig it up and was just about to drop it in the compost (which I probably would’ve done if I hadn’t been planning on sharing this with you all), but at the last minute I planted it in an empty spot out in the main garden, spraying it with the garlic-mint spray. And while it took longer to rebound (duh, I would, too!), I took the photo on the right just a few days ago, hardly believing what I was seeing.

    Is this stuff a miracle worker, or what? I should probably mention, too, that when I applied it the first time, we got a ton of rain the following week and I was sure it wasn’t going to work.  Garden M-I-R-A-C-L-E.

    Subscribe & Make This Year’s Garden A Success!

    Plan, dream, record and collect information for your best garden yet with AOC’s 10-page Garden Success Plan Notebook – a simple system to help keep you organized. You’ll also receive the popular weekly Newsletter full of useful information and behind-the-scenes happenings and occasional offers. Never any spam – read our Privacy Policy here.

    Welcome – so glad you’ve joined the AOC community! Your first step is to check your email to confirm your subscription.

    There was an error submitting your subscription. Please try again.

    And, you can probably see where this is going (should I have saved all the afters for the end? I was just too excited to share with you!) but here we have a reminder of the trumpet vine damage. This insect (I still don’t know what – I’ve never seen anything so it must be nocturnal) ate leaves like other bugs, but seemed to zero in on the new growing tips, which is a sure way to kill a plant.

    And now the vine is growing like trumpet vines are supposed to (that would be out-of-control, for those not familiar with trumpet vines, ha!), full of lovely leaves and new growing tips. I think this thing has grown 3 feet in just a couple weeks, that’s how much the insects had stunted it.

    Homemade Garlic-Mint Garden Insect Spray

    So, are you dying to know what is in the spray and how to make it? It’s super easy and uses easy-to-find (or grow) ingredients – I created it up by combining a couple of sources, none of which had a clear ‘recipe’ (I credited one source above) so I’m writing it out for you so you can make it whenever you need it.

    I’m so happy to gift this to your garden, because I think you’re going to love it as much as I do. Oh, and the mint? It makes this smell good – no yucky concoction here for you to suffer through.

    Click the green arrow for the full printable DIY Garden Insect Spray recipe!
    This content was originally published here.

  • Weeding, writing and arithmetic… why green fingers are good for our children | Environment

    Weeding, writing and arithmetic… why green fingers are good for our children | Environment

    From the water vole to the Scottish wildcat, the dwindling numbers of Britain’s most at-risk animals are well documented. But now the alarm bell is sounding over a rather more overlooked endangered species: green-fingered children.

    Young people are so rarely spotted in gardens across Britain nowadays that the Royal Horticultural Society is warning that the country is facing a green skills crisis unless more learn to garden.

    The society’s director general, Sue Biggs, says that generations of children are growing up disconnected from nature because they are not being taught about gardening at school. “In a few years’ time, we won’t have enough gardeners to keep the 22 million gardens in this country going, and that will only make environmental issues worse,” she asserts.

    Biggs believes that although a career in horticulture is a perfect fit for a young person passionate about fighting the climate crisis, few are encouraged to take up gardening. Many universities and colleges have stopped offering horticultural science and botany courses as a result, she adds. “The last five positions we filled at Wisbech, our flagship garden in Surrey, have all been given to people from overseas. We cannot find people who are British, trained at a British university.”

    She adds: “If we can make young people see that, by growing plants, they are helping the quality of our air and environment, and that will reduce the impact of climate change, then I think an awful lot of them will be much happier and feel less scared about the future.”

    She suggests that young climate change activists consider a “national day of garden protests” next. “To improve our environment, you can either stop doing things, like purchasing single-use plastic, or you can start doing things, like gardening – or, best of all, do both.”

    The Digital, Culture, Media and Sport Committee publishes its report on garden design and tourism on Monday, laying out plans to support garden tourism and better promote local gardens across England.

    Almost a third of all visits to the UK include a trip to a garden or park, and the horticulture industry, which supports approximately 570,000 jobs, is worth £24bn a year to the British economy. But Biggs says that teachers and parents in the UK do not value gardening as they should and young people don’t see it as “cool”.

    Teachers need to be imaginative and visit gardens and use gardening to demonstrate things already on the curriculum

    Recent research indicates that children often don’t know where their food comes from – with one survey finding that more than one in 10 of those aged 11 to 14 didn’t know that carrots and potatoes grew underground.

    The cost of creating a school garden is not the issue, Biggs suggests. “Between sleeper beds, compost and seeds, you’ve got everything you need. I think it’s more pressure on teachers’ time, and the timetable.”

    Gardening is now mainly being taught in extracurricular clubs, the RHS chief says, and that means “it needs a teacher who’s prepared to put extra effort in”. She would like to see more teachers using gardens to teach maths, geography, science, history and art, adding: “Teachers need to be imaginative and visit gardens and use gardening to demonstrate things already on the curriculum.”

    At Springhallow School in Ealing, west London, where pupils recently won the RHS School Gardening Team of the Year award, the garden is ablaze with colour. Marigolds, poppies and sunflowers peep out from raised beds, along with sweet-smelling herbs, tasty vegetables and tactile plants such as lamb’s ear, bunny tail grass and phlomis. All the pupils at the school have autism, and the garden is used by teachers to encourage them to work together in a team, try new food they have grown and enjoy sensory experiences outdoors.

    Cath Baynton, who teaches at Springhallow, says children who garden learn valuable life skills, particularly around communication: “It’s really good for their social interaction.”

    She believes developing a relationship with nature is crucial for children and the future of the planet, and the curriculum for mainstream schools is too prescriptive. “A lot of children in London don’t have a garden or access to outside space, and have never dug soil and encountered worms and beetles,” she says.

    Youngsters who garden learn about the environment they live in and the circle of life, she says. “They get the connection between a pest and predator – they make the connection between the wildlife we see and the plants we are growing.”

    It also teaches them about problem-solving and resilience. “Sometimes, in a garden, things do not go according to plan.”

    This content was originally published here.

  • You can easily grow evergreens in your garden

    You can easily grow evergreens in your garden

    Trees and shrubs are classified as either evergreen or deciduous. A deciduous tree loses its leaves in the fall and new leaves appear in the spring. The term “evergreen” describes trees that retain their color throughout the year, and are often able to endure cold weather and dry seasons.

    Evergreen trees can be either broadleaf or needled. Although called evergreen, the leaves or needles of these trees are not always green. The Colorado blue spruce, for example, is classified as an evergreen but its needles are a silvery blue color. Conifer trees may be evergreen, but some are deciduous.

    The variety in these trees makes them a perfect addition to your garden as they retain the architectural lines defining the structure of your garden year-round. Evergreens are found on every continent except Antarctica and are valuable resources, providing lumber, medicinal ingredients and food.

    While a leaf may remain on an evergreen tree for two years or longer, they do eventually fall off and are replaced. This may happen during any season of the year. Evergreens are important to birds, which use them for cover during the cold winter months.

    Birds also seek shelter in warmer climates on unusually cold nights. The dense needles or leaves on the evergreen offer protection from rain, wind and snow. Since evergreens come in all sizes and shapes, you’ll likely find something that fits well in your .

    Choose your tree to match your needs

    Most evergreens require very little care. But before going out to purchase trees or shrubs for your garden, it’s important to determine the purpose in your landscape. Do you want a windbreak for your house to reduce your electric bill? Would you like screening and privacy from the neighbors? Or will these trees be decorative, providing an anchor for your garden?

    Since the trees come in a variety of shapes, sizes, colors and leaf types, understanding the purpose for which they’ll be used will help determine the tree types that will work best in your yard. Although they survive in a wide variety of growing zones, most thrive in specific zones.

    Your trees are part of your landscape, so you’ll likely want rich, full trees or shrubs, and not spindly plants that appear to just be hanging on. The nursery where you purchase your evergreen trees will likely have a good understanding of the hardiness zones where the trees you choose will thrive.

    If purchasing online, be sure to do your own research on the hardiness zones. You’ll find the hardiness zone where you live on the U.S. Department of Agriculture’s Plant Hardiness Zone Map.

    Consider your soil

    As you choose your evergreen trees or shrubs, remember some may tolerate dry soils while others need a moist environment. Some trees prefer acidic soil, whereas others require a more alkaline type. Interestingly, trees that thrive in dry soil also enjoy alkaline soil, so if your area has dry soil and tests alkaline, it’s best to consider drought-resistant trees.

    On the other hand, acidic soil tends to hold more moisture, so evergreens that grow best in acidic soil must also like it moist. However, if you have your heart set on a specific tree that prefers an environment opposite to what you have in your garden, you might consider changing your soil’s pH to adjust for your tree or shrub.

    The pH is a measurement of alkalinity or acidity and the scale ranges from 0 to 14. A pH of 7 is neutral, below which is acidic and above is alkaline. The soil pH affects the availability of nutrients to the plant, and most essential nutrients are best available between a pH of 6 to 7.5.

    Before attempting to change your soil pH, it’s best to have it tested. If it’s alkaline, you may increase the acidity by adding elemental sulfur, organic mulch or sphagnum peat. If your pH is highly acidic, you may raise it by incorporating limestone into the . Be careful not to add too much of either, though, as it may damage your plants.

    Wood ash also raises your soil’s pH. Modifying the pH is a process often requiring repeated treatments over time. It may also be necessary to treat the soil around your trees each year after they’ve been planted, but remember to test first to avoid damaging them.

    How much care will your tree require?

    Most varieties thrive in full sun to partial sunlight. Some have a higher tolerance than others for sun exposure, extreme weather conditions, and pests and insects. Your trees will require regular watering through the summer, especially during dry seasons. They also appreciate mulching to fortify the roots from injury during winter or from the drying effects of wind and sun.

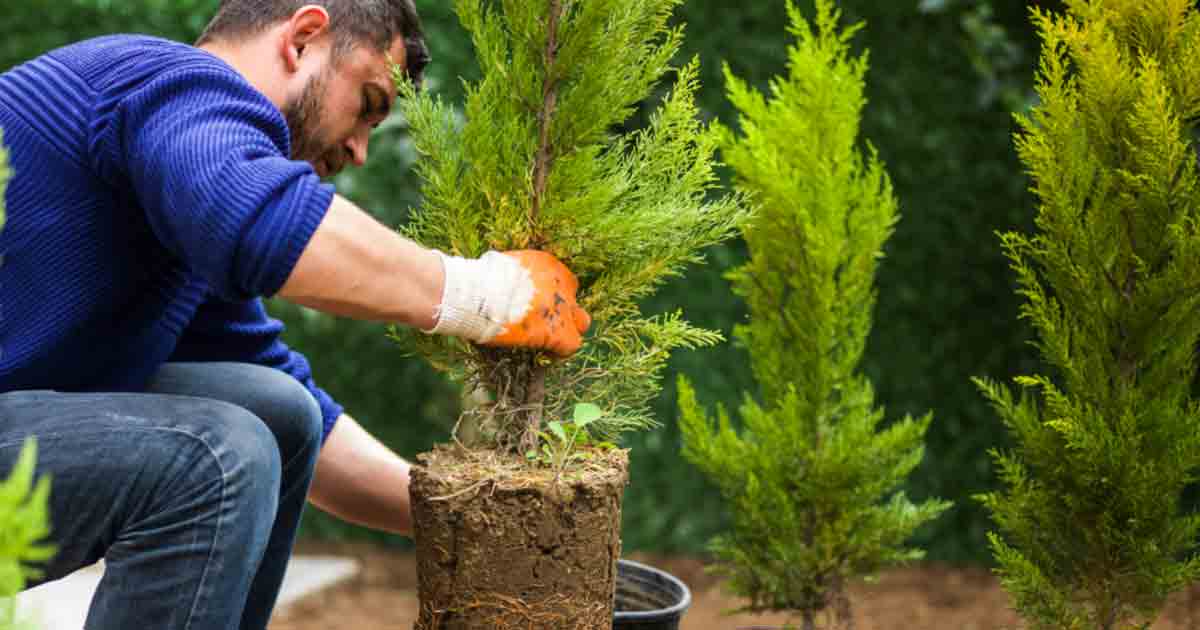
    Evergreen trees don’t usually require fertilization, but if new growth is showing slowly, you may find fertilizing to be beneficial. Purchase and plant your tree or shrub in the spring, summer or very early fall, so it will have time to establish roots. This will also reduce the risk of injury during the winter.

    When you bring your evergreen home, it will likely come with the roots balled in a burlap bag or in a pot. The hole you dig should be as deep as the root ball and at least two to three times wider. After planting, regularly water the tree during the first year. A good soaking once a week, especially during dry periods, is usually enough.

    The tree will appreciate 1 to 3 inches of water every week when it doesn’t rain. It’s important to soak the soil once or twice a week to encourage the roots to go deep rather than to irrigate on a daily basis.

    Use a drip irrigation system or soaker hose to allow the soil to absorb as much water as possible through the watering. Dumping large amounts of water on the soil only encourages runoff. Evergreen trees could be watered at night with a soaker hose to avoid moisture loss due to evaporation during the day.

    Prune your trees for best results

    Most evergreen trees and shrubs will require yearly pruning to keep them in good condition and in your desired size or shape. Most have a strong central branch that requires pruning only to control the height, trim into shapes or increase the density of the remainder of the tree or shrub.

    It’s important to identify your evergreen species to understand the growth habits before pruning or you may lose the natural shape and beauty. For the most part, new growth will extend from buds formed during the previous year at the tips of the branches and twigs.

    However, there are a few species capable of producing new growth on old wood. Most types of evergreen may be pruned in the early spring before growth starts, or during the semi-dormant period in the middle of the summer.

    It is ideal to follow the natural shape of other evergreen trees or shrubs, remove any dead or diseased branches and allow the cuts on the branches to heal to form buds for the following year. Unless you have an evergreen you’re using as a hedge, selectively pruning one branch at a time is better than shearing.

    Pine trees have different pruning requirements. Most pine trees will produce buds at the end of the shoots and not along the stems. To produce a compact pine or maintain a shape, one-third to one-half of each new shoot may be cut off as it grows in the spring. Don’t prune back into the wood as new growth will not develop from this area. It’s not recommended to shear pine trees.

    Large evergreens — Screening, privacy and decoration in one tree

    Evergreen trees add color and visual interest to your garden during the winter when everything else has died off. You’ll find evergreen trees in almost every region of the world and some have become garden favorites.

    Conifers are likely the type of evergreen tree you would most readily recognize. There are nearly 630 species of conifer trees, several dozen of which are popular in the garden. When most people think about an evergreen tree, a conifer likely springs to mind. They range in size from dwarf fir trees to massive Scotch Pines, reaching over 150 feet high.

    Conifers are identified by cones, which are an elaborate system of protecting their seeds. The leaves are often in the form of needles or scales. While they may be less efficient in producing nutrients for the plant, they are better able to withstand cold and hot, dry weather. Some of the most common Conifer trees include:

    • Hemlock trees — These trees are easily distinguished by their furrowed, cinnamon-colored bark. The foliage is flat and the branches come out horizontally and then bend downward.
    • Redwoods — These are officially among the oldest living trees. Old growth redwoods may be seen at Big Basin Redwood State Park in California and in the Santa Cruz mountains.

    While most varieties of broadleaf trees are deciduous, some stay green all year round. The leaves will be smaller and have adapted to resist the cold. Many species of holly are deciduous, but the European Holly is evergreen.

    It became popular as a Christmas decoration when Roman soldiers wanted to celebrate the New Year with traditional green branches. Although it easily grows in Italy’s warmer climate, holly was a substitute in northern Europe. Rhododendrons also have species including evergreen varieties.

    Dwarf varieties may help develop strong lines for your garden

    As you create your garden, consider using dwarf evergreen trees to add color throughout the year and to define the architectural bones. These low-to-the-ground, always-green shrubs may be a feature of their own or may help to move your eye from one area of the garden to the next.

    The recent growth in popularity has likely been from the variety now available in dwarf size shrubs and trees. These trees mature to a height of 12 feet or less and grow slowly. The ideal time to plant is while they’re dormant in October through March. Most will prefer full sun and a slightly acidic soil. Breeders are developing new varieties every year. Here are a few described by The Spruce:

    • Hudsonia — This slow-growing balsam fir tops out at 1 foot tall and 2 feet wide and is perfect for small gardens. It is among the most pleasantly aromatic evergreens, thriving in hardiness zones 3 to 7.
    • Hertz Midget — This is one of the smallest evergreens, growing as a tight round ball 1 foot tall and wide. It is a smart choice for a small garden and easily tolerates some shade. It grows in hardiness zones 2 to 8.
    • Pendula — This Canadian hemlock tree is hardy, growing 3 feet tall and 8 feet wide. Given the opportunity it may drape over a wall. It grows well in hardiness zones 3 to 7.
    • Minnima Aurea — This bright yellow, false cypress grows 2 feet tall and 1 foot wide in a pyramidal shape, lending a bit of height to your garden. It is easy to grow and care for but doesn’t like exposure to strong winds. It grows well in hardiness zones 4 to 8.
    • Rheingold — This evergreen has a rich gold color, mellowing to copper in the fall. It grows 3 feet tall and wide, and as the branches grow straight up it has a more conical appearance than a round shrub. It grows in hardiness zones 3 to 8.

    Natural pest and disease control strategies

    Evergreen trees are relatively easy to care for. However, they are also vulnerable to insect attacks. The best way to treat the condition is to identify the problem and use a specific, natural control to eliminate the problem without damaging the remainder of your garden. Some of the more common insect problems include:

    Aphids — These appear mostly on spruce and pine trees and usually in groups. They secrete a shiny, sticky material present on the leaves or beneath the tree. A blast of water from your hose helps dislodge them to the dirt where they ultimately will die.

    For a large population of aphids, dust the plant with flour as it constipates the insects. You may also try spraying the plant with a mild solution of water and a few drops of dish soap every two to three days for two weeks. You may help prevent them by planting catnip nearby or attracting their natural predators — lady beetles and parasitic wasps.

    Bagworm — These appear on red cedar, juniper, spruce and pine trees. You’ll notice the foliage begins turning brown or is missing. Bags covered with dead foliage up to 2 inches long will be hanging from the branches of your tree. These are actually caterpillars from a variety of moth species.

    Control is most effective in the early spring or late fall. Add 2 tablespoons of dish soap to 1 gallon of water. Pour the solution into a garden sprayer. Find a long stick to puncture the bag open and then saturate the inside with the soap mixture.

    Spruce spider mite — These appear on spruce, pine, juniper and other conifer trees. You’ll notice a yellow speckling along the needles, more commonly on the base of the needle in early summer. The mites are usually present in early spring and late fall but not in the summer months.

    They live on the underside of the leaves. Use a strong spray from your hose, or spray the leaves with a garden sprayer loaded with 3 tablespoons of dish soap to 1 gallon of water, being sure to soak the underside of the foliage.

    This content was originally published here.

  • You Can Buy A Garden Igloo On Amazon

    You Can Buy A Garden Igloo On Amazon

    With summer finally arriving, it is time to prepare for your days off when you’ll be able to spend some time relaxing and feeling nothing else besides complete bliss. While some enjoy spending their free time in the wilderness, others would much rather try out this new form of camping and relaxation called glamping – a way of spending time in nature without losing any comfort. So, if you feel like you’d much rather choose glamping over camping, this Garden Igloo from Amazon is perfect for you.

    The tent is made out of completely recyclable materials and it’s unique transparent design lets you relax while looking at the sky day and night.

    If properly taken care of, the transparent cover remains intact for a minimum of two years, it also withstands exposure to sunlight as well as temperatures dropping as low as -4°F and rising as high as 140°F.

    The dome is waterproof and wind resistant

    The base area is 107 ft² and it is 7′ 2″ tall meaning it will easily fit at least a few of your friends.

    The tents are originally made in Germany but they are also shipped to the United States as well. The company also offers covers to add on the solid base

    If you think it might get too hot during the summer to chill in the dome, you can get the Canopy Cover that leaves the dome open to fresh air and sunlight.

    If you’d like to decorate your backyard with an awesome dome like this, you can find it on Amazon.


  • Attracting Wildlife to Your Backyard

    Attracting Wildlife to Your Backyard

    When people ask me how to attract birds, bees and butterflies to their backyard, my answer always begins with planting native plants. What do I mean by native plants? A plant is considered native if it has existed in an area or habitat and was not introduced by humans. Native plants have formed symbiotic relationships with native wildlife for thousands of years and, in turn, offer the best habitat. Adding native plants can help make your yard a great place for wildlife!

    Attracting birds begins with thinking about what birds eat. What would they be looking for if you were to see them in a forest preserve? Native plants can offer three main food sources for birds: seeds, fruits and insects. Planting a variety of natives that can offer all three of these foods throughout the year will get you the most bang for your buck when looking to attract birds to your backyard. 


    Insects that birds like to snack on are easy to attract to your yard, since they go by the saying, “If you plant it, they will come.” Insects that birds like to snack on will naturally be attracted to the natives you plant. Consider adding fruit shrubs like red osier dogwood, American hazelnut or serviceberry. Cup plant can be a great addition to a sunny garden. Birds not only love the seeds, they are also attracted to the water the cup plant holds in its leaves and will use it for both drinking and bathing.
     
    dogwood-Alan-Anderson

    Red osier dogwood

    When using native plants to attract butterflies to your yard, consider both nectar plants and host plants. Adult butterflies eat nectar plants and young caterpillars eat host plants. Native milkweeds are the go-to host plant for attracting monarch butterflies. However, many other butterfly species benefit from host plants, too. Spicebush, Golden Alexander and pussy toes are all plants that native butterflies will use as host plants. When planting host plants, keep in mind that these plants are going to be heavily munched on so planting more is always better! A few butterfly-loving nectar plants include common ironweed, purple joe pye weed, purple prairie clover and coneflowers.

    Pale purple coneflower

    What about other pollinators? Native bees are incredibly efficient pollinators, but they’re not the only pollinators in town. Don’t forget about other pollinators like moths, hummingbirds, flies and beetles. Providing native plants that overlap in bloom times greatly helps all pollinators. Plants such as common boneset, yellow giant hyssop, royal catchfly, New England aster and nodding wild onion are a few good pollinator species. Planting species of plants in clumps rather than a single plant is beneficial to pollinator wildlife.

    Nodding wild onion
     

    When adding native plants to your yard, it benefits all wildlife, not just the ones you may be interested in seeing. All native plants mentioned in this post will be available to purchase at the District’s native plant sale on May 10 and 11 at Mayslake Peabody Estate in Oak Brook. A few more ways to help bring wildlife in to your backyard include limiting your use of pesticides, providing a water source such as a birdbath and providing shelter or nesting boxes for birds or other pollinators.

    This content was originally published here.

  • A Family Herb: Chamomile Flower

    A Family Herb: Chamomile Flower

    The lovely little chamomile flower is reminiscent of peaceful sunshine filled days, which speaks to the gentle power of this plant for easing discomfort and bringing happiness. In herbalism the two most commonly used chamomiles are the German chamomile (Matricaria chamomilla syn. Matricaria recutita), which may be the most familiar, and Roman chamomile (Chamaemelum nobile).

    Well-known and beloved, chamomile has been employed for thousands of years to ease the woes of humanity. This little plant has long found a happy home in the garden where people could keep it close at hand to help their families with such unpleasantness as fever, painful menstruation and headaches, digestive upsets, and emotional stress. Chamomile’s abundant useful actions make it a wonderful herb choice for every member of the family.

    Helpful Chamomile Flower For Families

    You may be surprised to discover that the little apple-scented chamomile flower is full of nutrients such as calcium, magnesium, potassium, and B vitamins (Mars, 2015). These nutrients provide nourishment to the nervous system and muscles helping to induce a sense of calm while relieving muscle spasms and tightness.

    Perhaps chamomile is best known for its wonderful calming action and indeed, a warm cup of chamomile is like a comforting hug. It is used to ease tension and stress, emotional upset, nervousness, and insomnia. Happily, chamomile is gentle enough for children while still being helpful for adults. Herbalist Matthew Wood considers chamomile to be a remedy for babies, and not just actual babies but for the babyish behavior such as whining, fussiness, and tantrums that all of us are capable of exhibiting at one time or another (Wood, 1997). So when someone in your family is fussy and cranky after a hard day or is coming down with an illness, call on chamomile to ease their distress.

    Chamomile is also well-known as a digestive aid. It has bitter constituents which help to gently stimulate healthy digestion. And when a nervous tummy comes to call, chamomile is the perfect herbal friend for easing those digestive woes that arise from upset emotions. In particular, chamomile is used to soothe colicky babies as well as nervous stomach upset that results in diarrhea. This makes chamomile a great herb to turn to when kids (or adults) have a stomach ache due to stress or nervousness, for instance, such as the anticipation over an upcoming event like the first day of school or a big presentation.

    Gentle chamomile can also be a soothing helper when people are in pain. Its anti-inflammatory and antispasmodic actions are used to soothe all manner of minor issues in families such as headaches, earache, teething pain, and menstrual cramps while simultaneously relaxing the nervous system and easing situational distress.

    What’s more, taken during colds and flus, it can help to ease symptoms and encourage healing sleep as well as reducing uncomfortable fever symptoms such as aches and restlessness. Chamomile is also used to help ease allergies and makes a wonderfully soothing eyewash for allergenic eyes. Finally, chamomile is a lovely vulnerary, anti-inflammatory, and antiseptic herb that can be used for promoting skin health while encouraging healing and soothing issues such as wounds, burns, and rashes.

    Be Prepared With Chamomile

    Life has its many ups and downs so why not be prepared for some of those eventualities by stocking up with chamomile flower remedies? All you need is a supply of chamomile flowers to harness the wonderful properties of this plant. Chamomile makes a wonderfully effective tea that can be used to address most of the issues discussed above. The flowers can also be brewed into a strong tea, by steeping for an hour or more, that is useful in as a compress or in the bath.

    A Simple Cup Of Chamomile Tea

    • Place the flowers in a heat-proof container and cover with the hot water.
    • Be sure to put a lid on your tea as it is brewing so that the volatile anti-inflammatory essential oil in the chamomile isn’t lost to evaporation.
    • Steep the tea for 3 to 10 minutes, strain out the flowers and enjoy.
    • The bitter constituents are released in greater amounts during long steeping times. If the tea is too bitter for your family, try sweetening with honey or reducing the brew time.
    • This recipe can be easily doubled or even quadrupled for making large amounts of tea at once.

    Don’t forget chamomile when everyone is over tired and stressed! Chamomile is a great friend for kids and parents alike especially when parents are being tried by their child’s fussiness because of a cold, colic, or teething. In these cases, everyone can drink a cup of chamomile tea or get into a tub of strong chamomile infusion. If mom is breastfeeding, she can drink chamomile tea prior to nursing baby and the baby will get the benefits of the tea along with mom. It is a great way to relax during those intense times of early motherhood.

    Using chamomile as a tincture can be more convenient than brewing up a cup of tea. Learn how to make an alcohol-free glycerite tincture here that your whole family can use for insomnia, stress, and tummy upsets – just use chamomile flower in place of the other botanicals. 

    A classical glycerite combination for kids is made with chamomile, lemon balm, catnip, and fennel. This soothing combination helps to calm stomach upset and encourage healthy digestion as well as to address respiratory infections. You can make your own by following the glycerite instructions above and using equal parts of these herbs.

    Chamomile also combines wonderfully with many other herbs such as lemon balm, mints, catnip, ginger, roses, and fennel. Try blending chamomile with any of these herbs to make tasty teas, glycerites and herbal honeys.

    Chamomile Body Care

    Chamomile is a wonderful herb to use in skin care. Its anti-inflammatory and vulnerary properties gently yet powerfully help to soothe inflammation while encouraging skin repair. This makes chamomile useful for assisting in healing wounds, scrapes, rashes, blemishes and more. A simple infused oil made with chamomile flower can be used for gently massaging babies and kids before bedtime. This same oil adds wonderful benefits when used as the oil base in making skin salves, sugar scrubs, lip balms, and whipped body butters

    Chamomile flowers can also be used to make water based preparations such as baths and compresses for soothing the skin and calming the spirit. Chamomile in the bath is particularly wonderful for dry itchy skin and rashes.

    Milky Chamomile Oatmeal Bath

    • Combine everything together in a bowl and stir well.
    • Stuff the mixture into a sock, muslin bag, or wash cloth and tie off at the top using a bit of string if needed.
    • Fill the tub with the hottest water available and toss the herb bundle in.
    • While you wait for the water to cool to bathing temperature, your bundle will steep in the water creating a big tea cup in your bathtub!
    • Once the water has cooled, slip in and enjoy your bath. Use the bundle to gently scrub the skin and be sure to give it a good squeeze to get all the herbal goodness into the water!

    Playtime With Chamomile

    Playing with herbs helps kids to make friends with plants. Then when it comes time to use the herb as a remedy the child feels comfortable knowing that this herb is a good friend who is now here to help them feel better! 

    Chamomile is an easy herb for kids to grow from seed. Help your child find a nice sunny little spot to grow their own little patch of chamomile. (Visit here for fun seed sprouting ideas!) Encourage your kiddo to care for the plants. Children can enjoy the little soft fern-like leaves as they grow and have fun picking the pretty little aromatic blossoms.

    For young kids that enjoy play dough, make up a batch of chamomile play dough together for special calming playtime.

    Chamomile Play Dough

    • Invite your child to help measure the flour, salt, cream of tartar, chamomile tea and oil into a pan.
    • Carefully stir and heat this mixture over medium-low heat on the stove.
    • Stir regularly while the dough forms.
    • Once the dough has formed and is no longer sticky remove from the heat to cool before playing. This is a great time to sit with your child and sip a cup of chamomile tea together!
    • Now for the fun part! Set up a space with a hard surface (like the kitchen table) for your child to play. During playtime offer the optional ingredients as fun mix-ins to enhance play.
    • Store your play dough in an airtight container when not in use. It should last for up to a month before it is time for a new batch!

    Use Chamomile Safely

    Though rare, chamomile can cause allergic reactions especially for people who are allergic to ragweed or other plants in the Asteraceae family. If you will be enjoying chamomile with your child(ren), be sure to visit our post about using herbs safely with kids for guidelines including dosages.

    This content was originally published here.

  • How to Choose a Thermostat for Your Home

    How to Choose a Thermostat for Your Home

    How to Choose a Thermostat for Your Home

    By Josh Crank, July 5, 2018, Energy Efficiency, Home Improvement

    Not long ago, there were only two basic categories of thermostats: manual and programmable. But in the age of the Internet of Things, we now have a third option — the smart thermostat — that allows a level of climate control we didn’t have before. And while the smart thermostat is the thermostat of the future, it’s still worth putting a little thought into which is the right thermostat for your home.

    What’s Your Ideal Thermostat Type?

    Manual Thermostat

    A manual thermostat is the most basic design available. Most new manual thermostats are digital nowadays, though it’s not impossible to find old-fashioned dial thermostats. The temperature can only be changed when someone uses the thermostat itself, so it’s only a good option for spaces where there’s usually someone home. Manual thermostats are cheap, often around $30.

    Programmable Thermostat

    A programmable thermostat allows you to set heating and cooling schedules based on when you’re out of the house or sleeping, but you can only change the programming when you’re physically using the thermostat. The programming feature makes it easier to conserve energy on HVAC use. They’re often slightly more expensive than manual thermostats, but easy to find at $60 or less.

    Smart Thermostat

    The key feature of smart thermostats is that they’re connected to the Internet, so they can be controlled from anywhere using a smartphone. Features vary from model to model, but many smart thermostats allow for fine-tuned programming with user-friendly smartphone apps. Most range in price from $100 to $200.

    Will a Smart Thermostat Work in Your Home?

    If you’re ready to upgrade to a smart thermostat, there are a couple of factors to consider. First, you’ll need a wireless internet connection in your home to use most smart thermostat features. If you’re not already paying for an internet connection, that’s an additional cost to factor into the total upgrade price.

    Second, you should check the specifications of the smart thermostat you’re considering to make sure it works with your heating and cooling system. It’s true that most central HVAC systems work nicely with most smart thermostat models, but if you have a heat pump, radiator heating, radiant floor heating or another type of system, you may find that certain thermostat models have compatibility exceptions.

    Why Upgrade to a Smart Thermostat?

    Smart thermostats cost more upfront, but if you’re currently using a manual thermostat, this is an upgrade that can pay for itself. Models like the Hive Active Thermostat make it easier than ever to stay comfortable while providing a convenient way to using less energy.

    In addition to the ease and convenience of programming your thermostat by smartphone, the Hive Active Thermostat has features like Quick Heat and Quick Cool that allow you to request a temporary boost in heating or air conditioning without the need to manually change the temperature back later. You can also program these features to activate automatically when your smartphone comes within a certain distance of your home, such as when you’re coming home from work.

    The Hive Active Thermostat communicates with other smart devices to save you even more on energy. For example, if you connect a fan to a Hive Active Plug, you can control both your thermostat and your fan from anywhere. You can let the fan keep you cool while turning your thermostat a little higher, allowing you to save money without even getting off the couch.

    Extras like Hive’s motion sensors and window and door sensors can also become a part of your heating and cooling routine. By programming your climate control to kick on when you walk through the door or setting the fans to activate automatically when you’re in the room, you can conserve energy without even thinking about it. Compatibility with voice-activated devices like Amazon Alexa and Google Assistant add another layer of convenience.

    Even if your manual thermostat has never let you down, the user-friendly interface and savings potential of a smart thermostat are reasons enough to consider a switch.

    Be Sociable, Share!

    This content was originally published here.