Category: Home & Garden

  • The Best Espresso Machines (2019)

    The Best Espresso Machines (2019)

    Look, there’s no getting around the fact that purchasing an espresso machine for your kitchen is a luxury. While it’s far from an essential kitchen appliance, if you’re addicted to espresso drinks, it sure is nice to be equipped with the gear to make a cappuccino, latte, or velvety smooth shot at home.

    If you’re ready to pull the trigger on buying an espresso machine, be prepared to shell out a little cash. Espresso machines can be wildly expensive. Rightfully so. Pulling a perfect shot requires precision: The machine must maintain both precise temperature and stable pressure throughout the brewing process. Achieving this stability is difficult and requires complex machinery, which is why you can find machines for upwards of $5,000.

    We wanted to find the best espresso machine available to home brewers for less than $1,000. At this comparatively low price point, we hoped to find a machine that could pull a shot that—if not as high-quality as one served at a prized Italian cafe or as high-dollar as a Brooklyn coffee shop’s—would have nuanced flavor, the right amount of brightness and acidity, and very little bitterness.

    It turns out, this is possible. In 2018, we tested 12 countertop models and found an espresso machine worth paying for. To see if our 2018 winner held up, we added a few more models in 2019 and retested. Keep reading for the best espresso machines of 2019; to see the contenders and find out how we tested, scroll to the bottom of the page.

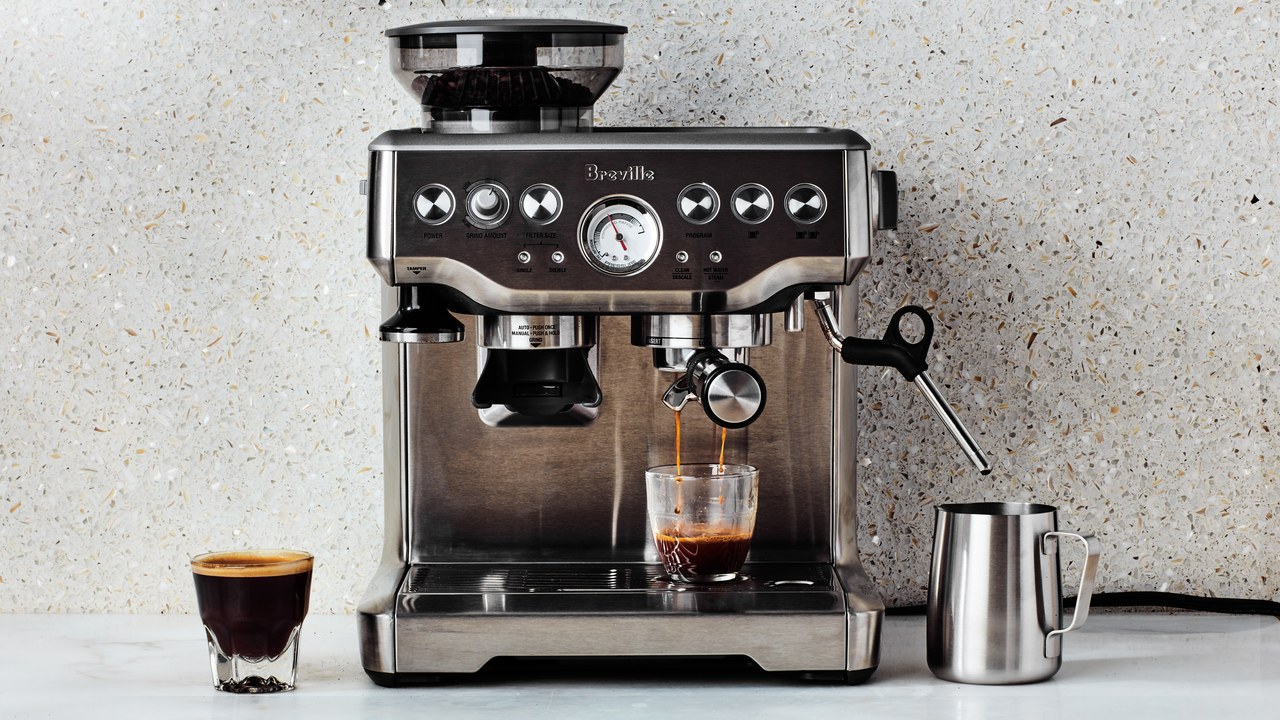
    The Best Semi-Automatic Espresso Machine: Breville Barista Express

    This was the number one choice in 2018’s test and it remains the winner. From the construction to ease of use, it’s clear that the Breville Barista Express was thoughtfully made, and there was no competition when it came to the final quality of the espresso shot.

    The highlight of the Breville Barista Express is a pressure meter that allows you to accurately assess the quality of the coffee as you make it, just like on a professional espresso machine. This is extremely valuable because it helps you figure out what other variables need to be tweaked to make a better cup. For example, if the pressure is too low while you’re pulling a shot, you can tamp with more pressure or use a finer grind the next time. None of the other machines we tested had a feature like this, meaning that if you pull a shot that doesn’t taste great, you have no way of knowing if it’s the machine or you.

    As long as you’re pulling shots within the right range of pressure, the Breville espresso maker produces full-flavored, densely textured shots that were the closest to what you might get in a cafe. The concentration compared to other machines was unrivaled, and the crema was dark and varied—or tiger striped, as coffee connoisseurs would call it. Other machines produced shots with a uniformly white or tan crema that could be dense but was rarely flavorful.

    The Breville was also the only semi-automatic machine to produce a velvety, well-incorporated milk foam. The consistency with which it incorporated air made for a beautifully textured latte—and our coffee expert was even able to make some latte art with it (something that was impossible with the air bubbles from other models, including the Gaggia and all of the less expensive machines).

    Finally, the design and extra tools are impeccable. The machine includes a large drip tray to catch spilled coffee and milk and has a sensor that lets you know when the tray is too full. It also has a compartment underneath for storing extra filters (which are included). It includes hefty, stainless steel milk steaming jug and a tamper for pressing the espresso grounds down.

    The Best Automatic Espresso Machine: Espressione Concierge

    The Espressione Concierge replaces last year’s winner in the automatic category, the Jura Ena Micro 1, which is just as fast and easy to use. The Espressione has a handily removable water tank, light-up buttons, and built-in burr grinder. Most importantly, it had a clear advantage when it came to taste.

    None of the automatic machines we tested could produce a shot that came close texturally or flavor-wise to a semi-automatic, but the coffee from the Jura machine was downright watery. Even when selecting the Jura’s stronger brew option, compared side-by-side, the Espressione Concierge pulled better tasting shots that were closer to the full flavor and body of real espresso.

    The Jura Ena Micro 1 is a slightly more attractive machine with its seamless black finish, but it also measures about an inch wider and longer than the Espressione, if space is a concern. Additionally, the Espressione comes with a milk frother while the Jura does not, which can be a deal-breaker for some shoppers.

    The Espressione produces a seemingly effortless single, double, or lungo coffee within a few minutes of powering up, exactly what you want in an automatic machine.

    How We Tested & Other Models We Tried

    We tested several machines by making shots of espresso and lattes on each. For our 2018 test, we enlisted the help of an expert from Students of Coffee, a group of coffee educators and roasters at New York University, to judge for quality. For the 2019 update, we had Tammie Teclemariam, a former barista who’s interned at Annapolis’ Ceremony Coffee, cross-test last year’s winners against the new contenders.

    The majority of the models we tested were semi-automatic, meaning brewers still have to grind the coffee and pack it in the portafilter (the little filter cup with a wand that you place in the front of the machine). Semi-automatic espresso machines heat the water for you, and then pump it through the grounds at varying levels of pressure, depending on the machine. The semi-automatic models we tested were:

    We also tested three fully automatic varieties of espresso maker. For these, you insert the beans into a grinder, then press a button for the machine to grind and make your shot.

    Since semi-automatic espresso makers require you to dose the coffee yourself, grind and pack it, they give you more control. You can tinker and master the art of making espresso. Fully automatic machines are a good option for someone who wants quality espresso at home but wants to put in less effort (and skill). That said, a semi-automatic machine will yield a better cup.

    Factors We Evaluated

    1. How well do the machine control temperature and pressure?

    For semi-automatic machines, water pressure and temperature must be stable and consistent, and the pressure shouldn’t be too high. Typically, coffee is brewed at a pressure of about 10 bars, and the ideal water temperature is around 195°F. Generally, the more expensive the machine, the better the equipment inside that regulates these two factors. High-quality machines tend to have a mechanism called a PID, or proportional-integral-derivative, controller. The PID’s function is to maintain constant water temperature with extreme accuracy, down to the degree. A central problem plaguing inexpensive espresso machines is that they lack a PID, meaning the temperature of the brewing water can fluctuate up and down and yield inconsistent results. Inexpensive machines often advertise that they have 15 or 20 bars of pressure as a selling point, but higher pressure is not the priority, and too much pressure can actually lead to over-extraction and bitterness in your espresso shot. Therefore, we looked for a machine with good temperature and pressure control.

    2. How well did the steamer wand incorporate air?

    Most of the espresso machines we tested only included a single boiler for heating. This means that there’s only one mechanism for heating both the water for brewing and the steamer wand. Because of this, it’ll take the steamer wand a while to heat up after pulling the espresso shot, since the steamer wand operates at a much higher temperature than the brewing temperature of around 195°F. It is possible to buy a home machine with a double boiler (Breville makes one) but this raises the price significantly (we didn’t test that Breville because it’s over $1,000), and the minor wait time wasn’t a major concern for us. We figured it wouldn’t be for home brewers either.

    To find the best espresso machines under $1000, we tested a variety of semi-automatic and automatic models with the help of coffee pros.

    source

    Eparé Espresso Cups, Insulated Glass Demitasse Lid & Saucer Set

    Please Click Here

    • PERFECT FOR YOUR BREWER: Set of 2 double-wall double espresso cups measuring 2 ½ by 3 by 3 ½ inches and holding 4 ounces each. Perfect for morning coffee, tea, hot or cold beverages. Perfect glassware for morning coffee, tea, latte, espresso, brew, hot, or cold beverages.
    • HAND BLOWN BOROSILICATE GLASS: Hand blowing from high-quality chemistry grade borosilicate makes these double-walled glasses thinner, lighter, capable of withstanding thermal shock, scratch, and break resistant.
    • MODERN KITCHEN DESIGN: Double wall design creates a dramatic optical illusion and prevents condensation. The visual appeal makes this an exciting product for any home, restaurant, or café.
    • PERFECT FOR HOT OR COLD DRINKS: The contemporary cups keeps the temperature of liquid hot or cold for a longer period of time while the outer glass wall remains comfortable to the touch.


  • How To Pick The Best Smoke Alarms For Your Family

    How To Pick The Best Smoke Alarms For Your Family

    When it comes to your family’s safety, you don’t want to compromise. At home you want to make sure you have all the systems in place that will protect them from any of life’s hazards and that those systems are the best ones on the market for your needs.

    One of the most important safety items for your house is your smoke alarms.

    I’ve partnered with Kidde, a leading manufacturer of fire safety products, to help you understand what you should look for in a smoke alarm to help keep your family safe.

    Founded by Walter Kidde, the company has been a pioneer in early smoke detection and fire suppression. The company began in 1917 and started with the first integrated smoke detection and carbon dioxide extinguishing system for use on board ships. Now, Kidde products are found in homes and businesses throughout the world and their smoke and carbon monoxide alarms help to alert people faster when there is a hazard.

    Kidde Worry-Free smoke alarms are designed for various areas throughout your home and they all have a 10-year sealed battery that eliminates the need for you to change the batteries twice a year during Daylight Saving Time (which is just around the corner again). The alarms provide continuous protections from smoke and fire – even when the power goes out.

    Here are a few things you should know when picking smoke alarms for your home.

    Know the different types of smoke alarms and understand the positives and negatives

    There are two main types of smoke alarms for the home and each can serve a different purpose.

    Ionizations alarms have sensors that work ionizes the air in the alarm with trace amounts of an element that sets up an electric currant. When smoke enters the alarm, it disrupts the current and makes the alarm go off. These alarms are said to be better at detecting smaller smoke particles from fast flaming fires that happen quickly.

    According to Consumer Reports, these alarms are not always the best for the kitchen and bathroom areas because they are disposed to false alarms when food is burning or when there’s a lot of steam.

    Photoelectric alarms have sensors that use a small pulsating strobe light and when smoke enters the detection chamber it detracts the light to trigger the alarm. These alarms are great for detecting larger smoke particles from slower and smoldering fires, including electrical fires and fires involving certain types of fabrics.

    These are good for the kitchen area because they aren’t as prone to emitting false alarms from burning food or cooking steam. The Kidde Worry-Free Kitchen alarm features a photoelectric sensor and comes complete with both smoke and carbon monoxide sensing technologies. As with all Kidde Worry-Free alarms, it also boasts that same 10-year battery.

    A third type of alarm is becoming more popular and that’s a duel-sensor alarm, which includes both the alarm sensors above. They are more costly than the alarms with one type of sensor. Kidde recommends that both type of alarms be installed to help ensure maximum protection for your family.

    Make sure you know how your system is powered

    Many smoke alarms are run off batteries and could include 9-volt, AA or AAA batteries. It is recommended you replace those batteries during Daylight Saving Time.

    Some smoke alarms, the Kidde Worry-Free alarms included, come with lithium batteries that are designed to last for 10 years. This means you don’t have to worry about swapping the batteries out each year, which is a bonus since changing the batteries – even at Daylight Saving Time – can be hard to remember.

    A third way to power smoke alarms is to have them hardwired into your house. However, these units need to have a back-up battery because they will not work when you have power disruptions. A lot of new homes are being built with systems like this and the alarms are all wired to one another so when one senses smoke, they all go off.

    House size should be a consideration

    When looking for the best smoke alarms for your house, you should plan to have an alarm in each room of your home. This includes your hallways and basement for maximum protection. Kidde makes alarms that are designed for each room and they are labeled on the packaging, so it makes picking up the proper smoke alarms easy.

    It is also recommended that you have protection in the attic. However, in this instance you should consider a heat alarm. Kidde has a heat alarm that will sound if temperatures in the attic reach above 135 degrees.

    Make sure it has the UL label

    When picking a smoke alarm, you want to make sure the products bare the UL label. The UL label means that the prototypes have been tested and certified by the Underwriters Laboratories, Inc. There are strict rules the manufacturers are required to adhere to, and they have to prove that mass-produced products can pass specific tests. The products are tested before they go to market AND then Underwriters Laboratories, Inc. conducts follow-up tests to ensure standards are consistently being met.

    Kidde units all have the UL label and the company additionally complies with guidelines from the Federal Housing Authority, Housing and Urban Development and National Fire Protection Association.

    Make sure there is a way to test the device

    Smoke alarms should be tested to ensure they are still working and there should be an easy way to test each unit. Kidde alarms have a large, push-button right in the middle of the unit, and they recommend you test it once a week.

    Ensure that it’s easy to maintain

    No matter which type of device you use, you want to make sure it is easy to keep maintained and clean.

    If you buy alarms that require the batteries to be replaced, make sure there is easy access to the battery panel.

    It is also recommended that you vacuum your alarm to keep it free of dust and debris that could cause it to malfunction.

    Consider your family’s special needs

    If you have family members with special needs, look for add-ons for your fire safety system that will help keep everyone safe. For instance, if you have someone who is deaf or hearing impaired you might want to consider alarms that will also include some sort of visual signal or motion option. Kidde has a strobe lights and other auxiliary devices available to help your family with these special circumstances.

    For more information on the Kidde and all its safety products, click here. To see all their fire safety products, click here.

    Grab your own Kidde 10-year battery smoke or smoke/CO alarms on ShopKidde.com and use TIMEFORACHANGE to get 20% off and free shipping!

    Source

    https://www.theeverydaymomlife.com/lifestyle/home/best-smoke-alarms-for-family/

  • Six reasons to NOT clean up the garden this fall

    Six reasons to NOT clean up the garden this fall

    Twenty-some years ago, fresh out of college with a horticulture degree in-hand, I started teaching adult education classes at a local botanic garden. For many years, I taught a class called Preparing Your Garden for the Winter. It was all about how to clean up the garden every fall. I would show slides (remember those?) of how well-kept gardens should look in January. In the images, every plant was cut to the nub, except for the ornamental grasses and butterfly bushes, and the whole garden was snug under a thick layer of mushroom soil mulch. The roses were neatly trimmed to two feet and wrapped in a blanket of burlap, folded and stapled closed to keep them protected from freezing winds. There was nary a fallen leaf in sight; everything was raked up and hauled off. 

    You see, that’s how we gardeners used to roll in the early ’90s before we knew better. Before we knew all the reasons NOT to clean up the garden. We’d cut everything down and perform a big, end-of-the-season gardening clean up until there was no shred of nature left behind. We’d turn the place into a tidied, controlled, and only slightly dirtier version of our living room. Everything was tucked and trimmed and in its place. Most of us weren’t interested in supporting wildlife much beyond hanging up a bird feeder, and the phrase “wildlife habitat” was only used in places like zoos and national parks.

    MY LATEST VIDEOS

    Unfortunately, many gardeners still think of this kind of hack-it-all-down and rake-it-all-up gardening clean up as good gardening, but in case you haven’t already noticed, I’m here to tell you times have changed. Preparing Your Garden for the Winter is a completely different class these days. We now understand how our yards can become havens for creatures, large and small, depending on what we plant in them and how we tend to our cultivated spaces. Thanks to books like Doug Tallamy’s Bringing Nature Home, we now know how important native plants are for insects, birds, amphibians, and even people. Our gardens play an important role in supporting wildlife and what we do in them every autumn can either enhance or inhibit that role.

    To that end, I offer you these six important reasons NOT to clean up the garden in the fall.

    1. The Native Bees: Many of North America’s 3500-plus species of native bees need a place to spend the winter that’s protected from cold and predators. They may hunker down under a piece of peeling tree bark, or they may stay tucked away in the hollow stem of a bee balm plant or an ornamental grass. Some spend the winter as an egg or larvae in a burrow in the ground. All native bees are important pollinators, and when we remove every last overwintering site by cutting everything down and completely cleaning up the garden, we’re doing ourselves no favor. We need these bees, and our gardens can provide them with much-needed winter habitat.

    MY LATEST VIDEOS

    Some species of native pollinators, like this docile leafcutter bee, overwinter in hollow plant stems.

    2. The Butterflies: While the monarch flies south to overwinter in Mexico, most other butterflies stay put and take shelter somewhere dry and safe until spring. Some butterflies, like the mourning cloak, comma, question mark, and Milbert’s tortoiseshell, overwinter as adults. They nestle into rock fissures, under tree bark, or in leaf litter until the days grow longer again and spring arrives. Butterflies that overwinter in a chrysalis include the swallowtail family, the cabbage whites and the sulfurs. Many of these chrysalises can be found either hanging from dead plant stems or tucked into the soil or leaf litter. You can guess what a fall gardening clean up does to them. And still, other butterfly species, such as the red-spotted purple, the viceroy, and the meadow fritillary, spend the winter as a caterpillar rolled into a fallen leaf or inside the seed pod of a host plant. If we cut down and clean up the garden, we are quite possibly eliminating overwintering sites for many of these beautiful pollinators (and perhaps even eliminating the insects themselves!). Another excellent way you can help butterflies is to build a caterpillar garden for them; here’s how. Declining butterfly populations are one of the best reasons not to clean up the garden.

    3. The Ladybugs: North America is home to over 400 different ladybug species, many of which are not red with black polka-dots. While the introduced Asian multicolored ladybug comes into our homes for the winter and becomes quite a nuisance, none of our native ladybug species have any interest in spending the winter inside of your house. Most of them enter the insect world’s version of hibernation soon after the temperatures drop and spend the colder months tucked under a pile of leaves, nestled at the base of a plant, or hidden under a rock. Most overwinter in groups of anywhere from a few individuals to thousands of adults. Ladybugs are notorious pest eaters, each one consuming dozens of soft-bodied pest insects and insect eggs every day. Leaving the garden intact for the winter means you’ll get a jump start on controlling pests in the spring. Skipping a fall gardening clean up is one important way to help these beneficial insects.

    Ladybug larvae, such as this one, are voracious predators of many garden pests, including the aphids in this photo. Skipping the fall garden clean up encourages them.

    4. The Birds: Insect-eating birds, like chickadees, wrens, titmice, nuthatches, phoebes, and bluebirds, are very welcome in the garden because they consume thousands of caterpillars and other pest insects as they raise their young every gardening season. Not cleaning up the garden means there will be more protein-rich insects available to them during the coldest part of the year. These birds are quite good at gleaning “hibernating” insects off of dead plant stems and branches, and out of leaf litter. The more insect-nurturing habitat you have, the greater the bird population will be. Your feathered friends will also appreciate feasting on the seeds and berries they can collect from intact perennial, annual, and shrub stems. Songbirds are one of the best reasons to skip the garden clean up!

    5. The Predatory Insects: Ladybugs aren’t the only predatory insects who spend the winter in an intact garden. Assassin bugs, lacewings, big-eyed bugs, minute pirate bugs, damsel bugs, ground beetles, and scores of other pest-munching predatory insects spend the winter “sleeping” in your garden as either adults, eggs, or pupae. They’re one of the best reasons not to clean up the garden in the fall because they help you control pests. To have a balanced population of these predatory insects, you have to have winter habitat; when spring arrives, they’ll be better able to keep early-emerging pests in check if they’ve spent the winter on-site, instead of over in the neighbor’s yard.

    Green lacewings are one of many beneficial insects that need winter habitat.

    6. The People: If the previous five reasons aren’t enough to inspire you to hold off on cleaning up the garden, I’ll add one final reason to the list: You. There is so much beauty to be found in a winter garden. Snow resting on dried seed pods, berries clinging to bare branches, goldfinches flitting around spent sunflowers, juncos hopping beneath old goldenrod fronds, frost kissing the autumn leaves collected at the base of a plant, and ice collected on blades of ornamental grasses. At first, you might not consider yourself to be one of the reasons not to clean up the garden, but winter is a lovely time out there if you let it be so.

    Delaying your garden’s clean up until the spring is a boon for all the creatures living there. Instead of heading out to the garden with a pair of pruning shears and a rake this fall, wait until next April. By then, all the critters living there will be emerging from their long winter nap. And even if they haven’t managed to get out of bed by the time you head out to the garden, most of them will still manage to find their way out of a loosely layered compost pile before it begins to decompose. Do Mother Nature a big favor and save your garden clean up until the spring. And, when spring does arrive, please use these pollinator-friendly tips for cleaning up the garden the right way.

    source

  • 12 plants that repel unwanted insects

    12 plants that repel unwanted insects

    Are you an insect magnet? If you aren’t, you probably know one. Insect magnets attract annoying insects the second they walk outdoors — or so it seems.

    If this describes you, take comfort in knowing that one of the ways you can fight back against mosquitoes, gnats, flies, no-see-ums and other pesky bugs doesn’t have to involve covering yourself with a sticky spray or engaging in chemical warfare. To help you enjoy going outdoors, try strategically placing insect-repelling plants in your garden or on your patio.

    Essential oils in these plants act as nature’s bug repellent. Insects tend to avoid them. You can even use some of these plants to make your own natural bug repellent.

    But know that simply including insect-repelling plants in your landscape will not in itself ensure your garden is insect free.

    “There’s not enough research in this area to support that,” says Dr. Bodie Pennisi, an associate professor and extension landscape specialist at the University of Georgia’s Griffin campus. “The concentration of oils is not there to offer that kind of protection.”

    There may be fewer insects, but no one’s done the research into how many plants, planted how close together, would be effective in repelling insects to any great extent, says Pennisi. One of the best things people can do to hold down mosquito populations, she advises, is to eliminate any standing water, which is where mosquitoes breed.

    For those who would like to give the natural route a try, we’ve described some easy-to-find herbs readily available at most nurseries that are said to repel mosquitoes and other annoying insects. The smell of fragrant herbs is the result of the distribution of tiny globules that contain oils. High temperatures, for example, can cause the globules to become volatile, evaporating the essential oils and turning them into vapors, Pennisi says. The many globules on the underside of rosemary leaves (seen at right) are one of the best examples of this.

    We’ve included our take on ornamental flowers that can help keep plant-attacking insects at bay. Keeping your growing areas as insect free as possible will help your vegetable garden stay productive and your ornamental beds attractive. In addition, we’ve included a carnivorous plant that eats insects which you can also include in your eco-friendly insect barrier.

    First, the herbs

    You can keep basil in pots to repel insects or make it into a repellent spray. (Photo:arifm/Flickr)

    Repels house flies and mosquitoes. Plant basil in containers by your house doors and in outdoor areas where you like to relax or entertain. Basil is delicious in salads, in many pork and chicken recipes and with a variety of soups. Basil also improves the flavors of certain vegetables, include tomatoes, peppers, and asparagus. You also can use fresh basil to make an insect repellent spray. A simple recipe calls for pouring 4 ounces of boiling water into a container holding 4 to 6 ounces of clean, fresh basil leaves (stems can be attached), letting the leaves steep for several hours, removing the leaves and squeezing all of the leaves’ moisture into the mixture. Then thoroughly mix 4 ounces of (cheap!) vodka with the basil-water mixture. Store in the refrigerator and apply as a spray when going outdoors. Be sure to keep the spray away from your eyes, nose, and mouth.

    Mihaliova/Shutterstock)

    Repels moths, fleas, flies, and mosquitoes. Lavender has been used for centuries to add a pleasantly sweet fragrance to homes and clothes drawers. Although people love the smell of lavender, mosquitoes, flies and other unwanted insects hate it. Place tied bouquets in your home to help keep flies outdoors. Plant it in sunny areas of the garden or near entryways to your house to help keep those areas pest free. You can also use oil extracted from the flowers as a mosquito repellent you can apply to exposed skin when going into the garden or patio. The Everything Lavender website has a guide for extracting the oil and making a lavender-infused body oil. Added benefits are that lavender oil nourishes the skin and has a calming effect that induces sleep.


    Lemongrass contains citronella, a natural oil often found in insect-repelling candles. (Photo: Zulashai/Shutterstock)

    Repels mosquitoes. You’ve no doubt seen citronella candles in stores during the summer and read how citronella will keep mosquitoes away. Citronella is a natural oil found in lemongrass, an ornamental that can grow up to 4 feet tall and 3 feet wide in one season. (It’s worth noting that lemongrass isn’t just the name of one plant; it’s the umbrella name for plants in the Cymbopogon family, which also includes citronella grass.) This grass with wonderful culinary uses is hardy only in South Florida (Zone 10), so almost everyone else will have to grow it as an annual. It does well in a pot or in the ground in a sunny, well-drained location. Use its fragrant, narrow leaves in chicken and pork dishes and to flavor soups and salad dressing. Many Asian recipes call for lemongrass.


    Bruise the leaves on this hardy plant to repel mosquitoes. (Photo: Andrea_44/Flickr)

    Lemon thymeRepels mosquitoes. This hardy herb can adapt to dry or rocky, shallow soil and will thrive in your herb garden, a rock garden or a front border as long as these are in sunny locations. The plant itself will not repel pesky mosquitoes. To release its chemicals, you must first bruise the leaves. To do this, simply cut off a few stems and rub them between your hands. Before you do that, though, it’s advisable to make sure the plant’s natural properties will not adversely affect you. Determine your tolerance by rubbing crushed leaves on a small area on your forearm for several days.


    Mint spreads aggressively so it’s best grown in pots unless you want it to take over your yard. (Photo: Edsel Little/Flickr)

    Repels mosquitoes. Mint is best grown in pots rather than the ground because it spreads aggressively. Once established in the garden, it can be difficult to remove. Cuttings of mint in mulch can help broccoli, cabbage, and turnips. The leaves are commonly used to flavor minty iced tea. The aromatic properties found in the leaves are also present in the stems and flowers. With a little work, the plant’s aromatic oils can be extracted and combined with apple cider vinegar and cheap vodka (or witch hazel) to make a mosquito repellent. Containers of mint strategically placed in the garden or on the patio will help keep nearby plants insect free.


    Home cooks love rosemary as much as insects hate it. (Photo: Alice Henneman/Flickr)

    Repels mosquitoes and a variety of insects harmful to vegetable plants. Rosemary is available in various forms. Plants can be grown in containers on a patio and shaped into ornamental pyramids, grown in herb gardens or planted in landscaped beds, where some varieties can grow quite large. Rosemary’s oils are as delicious to home cooks who use herbs as they are unpleasant to many insects. The plant itself and its cuttings are effective repellents. You can make a simple repellent spray by boiling 1 quart of dried rosemary in a quart of water for 20 to 30 minutes and then straining the liquid into a container at least a half-gallon in size that contains a quart of cool water. Put a cap on the combined liquid and store it in the refrigerator. Add the repellent to small squirt bottles as needed when going outdoors. Discard the remaining repellent in the refrigerator when it no longer has a strong telltale smell of rosemary.

    Next up: Ornamental flowers

    source

  • How to Tidy Your Pantry

    How to Tidy Your Pantry

    Here’s Marie Kondo’s Advice in a Nutshell

    The basic principles of the Marie Kondo tidying method (most relevant to the pantry) are:

    • You organize by category, rather than location. That means instead of going cupboard by cupboard, you pull all your pots and pans out at once to inspect.
    • Take everything out. Nothing should be left on the shelf.
    • Put back only the things that spark joy.

      Tip 1: Just Toss What You Won’t Use

      I tossed anything that was expired or stale and all the spices that smelled dull. I also started a “for the food pantry” box for anything that was good but I knew I would never use.

      Tip 2: Use the Space Wisely

      When arranging things on the shelves, I didn’t put anything in stacks. I also tried to minimize how often I put things behind other things. But if I had two cans of condensed milk, I did put one behind the other. I positioned tall containers (like flour, for instance) behind shorter ones (powdered sugar).

    Yes, There IS Joy in a Tidy Pantry

    In the end, while the ramen noodles and olive oil did not really spark joy, my organized shelves definitely did. I find myself smiling when I look in the pantry. Like mess encourages mess, neatness is also contagious. No backsliding yet—and I’m still down to one can of Pam!

    Party Patina has many more ideas for organizing your kitchen and whole house.  Be sure to visit this site at, www.partypatina.com.

    source:  https://www.tasteofhome.com


  • Soil For Raised Beds: How To Make The Best Raised Bed Soil

    Soil For Raised Beds: How To Make The Best Raised Bed Soil

    Raised bed gardening is an excellent way to garden in a small space. The quality of soil for raised beds gives gardeners one reason they produce bumper crops.

    If you experience trouble stooping, bending and kneeling, raised bed gardens to allow for easy care. You can set up your raised bed garden at a height most comfortable for you.

    With complete control over the soil, you can mix the soil you want and put it in place for the best results.

    You control the type of soil used in for the raised garden beds

    Let’s be clear…

    No specific combination of ingredients will make the perfect all around raised garden soil. What you put into your soil depends very much upon what you plan to plant and your local climate.

    Various plants require different pH levels. For example, blueberries need a more acidic soil.

    Additionally, gear the soil texture toward your local weather conditions. For example, if you live in a very arid and dry climate, you will want a soil mix that will retain moisture with good capillary action.

    On the other hand, if you live in a very rainy and damp area you will want to create soil for a raised garden bed allowing for good drainage.

    Soil Mixture For Raised Beds Begins With A Good Basic Soil Mix

    One good way to start “building” out fertile soil… begins by making a 50-50 mix of high-quality compost and screened topsoil.

    When you blend the compost and screened topsoil together thoroughly, you will have a nice basic soil mixture you can amend to suit your specific climate and plant needs.

    For a more quickly draining blend of compost, create a three-part mix. For this coarse mixture, combine equal parts of:

    As with the 50-50 mix, combine the horticultural vermiculite, compost, and peat moss thoroughly for best results.

    Coco coir makes a great alternative for peat. Additionally, to get a wide variety of plant nutrients for your organic garden source compost from at least five different places.

    Why Not Just Buy Compost?

    If you rely only on bagged compost from the garden center, you’re likely to get a scarcity of organic nutrients. There is really no reason to purchase compost. It is easy to make your own compost at home.

    A well-seasoned compost rich with organic matter, made from yard and garden clippings and kitchen scraps provides a wealth of nutrients for organic gardening.

    If you also keep chickens, equines, rabbits and/or goats you have an excellent source of rich and nourishing compost. If you do not personally keep any livestock, you should look for a local organic farm or gardeners supply where you can purchase some natural compost.

    Raised Garden Bed Soil Does Not Have To Be Deep

    When you have created this kind of high quality raised bed gardening mix, you don’t need to spread it very thickly. This highly nourishing fertile mixture will support a wide variety of plants even if it is only six inches deep.

    Be sure to line the bottom of your raised bed with thick layers of cardboard (sheet mulching) and/or newspaper or landscaping fabric to prevent plant roots from contacting native soil and to prevent weeds from growing up into your rich soil.

    When Should You Amend Soil Used In Your Raised Bed Garden?

    Early in the spring each year, till your raised bed garden soil and replenish it. Remember that friable garden soil is airy, soft and light.

    You should be able to poke your finger into your soil easily all the way up to your topmost knuckle. If you find your soil is hard and unyielding, take steps to till it, amend it and lighten it.

    Experts recommend tilling the native soil first before starting to fill the raised beds.

    How To Amend Soil Mixture For Raised Beds

    Both the 50-50 mix and the three-part mix provide basic building blocks for good soil in the garden. Once you have this in place, you can tweak and amend the soil to suit your particular plant choices.

    One good addition to well-balanced garden soils is organic, slow-release organic fertilizer. Working this into the soil one or two times a year (e.g. early in the spring and/or late in the fall) will help boost the nutritional value of your soil.

    After application, apply a generous layer of mulch or compost to hold the nutrients and moisture into the soil.

    A few other good specialty amendments include:

    Create Soil For Your Raised Garden Bed To Suit Your Purpose

    The texture of your garden soil should be in line with your goals. For example, if you are sowing seeds directly into your bed, you will want to have a finer texture of the soil. Luckily you don’t have to change out all of the soil in the bed to do this.

    Begin with your basic 50-50 or three-part mix and then top it off with a finer textured soil. Good soil for seed starting should be spongy, moist and rich. You can accomplish this by creating a combination of finely sifted, blended compost and peat moss as your seed starting medium.

    Mulch Is Very Important!

    Remember, with fairly shallow soil, garden mulch plays an important role. It helps hold in moisture and protects the soil from damaging rays of the sun. It also helps prevent invasion by weeds.

    Once your seedlings have started, thin them out to allow the hardiest to take hold. Mulch around them to hold nutrients and moisture into the soil to help them thrive.

    You may be surprised to know that modern gardeners believe that a couple of inches of pure compost make the best mulch. It performs all of the protective and moisture holding functions of bark mulch and adds nourishment to the soil.

    The Right Soil Produces Bumper Crops!

    Raise bed gardening is a great choice for small spaces. Properly maintained raised gardens can produce four times the amount of crops or vegetables as a traditional garden patch using compost alone.

    This is great for home vegetable growers with very small yards or even patio and balcony type garden settings. When you put forth the effort to create light, airy, highly nutritious soil mix for your raised-bed gardening project, you can expect to enjoy abundant success.

    Raised bed gardening is an excellent way to garden in a small space. The quality of the garden soil for raised beds gives gardeners one reason they produce bumper crops. Learn how to create a great soil mixture for your raised garden and enjoy increased yields.

    source: https://plantcaretoday.com

  • Best Vegetables to Grow in Pots | Most Productive Vegetables for Containers

    Best Vegetables to Grow in Pots | Most Productive Vegetables for Containers

    Growing vegetables in containers? Learn about the best and most Productive Vegetables to Grow in Pots to have the bountiful harvest this growing season.

    Growing vegetables in containers are possible, but there are some that grow easily and produce heavily in containers. For your help, we’re adding 20 Best and Most Productive Vegetables to Grow in Pots.

    A Tip: The productivity of a small garden also improves when you utilize vertical space. Using a trellis to provide support to trailing plants and vines always helps.

    Best Vegetables to Grow in Pots

    1. Tomatoes

    Without a doubt, tomatoes are the most productive vegetables you can grow in pots. Tomatoes need ample sun (five to six hours minimum). The pot size depends on the type of tomatoes you are growing. In containers, growing dwarf varieties of determinate type are better. You should also try cherry tomatoes for higher yield. Click here to learn about the best tomato varieties for containers.

    2. Beans

    Most of the beans are climbers or bushier type, and they grow upward. They are productive in pots and easy to grow. You can grow them on a trellis near a wall, and within weeks, you will get a green wall of beans running across the trellis. For growing beans, you need a sunny spot, and a pot that is minimum 12 inches deep (the bigger, the better) and a strong trellis-like structure for support. Since beans fix the nitrogen most of the vegetables that require more nitrogen are good to grow underneath them. If you’re growing beans in a very large pot, combine summer savory, kale, or celery with them.

    3. Lettuce

    Lettuce grows up quickly, and you will have the opportunity to harvest this leafy green multiple times throughout the growing season. As lettuce is a cool season crop, you’ll have to decide what is the right time for its growth according to your climate. Usually, seeds are started in spring. But if you live in a warm climate, grow lettuce in winter.

    For growing lettuce, choose a wide planter rather than deep (six inches deep is fine). When planting, make sure to leave space of at least four inches between each plant. Remember, leaf lettuces can be grown more closely than head lettuces. Use well draining soil and do shallow and frequent watering to keep the soil slightly moist always. Must check out our lettuce growing guide to learn more.

    4. Peppers and Chillies

    Peppers and chilies are super productive and excellent candidates for growing in containers. They look great in pots and need a sunny and warm place to thrive. If you keep the pot in a sunny spot and provide right soil and fertilize the plant time to time, it will fruit heavily. A large pot that is at least 12 inches deep is optimum.

    5. Radishes

    Radishes are one of the quickest growing vegetables and suitable for container vegetable gardening as you can also grow them in small and wide pots. A planter that is just 6 inches deep is enough but if you want to grow larger varieties use 8-10 inches deep pot. Allow 3 inches of space between each plant.

    6. Asian Greens

    Asian greens are great crops to grow in pots as they grow fast and don’t need a lot of sunlight. You can grow them in part shade, in a spot that receives at least 4 hours of morning sun. Providing them plenty of moisture and organic fertilizer is important so that they thrive.

    7. Spinach

    Spinach is one of the best vegetables for containers. It grows well in partial shade and any kind of space. Growing spinach in containers is easy too, you can even grow it indoors on a windowsill. For growing spinach in pots, choose a container that is least 6-8 inches deep. You don’t need a very deep pot rather use a wide one. Learn how to grow spinach in pots here.

    8. Peas

    Peas prefer moderate conditions, they are a perfect crop for container gardening and don’t require a large pot. They grow quickly without attention. You can even grow peas on a balcony. Choose a dwarf or bushier type varieties and do regular and frequent watering as peas prefer slightly moist soil. Keep the plants in a spot that receives full sun.

    9. Carrots

    Carrots grow best in cool weather. They need regular watering and moist soil. Otherwise, the roots dry out and crack. Growing this plant in containers is easy, and it doesn’t take much space as well. Learn everything about growing carrots in pots.

    10. Cucumber

    Cucumbers are heavy feeders and require regular watering too. Grow them in a medium to large sized pot (depending on the variety) and in full sun. You can have your homegrown successful crunchy cucumbers within a few months. To learn more about growing cucumber read this book.

    11. Eggplant

    Although eggplants are susceptible to many garden pests, still growing them is easy. They are heat-loving plants and need high temperatures both day and night, thus a suitable summer crop. But if you live in a warm climate, you can grow it year round.

    Also, it is easier to maintain them in containers than in a large vegetable garden. It is necessary that you keep the pots in full sun and feed heavily (like all other plants from tomato family–peppers, tomatoes, potatoes; eggplants are heavy feeders too).  Remember to buy quality seeds, click here.

    12. Squash

    Squashes are easy to grow plants. Summer squashes (Zucchini) are more productive than winter squashes. You can harvest bountiful even in containers. It is one of the most suitable crops for rooftop, balcony or patio gardeners.

    Growing vegetables in containers? Learn about the best and most Productive Vegetables to Grow in Pots to have the bountiful harvest this growing season.

    source:  https://balconygardenweb.com

  • Rose Fertilizer Tips: Selecting The BEST Natural Fertilizer For Roses

    Rose Fertilizer Tips: Selecting The BEST Natural Fertilizer For Roses

    Let’s be honest! When it’s time to buy a rose fertilizer, for many home gardeners, purchasing of a bag fertilizer for rose bushes is a purchase of mystery.

    This need not be; with a little knowledge, anyone can select a rose bush fertilizer to fit any particular need.

    You can buy with the assurance that you’ve obtained the proper ingredients for maximum results assured each bag.

    By law, all fertilizers carry numbers of the guaranteed plant food such as 10-6-4 or 7-8-5.

    The three numbers always indicate the number of units of:

    Fertilizers for roses, and for all plants, have always been and always will be in this order.

    Thus a formula or n-p-k ratio of 20-10-5 means:

    While complete high nitrogen fertilizers tend to give a showy display of top growth, this by itself is not sufficient to ensure healthy plant growth.

    In fact, an imbalance of nitrogen can give the false sense of security that plants or a lawn are developing beautifully, when in fact the root systems are being starved.

    For this reason, it is essential to feed each type of plant the precise, carefully balanced diet which brings maximum beauty and health to the entire plant.

    For healthy rose buses, one of the best diet formulas is 7-8-5.

    Unfortunately, most packages of rose fertilizers do not give much additional information about the contents.

    The reason is that individual states have different rules as to “how to express the contents” of-a-package and what can and cannot be listed.

    Inasmuch as the fertilizer manufacturer cannot afford to print, fill and inventory different packages for every state, they omit much data and lists only the information and terminology agreed upon by all states where it is sold.

    Thus a rule to follow is to always ask to see the manufacturer’s literature before you buy. This holds true for organic fertilizers, Miracle-gro, slow-release granular fertilizers and everything in between.

    Read more 


  • Difference Between Determinate and Indeterminate Tomatoes

    Difference Between Determinate and Indeterminate Tomatoes

    Understanding the differences in how determinate and indeterminate tomato plants grow and set fruit can help you choose the best type for your home garden. The differences can influence not only which type you choose, but also how the plants should be spaced, trellised, and pruned.

    Differences between the growth types

    Plant size at maturity

    The first difference that we can easily see in the garden is how large the mature plants become.

    Determinate tomato plants usually grow between one and five feet in height, which means they are less likely to overwhelm a small garden. Many patio and container type tomatoes have a determinate growth habit.

    Indeterminate tomato plants can grow to become much taller, as much as 8 or more feet tall. Main stems of plants in this growth type continue to grow in length/height for as long as they are healthy. Many heirloom varieties are indeterminate type tomatoes.

    Semi-determinate tomato plants are a third growth type that you may see. As you might have guessed, the characteristics of a semi-determinate plant are in between those of the two other types. These plants are a little less tall and rangy than indeterminate type tomatoes, but not as compact as determinate types. This growth type can work well in a small garden.

    Differences in when they set fruit

    Timing of fruit production and ripening — when it is ready to harvest — is another difference between the growth-types that we can see in the garden.

    Costoluto genovese is an indeterminate type tomato.
    ‘Costoluto genovese’ is an indeterminate type tomato.

    Determinate type tomato plants set almost all of their fruit within a few weeks, and then their productivity slows way down. The fruits form on side-branches that are fairly closely spaced on the plants.

    Indeterminate type tomatoes produce fruit all summer and into the fall, if they stay healthy. The fruits are spaced farther apart on indeterminate plants than they are on determinate plants.

    Semi-determinate type tomatoes can produce fruit through the whole season, but they may not be as productive toward fall as an indeterminate type.

    source: smallgardennews.com


  • 10 High Impact Landscaping Ideas For Instant Curb Appeal

    10 High Impact Landscaping Ideas For Instant Curb Appeal

    Most people want to make their yards look better, but sometimes it can be difficult to find something that makes your yard stand out. With these 10 high impact landscaping ideas for instant curb appeal, you’ll be able to make some changes for the better that are generally affordable and different from what everyone else is doing. In fact, most of these are quite simple and really make a dramatic difference.

    Use Planters

    Whether it’s on your front porch, down the driveway or by the windows, planters look excellent in the yard and go a long way toward getting you that curb appeal you crave. You can choose large or small planters depending on the size of the area you are working with, then place shrubs, plants, or flowers in them in a uniform or random fashion. This is one of the least expensive ways to brighten up any yard.

    patio-remodel

    Landscape Lights

    Landscape lights

    Landscape lights not only brighten up your yard, but they also make it more attractive. You can get very cheap landscape lights or go all out and get the expensive ones, but no matter which you choose, they look nice when used around a driveway, in flower beds, or in certain areas that need a spotlight. There are electric-powered lights and solar options. Solar lights are easier to maintain, but they may not be as bright and have to depend on the sunshine in order to gain power.

    Brick Pavers

    Brick pavers are not only pretty inexpensive, but they really make an area look clean and well-kept, which is why this is one of the more popular high impact landscaping ideas. You can use them to edge a flower bed or keep in mulch, and it makes the whole area look more uniform and tidy. It’s an easy landscaping idea and one that is easy to rearrange if you grow tired of the look. Because they’re not permanent, you can easily move them around to fit the look you’re going for and then change your mind and start all over again.

    pavers

    Plant Wildflowers

    If you want a look that is easy to maintain yet still pretty, plant wildflowers in a flower bed. You won’t have to worry about making the area look perfectly landscaped, but you will still have a flower bed that is lovely and didn’t take much work. Seeds work well, or you can go with cheap plants. Make sure to see if the plants are annuals or bi-annuals so you will know when to expect them to die off.

    wildflowers

    Add Window Boxes

    Window box

    Window boxes or planters make an excellent addition to your home’s curb appeal. You can buy these pre-made or make them yourself. Whether it’s a wood planter box or one you paint to match the trim of your home, this idea is one of the high impact landscaping ideas that makes a huge difference in how your overall home’s appearance looks to others.

    Make a Rock Waterfall

    Gutters are one of the areas of the home that have a purpose but can look pedestrian. By stacking flat rocks under the gutter, you create a waterfall effect once the water flows through the gutters, and it immediately brightens up the area and makes it prettier and more serene. This is another inexpensive idea that is fast and easy to do, and it can be rearranged in whatever way looks best to you. Flat rocks can be found at most big box hardware stores, and they’re easy to place because they do not have to be uniform.

    make a rock waterfall

    topdreamer

    A Tree Bench

    If you have a tree in your front yard, it’s easy to use a little bit of wood to build a tree bench. This idea is perfect for the children to sit on and read a book or enjoy a game, or you can even put a few potted plants on it to make it even more eye-catching. Best of all, this idea is not only attractive and unique; it’s also functional because you can sit on it and put things on it.

    tree bench

    Re-do Your Mailbox

    re-do your mailbox

    A mailbox is something we all have to have. They are often boring and plain-looking. Make a stone pedestal or place a flower bed around the mailbox. Make sure it is painted nicely to match your home and looks appealing instead of the humdrum mailboxes we’re all used to seeing.

    Make Your Own Walkway

    make your own walkway

    A walkway is easy to make and only takes a few hours of your time. Get stone pavers, mark out the walkway area and dig up the grass. Place fresh dirt in that area, place your pavers neatly, and sweep the dirt off, making sure that it fills in the gaps. You can make a more permanent walkway with cement, but if you want easier high impact landscape ideas, you can opt for the dirt and paver route to make things easy. This is also a good way to make a temporary walkway to see how you like it.

    Use Camouflage

    Garbage bins, air conditioning units, and other areas outside sometimes need a little camouflage to make the entire area look better. Build a brick encasement around garbage bins and air conditioning units to make the area look prettier. These things are unsightly, and while everyone has them, yours do not have to be an eyesore.

    use camouflage to hide air conditioner

    There are many high impact landscaping ideas you can use to make your home look better, and these are just a few of them. No matter which ones you choose, it is always worthwhile to make your landscaping look cleaner and more beautiful. Best of all, most ideas are really simple to pull off and won’t cost you a ton of money.

    source: Reliable Remodeler