Category: Home & Garden

  • How to Decorate a College Dorm Room – Adorable and Easy!

    How to Decorate a College Dorm Room – Adorable and Easy!

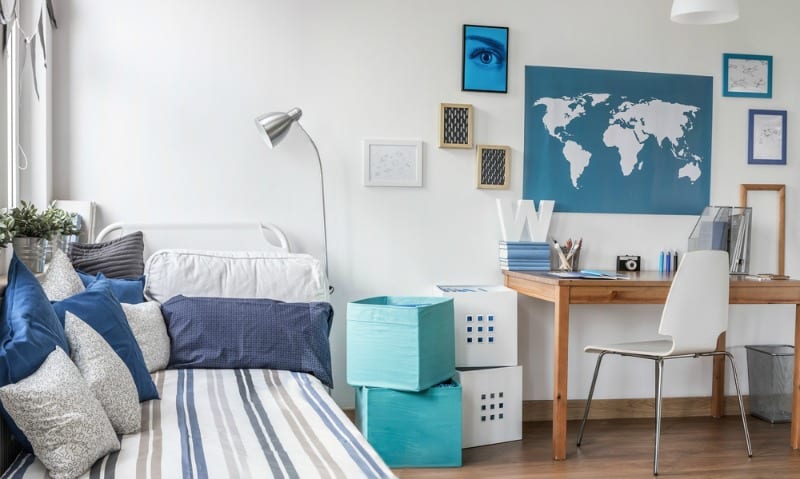
    There are few things that excite me more than an empty dorm room. After three years at boarding school and with sophomore year on the rise, transforming my dorm room is something I continue to look forward to as summer comes to an end. Here are some of my best tips (and secrets…) to making your college dorm room look more like a home and less like a prison cell.

    Note: We receive compensation from purchases made through some of the links in this post. 

    My Favorite College Dorm Room Ideas

    Dorm Lighting

    Light is hands-down the most important part of the dorm room. Most dorm rooms have minimal natural light and cringe-worthy fluorescent bulbs that immediately make a room less inviting.

    Another essential source of lighting is string lights, which have recently had a comeback in the home decor section of most websites and are no longer as ‘kitchy’ as they once were. I stray away from the wire lights because I have trouble finding places to wrap them around, but a lot of my friends find ways to make it work. A fun use for the wire lights is layering them in an extra-large mason jar for a DIY lamp.

    My favorite string lights are Globe String Lights . Two sets of globe string lights will likely be enough to fully line the perimeter of your room. This creates the appearance of natural, warm light that comes from all directions.

    This Light Box with Letters and LED Light is also fun, and you can change the included letters to display whatever saying or word you want. It comes in colored letters, or simple black.

    (Obviously, I’m obsessed with lighting.)

    Dorm Decor

    POSTERS AND PRINTS
    My first dorm room was laden with posters from AllPosters.com (as many other dorm rooms are) that, while displaying great movie and TV shows, darkened the color scheme and the vibe of the room. Now, I try to decorate with art prints and photographs from small businesses that I find on websites like Etsy and Society6 that have thousands of unique art prints by artists from around the world. Society 6 also offers student discounts of 20%.

    20×200 is a company that seeks to make art affordable and I’ve found a few great prints from their site in the past. You can also find unique posters and maps at art stores like A.I. Friedman and Michael’s.

    PHOTOS
    Steer clear from the glossy photos you print at the drugstore photo counter and look around on websites like Social Print Studio and Artifact Uprising (a little pricier). Both websites offer square (and large-format) matte prints that you can pull from Facebook, Instagram, or your photo library. These squares look great as a grid, fastened with clothespins on a piece of string, or in the frames that both websites offer.

    I often pull photos from websites like Tumblr and even just Google Images of artists’ works that I like and print them on Social Print Studio, which allows me to mix personal photos with more artistic images. You can also use the larger options on these websites to create your own posters or prints. I’m eager to try out their new panorama option.

    Also, another option that I have only learned after living through (and decorating) several college dorm rooms is that less is more. It’s fun to have wall-to-wall coverings with photos, prints, tapestries, and so on, but sometimes a more minimal approach gives the room a more mature, sophisticated look that one might have later on in college.

    TAPESTRIES
    I use pareos (sarongs), turkish towels, beach blankets, and tablecloths for my wall hangings because I think that they look less typical “dorm room” than the busy-looking tapestries that most companies sell. But, I also think that a statement tapestry can look great on a wall, and should be the standout piece in the room. If you go with a statement tapestry, I’d suggest taking it easy with the remaining decor, and go with neutral bedding.

    Dorm Room Essentials

    Desks

    I purchased a Desk Bookshelf (which some dorm rooms come with — check before ordering) my junior year of high school and have used it every year since.

    It’s an investment that will last, and aids not only in organization/storage but also in decor. I pile my favorite books atop of the hutch and use the inner shelves for my textbooks, notebooks, and binders.

    On my actual desk, I try to have as few items as possible. A good Desk Lamp  is important as well as somewhere that holds pencils and other office supplies that you’ll use everyday. For things that you won’t use as often, store them in the desk drawer using an organizer tray, like this one. I like the organization options offered at The Container Store. I like Miquelrius notebooks (even though they don’t look as cool as Moleskins) because they hold up well and the pages don’t feel cramped.

    This year, I pinned some of my favorite personal items, poems, photos, and postcards to a bulletin board and leaned it against the wall behind my desk. It was nice to look at while doing work and something I continued to add to throughout the year.

    Rugs

    A rug makes a huge difference in a college dorm room, warming up the space and providing another source of light, brightening colors. I would go with a neutral color that isn’t pure white, because, knowing dorm life, there are going to be a few spills.

    In the past years, I’ve either purchased one large area rug that spans most of the room or used two smaller rugs. It’s up to you. Try to find one that doesn’t curl up at the edges, which tends to get annoying.

    Furniture

    This really depends on the room, because some have much more space than others. A Butterfly Chair fits in most dorm rooms and can be changed with each school year if covered with a different tapestry. I used a rainbow beach blanket because I didn’t like the original color of the chair, but you can really use anything. Even an old bed sheet would work.

    Other options include floor pillows, bean bags, or other similar pieces. One year I even flipped over a dresser that I wasn’t using, layered it with a pool chair cushion and throw pillows, and transformed it into a makeshift daybed.

    Another great option, if you have the space, is a small couch with the option of storage cubes. A lounger that doubles as somewhere to put your shoes, food, or clothes is always a plus. I used my brother’s old couch from PB Teen, covered it with a tablecloth, and purchased the storage cubes from their website.

    “Kitchen” Area

    Kitchen Cart is great for additional storage in narrow spaces. I found a reasonably priced, nice one on Amazon that also doubles as a place to keep your microwave.

    Closet

    In my experience, you either get really lucky with a closet or you don’t. In the case that you don’t, a double rod extender makes one into two rows on the closet bar so you can hang things like skirts and pants. Raising the bed up with risers provides for under-the-bed storage, which is where I typically keep everything besides shoes and hanging items.

    If you can’t fit a shoe rack in the closet area, you can use a cube. I like clear drawers from The Container Store that are stackable and, because of the transparency, perfect for easy access. They offer both pull-out drawers and open-faced ones.

    This originally appeared on DaytripperU, a guide for college tours and towns.

    Check out all our top picks for dorm shopping, grad gifts, and other great ideas from the Grown and Flown community here

    Dorm Decor: Cute New Ideas Your Freshmen Will Love 

    Charlotte Klein is a sophomore English major at Wesleyan University. Her passions include reading, writing, visual journaling, and lying on the floor with her dogs. Charlotte has previously worked for The Huffington Post and Into The Gloss.

    SaveSave

    SaveSave

    SaveSave

    SaveSave

    SaveSave

    SaveSave

    The post How to Decorate a College Dorm Room – Adorable and Easy! appeared first on Grown and Flown.

    This content was originally published here.

  • Why you should turn your lawn into a meadow | Life and style | The Guardian

    Why you should turn your lawn into a meadow | Life and style | The Guardian

    My garden sings its own song. It starts after the dawn chorus with the honeybees, followed by the heavier buzz of the bumbles, punctuated by the hoverflies’ higher pitch. You can even sometimes hear the rustle and creak of beetles as evening comes. To lie among it, eyes closed, is to hear something exquisite.

    My garden sings this song because it is allowed to. I have long been a proponent of neglecting lawns to nurture nature, as Margaret Renkl recently made the case for in the New York Times – and there isn’t a manicured strip of green that doesn’t ache to do the same.

    Most lawns have been silenced by the regime of a lawnmower, leaving just a few species of grass. They are biodiversity deserts, barren of beetle and bee, contributing to a vanishing insect population – and worse still, we pursue this. There are aisles in garden centres promising ever-greener sward, with no moss and weeds. Let there be no misunderstanding: these are chemicals that silence the soil.

    There is another way. Your lawn is already a wildflower meadow – every inch of soil is waiting for its moment to burst forth. Those weeds are some of the best insect food, growing despite the weather, endlessly repeat blooming, rich in nectar and pollen. A seed bank is already there – it might even contain orchids. Oh, and perhaps plenty of moss, essential stuff for nests and nature of all sorts.

    The simplest route to this is not to abandon your lawn and mower but to learn how to move the mower’s blades up, so the cut is higher than 10cm. Hold out for your first cut until the end of June, then leave a month between each cut until autumn. If you need a route to the washing line or shed, mow just a path. The wildflowers will adapt and bloom under your blades, the bees will dance and the birds will sing in praise of it all.

    This content was originally published here.

  • How One Man Singlehandedly Repopulated a Rare Butterfly Species in His Backyard

    How One Man Singlehandedly Repopulated a Rare Butterfly Species in His Backyard

    Long gone from their home in San Francisco, the California pipevine swallowtail is back thanks to one man transforming his yard into a habitat for them

    The iridescent blue wings of the California pipevine swallowtail are considered by collectors to be among the most magnificent in North America.

    For centuries the beautiful butterfly thrived in the San Francisco and around the Bay Area. But as the region became increasingly urbanized in the early 1900s, the pipevine swallowtail began to disappear. Today it’s an extremely rare sight.

    Aquatic biologist Tim Wong at the California Academy of Sciences has made it his personal mission to bring the butterfly back, and he’s off to a very promising start.

    In 2012, he set out on a quest to find California pipevine, the pipevine swallowtail’s sole food source, which had disappeared in tandem with the butterfly in the city.

    “Finally, I was able to find this plant in the San Francisco Botanical Garden,” Wong tells Vox.com. “And they allowed me to take a few clippings of the plant.”

    Wong propagated the plant in his backyard, weeding, watering and tending it until he had created a pipevine swallowtail paradise.

    “I built a large screen enclosure to protect the butterflies and to allow them to mate under outdoor environmental conditions — natural sun, airflow, temp fluctuations,” he says.

    “The specialized enclosure protects the butterflies from some predators, increases mating opportunities, and serves as a study environment to better understand the criteria female butterflies are looking for in their ideal host plant.”

    After their habitat was ready, Wong scouted our 20 caterpillars from a few residences outside the city with more vegetation and collected them (with permission).

    He carefully transported them home and set them loose in their new feeding and mating grounds.

    About 6 weeks later, the hungry caterpillars turned into butterflies, and the females began laying tiny red eggs on the stems of the pipevine plant. Success!

    After several generations, the butterflies began to multiply exponentially.

    Having more than he knew what to do with Wong stared donating caterpillars to the Botanical Gardens, where their food originated from.

    At first he brought them in by the hundreds. Now, he brings them in by the thousands, every few months.

    While other conservationists have repopulated the pipevine butterfly in neighboring Santa Cruz and Sonoma counties, Wong has made the first and only successful attempt in San Francisco. In the late 1980s, a woman named Barbara Deutsch tried to reintroduce the species with 500 caterpillars, but they vanished after a few years.

    Wong attributes his success to the habitat he’s created for the caterpillars. In the past 7 years, he’s cultivated more than 200 California pipevine plants, with no herbicides or pesticides and lots of weeding by hand.

    “Improving habitat for native fauna is something anyone can do,” Wong says. “Conservation and stewardship can start in your very own backyard.”

    The post How One Man Singlehandedly Repopulated a Rare Butterfly Species in His Backyard appeared first on Return to Now.

    This content was originally published here.

  • How to get rid of moles in your yard | MNN – Mother Nature Network

    How to get rid of moles in your yard | MNN – Mother Nature Network

    As you walk onto your carefully manicured lawn, an unsightly raised pattern of grass and broken earth catches your attention. Curiosity gets the better of you. You step on the raised ground, and it suddenly gives way. Has this ever happened to you?

    Or maybe this: You’re surprised to find mounds of dirt ranging from the size of a baseball to a basketball that have appeared seemingly out of nowhere.

    If these scenes sound familiar, Alan Huot has some disheartening news for you. Sorry, you have moles in your yard.

    “Tunneling and mounds of dirt thrown onto the lawn are classic signs of mole activity,” said Huot, who lives in East Granby, Connecticut, and has more than 30 years of experience in controlling wildlife pests and nuisances ranging from moles to beavers to coyotes.

    Don’t despair, though, said Huot, a National Wildlife Control Operators Association certified wildlife control professional. “There are some practical things homeowners can do to get rid of moles.”

    Mole traps

    The most effective method, he said, is trapping. When shopping for a mole trap, Huot advises homeowners to consider several important factors. These include:

    There are three common types of traps, Huot said. They are:

    There are two primary reasons homeowners fail to catch moles with traps, Huot said. The first is that they invariably place the trap in the wrong spot. “To be effective, traps have to be placed in the traveling tunnels, which are the longest and straightest tunnels,” Huot said. The second, he said, is that homeowners typically only set out one trap, whereas professional wildlife control specialists will set out many.

    Moles’ food sources

    Believe it or not, if you’ve got moles it’s because you’ve got something good going on underground in your lawn: earthworms. “Earthworms are the No. 1 source of food for moles,” Huot said. “As long as there is an abundance of earthworms in a lawn, it is a target for moles. But, since earthworms are beneficial to a lawn, you should never try to eradicate them.”

    mole with an earthworm Moles love to eat earthworms, but their diet may include lots of grubs, too. (Photo: Cezary Korkosz/Shutterstock)

    Moles, which are insectivores, will also eat insects such as ants and certain beetle larvae, commonly known as grubs. Huot believes this has led to a misconception among homeowners that can lead do-it-yourself mole control to fail. “There is a widely held notion among consumers that a grub control treatment for their lawn will resolve or mitigate their mole problem,” Huot said. “The assumption is that if you get rid of the grubs the moles will leave. My contention is that while a grub control treatment or program will perhaps benefit the lawn, the moles will still live happy and fat because their No. 1 food source is earthworms!”

    In other words, trying to control the moles’ food source is a difficult strategy, thanks to moles’ varied diets. Aside from traps, the only other options for removing moles are unacceptable to many people — poisons and chemicals. Poisons could potentially harm children and pets, as well as predators that eat moles, and chemicals could kill or drive off beneficial wildlife such as earthworms.

    Traps are the best DIY option for getting rid of moles, Huot said — unless you live in a state that bans mole traps. Most states consider mole traps to be pest control devices, so they aren’t necessarily regulated like other traps. he said. However, he pointed out that some states such as Massachusetts do not allow any trap that grips an animal’s body. “Hence, there isn’t a mole trap on the market that is legal in Massachusetts,” he said.

    Mole repellents

    mole repellent spike A solar-powered mole-repellent spike defends a bed of onions. (Photo: Irina Borsuchenko/Shutterstock)

    Repellents may not be a good way to rid your yard of moles, but they can help prevent moles from moving in to begin with. Or, if you already have moles in part of your property, repellents might at least help you protect a prized section of your lawn or garden from becoming riddled with mole hills or mole tunnels.

    Castor oil is one common mole repellent, although there is some dispute about its efficacy. Tests have shown some benefits from castor oil with eastern moles, according to the San Francisco Chronicle’s Home Guides, although evidence is lacking for western moles. You can buy castor oil repellents in stores, typically pellets or liquids, that are designed to drive moles away with a mixture of castor oil and other offensive ingredients. You could also make your own version; Home Guides recommends mixing 6 ounces of castor oil into 2 gallons of water, along with 2 tablespoons of detergent. Use about one-sixth of this solution for every 1,000 square feet of soil, spraying before it rains or watering the soil afterward to help it soak in.

    Sonic repellents are another option for preventing moles from infiltrating an area. These often take the form of spikes that are slid into the soil, where their sonic vibrations can scare away moles. The frequency isn’t audible to humans, and should pose no danger to children, pets or non-target wildlife. As with castor oil, however, this is more about prevention than getting rid of moles that are already in your yard.

    Facts about moles in your yard

    star-nosed mole The star-nosed moles is easily recognized by the unique ‘star’ of 22 tentacles on its face. (Photo: Agnieszka Bacal/Shutterstock)

    Now that you know how to trap and repel moles, here are a few facts about moles that might help your efforts:

    Editor’s note: This story has been updated since it was first published in April 2015.

    How to get rid of moles in your yard
    Are there mole tunnels in your yard? Here are tips to help with mole control, from facts about food sources to pros and cons about mole traps and repellents.

    This content was originally published here.

  • Shoppers are raving about Ikea’s £3 blinds that can fit ANY window size

    Shoppers are raving about Ikea’s £3 blinds that can fit ANY window size

    PEOPLE are raving about £3 blinds from Ikea which can be cut to fit any window allowing them to transform their entire home on a budget.

    Dozens of people have been sharing photos of their makeovers on Facebook, with the blinds going viral after racking up thousands of views.

    The blinds are a bargain at just £3 each
    Facebook

    Costing just £3 each from the Swedish superstore, people have been able to redo their whole house for as little as £21 – a fraction of the cost of bespoke blinds.

    Ikea describes the Schottis Pleated blind as “easy to attach to your window frame. No drilling needed.”

    Measuring 90 by 190 cm, the blinds can easily be cut to size, allowing them to fit even the trickiest of windows.

    People have claimed a knife is the best tool for slicing through the pleated fabric, with incredible made-to-measure results.

    The blinds can be cut to fit any size window
    Facebook

    Posting online, one woman said: “Honestly this has got to be the easiest and most stylish blind I’ve got in the house. Ikea never fails, £3.

    “The size of the blind is 90cm x 190cm, mine has been cut down to fit in my window!”

    Another wrote: “Got my £3 Ikea blinds. Easily cut to size for my narrow door windows.

    “Half up at the mo to let the beautiful sunshine in!”

    A third shared: “Well I jumped on the band wagon with the Ikea blinds and I think they’re ok and do their purpose.

    “Bargain at £2 each, whole house done for £21.”

    Another woman added: “I love them thanks to whoever posted.”

    The handy clips mean you can adjust the blind to any height
    Facebook
    The blinds can be bought online from the website
    IKEA
    • Pleated blind Schottis, Ikea, £3 – buy now

    Also saying thanks was this woman, who wrote: “Thank you to everyone who posted about the Ikea blinds.

    “I got mine delivered today and I put them up as easy as anything.

    “Love that they still let the light through but stop the sun beaming into my eyes while we eat our dinner.

    People have claimed they’ve redone their whole house for as little as £21
    Facebook
    The blinds are easily attached with some double sided sticky tape
    Facebook

    “Totally worth the £3 each.”

    And someone else posted: “Love my £3 blinds from Ikea.

    “Perfect for keeping the sun out of my kitchen during the day.”

    The blinds are attached at the top with double sided sticky tape, with Velcro used to keep them down, and clips to adjust the height.

    If you’ve got a lot of windows – these blinds could be the answer
    Facebook
    The blinds have been transforming any room from kitchens to bathrooms
    Facebook

    Commenting on the numerous Facebook posts, people have praised the budget idea to brighten up rooms.

    One person wrote: “They are so easy to cut, I just measured and marked them.

    “I kept them together and put the bottom at the top and used a Stanley knife and it cut through the full blind like butter in one go.”

    Another said: “They come in one size, just cut what you need, very easy to do I done it with a good kitchen knife.”

    The white blinds instantly brighten any room
    Facebook
    People love how they give privacy while letting light in
    Facebook

    A third added: “I highly recommend the £3 Blinds from Ikea. So easy to put up and look really nice in my little boys room.

    “No drilling needed and can cut to size.”

    And if you’re loving the style, Ikea are selling black-out grey versions for £5 each.

    The blinds also come in a black-out grey version for £5
    Facebook
    Facebook posts of the blinds have gone viral racking up thousands of views
    Facebook

    MOST READ IN FABULOUS

    WORTH THE LABOUR PAINS

    My plumber hubby gave me £650 Louboutins ‘push present’ like Meghan

    FOOD FOR THOUGHT

    Mum raves about Aldi plate that means her kid eats dinner with NO tantrums

    PRICEY’S NEW LOOK

    Katie Price’s changing face from a fresh-faced model to surgery-obsessed

    HEADS UP

    Meghan and Harry unfollow everyone on Instagram including Kate and Wills

    AMAZING SPACE

    Woman revamps the kitchen she ‘hated’ for just £45 using B&Q worktop stickers

    PUSHING PRETTY

    Mums-to-be applying make-up during labour due to pressure of social media

    If you want more home improvement tips, this mum reveals how she was able to transform her kitchen floor for less than £50.

    And an interior design expert has revealed the ‘finishing touches’ you can make to revamp your home in minutes.

    Plus people are sharing the incredible home transformations they achieved using just tester pots of paint.

    This content was originally published here.

  • According To NASA’s Clean Air Study, These 10 Plants Are Oxygen Powerhouses

    According To NASA’s Clean Air Study, These 10 Plants Are Oxygen Powerhouses

    There are various ways to improve the air into your home. The best way to do this is the natural way. Mother nature has everything to improve our health. When the air in your home is stagnated you become tired, listless, you can get headaches. Your eyes could get irritated. Germs stay in the house if it is not getting enough fresh air. The best way to get fresh clean air into your home is bringing plants that NASA says is the oxygen bomb, or you could open your windows to allow a breeze though your home, maybe purchase an air purifier to clean and purify the air. Air purifiers are not cost effective. National Aeronautics & Space Administration (NASA) along with the Associated Landscape Contractors of America (ALCA) compiled a list of effective air-filtering plants as part of the NASA Clean Air Study. The research concluded that various plants could eliminate significant amounts of trichloroethyline, benzene, and formaldehyde from the air. They recommended for those that would like to benefit should ensure that in every 100 sq feet there should be at least one recommended plant. Below are a few of the common plants found in homes around the world and easy to find. Peace Lily or Spathiphyllum Spider Plant or Chlorophytum elatum Golden Pothos or Scindapsus aureus Elephant Ear Philodendron Aloe Vera Banana or Musa oriana Chinese Evergreen English Ivy or Hedera Helix Mother-in-Law’s Tongue Bamboo Palm or Charmaedorea seifritzii These 4 Plants in your bedroom would help you sleep better; Spider plant English Ivy Peace Lily Bamboo Palm NASA Clean Air Study

    The post According To NASA’s Clean Air Study, These 10 Plants Are Oxygen Powerhouses appeared first on Enlightened Consciousness.

    This content was originally published here.

  • 10 Plants That Will Help Attract Bees to Your Garden in the Spring – One Green PlanetOne Green Planet

    10 Plants That Will Help Attract Bees to Your Garden in the Spring – One Green PlanetOne Green Planet

    According to the Natural Resources Defense Council, cross-pollination from bees and other pollinators assist at least 30 percent of the world’s crops and 90 percent of wild plants. Without bees to pollinate plants, many would perish (food crops included).  If we’d like to keep berries, apples, onion, carrots, avocados, and many other foods, we need to start caring about bees. Bees are magnificent creatures, who not only pollinate food for

    Bees are magnificent creatures that not only pollinate food for all but also serve as a main indicator of the state of the environment on whole. Declining populations should be a huge indication that something is unbalanced and wrong. Between humans spraying pesticides on crops to habitat loss and climate change, bees are at risk. If bees go extinct, so will humans, along with just about every other species on the planet.

    Now, more than ever, it is important that we try to be as kind to bees as possible and give them an opportunity to visit our yards. Along with all of the other things you can do to help the bees, planting a garden is a great place to start. Even if you only have enough space for a container garden, you can “plant for the bees” by making it as organic as possible! Try planting these flowers and herbs this spring to not only add beauty to your home but attract our buzzing friends!

    1. Borage 

    Known as the “starflower” and the “bee bush,” bees love this medicinal herb! Borage is a bright blue, star-shaped flower that will bring beauty to any garden (and the bees along with it). This super plant is sure to have the bees buzzing!

    In the spring, catnip grows around to be around two to four feet tall and sports white or lavender colored flowers, attracting cats and bees alike! If you grow this around your garden, it’ll be likely that you will not only attract bees but butterflies and other pollinators.

    4. Flowering Currant

    These bright pink flowers draw in bees and butterflies. They are not only gorgeous, but their fragrance entices the bees to stay a while and take its pollen. This flower will bloom in early spring, which is perfect to help the bees rejuvenate after the winter months.

    shutterstock_600480731Maleo/Shutterstock

    Crocuses are early bloomers which are perfect for bees that visit your yard! These purple/blue beauties, tend to come up at the end of winter when the weather is still a tad on the colder side. Bulbs for these flowers are usually planted in the fall and the flowers grace us with their presence come March, depending on where you live of course. These flowers are super easy to maintain, so this is a great flower if you don’t necessarily have the green-ist of thumbs yet!

    Pussy Willows are also great for bees thanks to the fact they are early bloomers and have pollen ready for the bees at the very beginning of spring.

    7. Echinacea

    These lovely flowers come in all different colors and are known as, “the cone flower,” due to their shape. These flowers are perennials and unfortunately bloom later in the season.

    Sunflowers are one of the best flowers to plant for bees. They provide quality pollen and nectar for bees and seeds for birds, squirrels, and other wildlife. After the chance of frost is gone, go ahead and plant these seeds directly into the soil. You can also start the seeds indoors and wait until after the chance of frost is past to plant them outside.

    9. Lilacs

    shutterstock_402366895fotolotos/Shutterstock

    Lilacs are a great treat for bees as they produce both pollen and nectar. Lilacs have bright purple flowers that grow in bunches, making it easier for bees to graze from one blossom to the next. The nectar provides the bee with much-needed energy, while the mixture with the pollen is a necessity for growing larvae back at the hive.

    10. Hyacinth 

    Hyacinths come in all different colors (i.e. pink, purple, white, etc.) and are especially bright colored and fragrant. These flowers provide nourishing nectar, which is why these flowers are a win for the bees.

    Remember, when planting the above plants, stay away from hybrid varieties and keep your garden organic, i.e. don’t spray chemicals. Besides planting a garden, there are actually a ton of different ways to get active for bees! Try setting up a bee hotel, creating a bee bath, and planting wildflowers in your yard rather than grass lawns  to keep the bees coming back! Don’t have a yard? Simply try to buy organic and local as much as you can and spread the word about how important bees are to the planet around your community. Education and kind action can change the world, especially for bees.

    Looking for more information on how to help save the bees? Check out how the Bumblebee Conservation Trust is changing the world for bees!

    For more Life, Animal, Vegan Food, Health, and Recipe content published daily, don’t forget to subscribe to the One Green Planet Newsletter!

    Being publicly-funded gives us a greater chance to continue providing you with high quality content. Please support us!

    This content was originally published here.

  • Lantana Flowers Deliver Vivid Summer Color In The Sun

    Lantana Flowers Deliver Vivid Summer Color In The Sun

    As full sun-loving bedding plants that produce flowers in abundance, Lantanas are made to order.  Plant them in your outdoor garden when all danger of frost pasts.  In warm areas of the south where frost seldom if ever occurs, colorful lantanas can be grown all year in the garden.  There they will bloom constantly, needing only occasional trimming to keep them in shape.  I particularly like growing Lantana as trees or standards to show off their flowers.

    Lantanas The Verbena Relatives

    Lantana plants are members of the verbena plant family. The popular annual Verbena does not grow as tall as Lantana bushes and trees.  However, their free blooming habits and small tubular clusters of flowers look very similar.  Lantana flowers come in red, orange, pink, lavender and yellow.  One variety has yellow blossoms that turn to orange as they age. This bicolor effect is striking Lantana foliage is rough to the touch, but as a whole produces a bank of pleasing deep green.  Many new lantana flower colors and combinations have been developed over the years. Start your lantana collection by ordering new varieties in the spring.  Not only does lantana produce flowers all summer long but they solve a common problem in the landscape – the space between a sidewalk and foundation, facing south.  It is not only hot but often dry and they are drought tolerant. After a few weeks in late spring and early summer, when the young lantanas are getting established, they thrive in this difficult situation.  Lantanas withstand the first light frosts of fall. If you want to carry over old plants to the next season, dig them.  Prune the roots and tops back severely and pot in a moist mixture of equal parts sand, peat moss, and garden loam.  Lantanas can be wintered in a cool, sunny window by keeping the soil on the dry side (but never completely dry).

    Take Lantana Cuttings in August

    During the outdoor season, lantanas may grow into small shrubs as tall as four feet and sometimes more.  When this is the case, taking cuttings will be easier. It is not easy to “downsize” and pot oversized plants.  To root the cuttings, first fill a pot or other container with moist, clean, gritty sand or perlite.  Two parts sand (or perlite) and one peat moss make a good starter soil mix. NOTE: Less danger of fungus troubles if sand or perlite is used.  Seed or root starter kits help you to get started.

    Lantana Flowers Attract Butterflies and Hummingbirds

    Butterflies and hummingbirds show their approval of lantana flowers at certain seasons by coming regularly during the early morning and late afternoon for nectar from the flowers.  For a thrill, note the hours they come and sit quietly near the lantanas.

  • 12 reasons to plant a clover lawn | TreeHugger

    12 reasons to plant a clover lawn | TreeHugger

    The grass lawn’s glory days are over – here’s why we love a clover lawn instead. In the etymological timeline of the word lawn , we have laune from the 1540s, meaning “glade, open space in a forest or between woods.” I can picture that; meadow-like clearings in the trees where low wild plants are growing, replete with messy little blossoms and scampering woodland creatures. Today’s lawn does not look like that. No, today’s lawn is a strange construction that is not very natural at all. It’s more of a rampant carpet that is ravenous for water, demands an array of synthetic chemicals, and requires constant taming by means of a lawnmower. How did this become the ideal? The birth of the modern lawn may have more to do with the sales of lawn-maintenance products (think herbicides) than common sense – a point we’ve been kvetching about for years here on TreeHugger. In the U.S., we have 40.5 million acres of lawn; according to NASA, all that lawn uses 60 million acre-feet (the volume of one acre of surface area with a depth of one foot) of mostly drinkable water a year. (See how to cure lawn lust in 6 minutes for more on that.) And for what? We can’t even eat it! Lat year we wrote about planting clover instead of grass (see related stories below) and since it’s getting to be lawn season, I figured it was time to fire up the clover cheerleading section again. So without further ado, why you should consider kicking grass to the curb and try planting (or mixing in) lovely clover instead. 1. It is drought-resistant Because of clover’s deep roots, it needs much less water than does grass. As the Farmer’s Almanac notes, “Clover is an extremely drought-resistant plant and will keep its cool-green color even during the hottest and driest parts of summer.” 2. It is inexpensive Clover seed is cheap; the average cost is about $4.00 per 4000 square feet. You will also spend a lot less on water, products, and maintenance. And for those who have been fighting clover all along: Stop fighting, let it grow, and it’s yours for free. 3. It requires no fertilization Clover is a legume, and as such, takes nitrogen from the air and sinks it into the ground as a useful fertilizer. If you are adding clover to a lawn, it will work to fertilize the existing lawn; on its own, it requites no additional fertilizer. 4. It blooms! Who would want a monochromatic carpet of grass when you could have one sprinkled with a starscape of flowers? 5. It attracts pollinating insects Those blooms bring bees, and heaven knows the bees need our help. Honeybees love clover (does “clover blossom honey” ring a bell?); planting clover is a nice assist. 6. But It can be bee-free too That said, if you are worried about bee stings, there are options. Even though honeybees rarely sting when unprovoked and away from the hive, you can opt for a micro clover or simply mow the clover when it’s in bloom. 7. It grows in poor soil Poor soil is no problem for clover, much due to the fact that it supplies its own nutrients with that nifty nitrogen trick. 8. It resists pet urine While grass lawns are susceptible to brown spots from pet urine, clover is not effected by it. 9. It resists blight and mildew Mildew, fungus, blights … these things hurt grass lawns. making them unsightly and in need of treatment. Clover is not subject to these troubles. 10. It doesn’t need herbicides Since clover out-competes broadleaf weeds, you won’t need to douse the soil with toxic weed-killing things, hurray! 11. It doesn’t need pesticides Clover also stands up well to insect pests, so no need to to douse the soil with toxic insect-killing things as well, hurray! 12. It rarely has to be mowed Depending on what kind of clover you plant and what look you like, clover can be mowed very infrequently – by some accounts, as little as twice a season. I mean, maybe you like spending your weekends pushing a loud, exhaust-sputtering machine around, but if not, clover has your back. (And your feet too, see photo below.)

    This content was originally published here.

  • What to Ask Yourself When Building a Pool – Home Style Blog

    What to Ask Yourself When Building a Pool – Home Style Blog

    Who hasn’t dreamt of having their pool in the backyard to relax in and get a tan after work? It’s the best way of de-stressing after a busy day at work and a great excuse for gathering the family on weekends. You’ll thank yourself for having one during summer when it’s hot and you want to cool off by swimming laps.

    Installing a swimming pool in your property will not only increase the price of your home but will also improve you and your family’s lifestyle. It’s an excellent way to entertain young kids and keep them busy during school holidays, and also effective in keeping you healthy and fit with the opportunity to do laps whenever you feel like it. But before finding a contractor to build it for you, you need to be sure of your property boundaries. You can get a party wall surveyor to do it for you to make sure that the excavation is within your property limits so you’re sure that you won’t upset your neighbours by invading their property.

    If you’ve finally decided that it’s time to build one, below are some of the things that you might start asking yourself.

    How long will it take to build a pool?

    It doesn’t take one night to finish a pool. It’s a big job to dig the lot up, install tiles and install the water system. The best way to make it efficient is to hire a contractor that can make the job a breeze for you. With them to rely on, they can make planning easy by designing your chosen pool, taking care of the licences and permission from the council, and coordinating with other contractors involved in the job.

    How is planning done?

    The labour itself is a long process, and planning is a lengthier one. Building a pool is a big investment, and you’ll want to make sure that you do it once and do it right. This is why you need to take the time to plan it properly so that once construction starts, it’ll go smoothly and without issues. From deciding on the size and type of pool to the tile placement, these factors should be determined early on so that building your pool will be completed as soon as possible.

    How much budget should I allocate?

    Building a pool isn’t cheap and before everything else, you need to decide how much you’re willing to spend to have one. Talk to your contractor so they can give recommendations that will fit your budget.

    Take your time when deciding because a pool will be a permanent part of your property and it’s a significant investment to get one built. While some people already have a design and type in mind, there are homeowners who take a longer time to make up their minds before proceeding with the construction.

    A swimming pool is an excellent addition to any home because it’s the perfect spot for the family to spend quality time together. If you have the extra money and space to build a pool, rest assured it’s a decision you won’t regret.

    This content was originally published here.