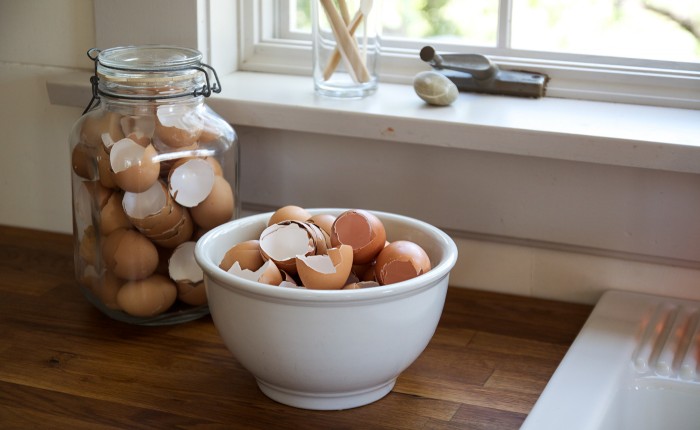
Last fall I started collecting eggshells after I read an article on Real Farmacy that touted their usefulness in the garden for everything from fertilizer to organic pest control. This spring I’m using the crushed eggshells in the garden five ways.
Above: All winter long I’ve been saving eggshells by simply rinsing them and placing them in an open container where they could dry out. (No, they do not smell. Everyone who comes to my house and sees them asks me this question.)
When my containers are full, I set the kids to pulverizing them into little bits with wooden spoons, thus compacting the shells so that I can collect more.
Fertilizer
Above: When tilled into the soil, ground eggshells provide your plants with calcium.
Though nitrogen, phosphorus, and potassium are most vital for healthy growth, calcium is also essential for building healthy “bones”—the cell walls of a plant. Composed of calcium carbonate, eggshells are an excellent way to introduce this mineral into the soil. To prep the eggshells, grind with a mixer, grinder, or mortar and pestle and till them into the soil. Because it takes several months for eggshells to break down and be absorbed by a plant’s roots, it is recommended that they be tilled into the soil in fall. More shells can be mixed into your soil in the spring.
By the same token, finely crushed shells mixed with other organic matter at the bottom of a hole will help newly planted plants thrive. (Tomatoes especially love calcium.) For an exciting recycled garden cocktail, try mixing your eggshells with coffee grounds, which are rich in nitrogen.
Finally, eggshells will reduce the acidity of your soil and help to aerate it.
Seed Starters
Above: Because they are biodegradable, eggshells make excellent, no-waste seed starters. For this, reserve some of your deeper shell halves. Sterilize the shelves by boiling them or by placing them in a 200°F oven for 30 minutes. (If you put them in a cooling oven after, say, you baked a roast chicken, you can sterilize eggs without using excess energy.)
Next, with a nail or awl, make a hole in the bottom for drainage. Add soil and seeds according to the packaging. When sprouts appear, plant them—egg and all—right into the soil. See a complete DIY at 17 Apart.
Pest Control
Above: A coating of crushed eggshells in the garden is said to help deter several pests, both large and small. Deer dislike the smell of the albumen and will stay away.
Apparently you can also use egg’s insides to deter deer. See DIY: Homemade Deer Spray. Be aware, however, that while deer hate the smell of eggs, rodents love it. Therefore, it may not be best to use this deterrent near the house.
Many gardeners also tout the use of crushed eggshells as a snail and slug repellent. But a recent test by All About Slugs in Oregon seems to have dispelled this. If you’ve had any success with eggshells as slug repellent, we’d be curious to know.
Bird Food
Above: Like plants and people, birds also benefit from a bit a calcium in their diet, especially the females who need extra before and after laying their eggs. To make bird food, start by sterilizing the shells by leaving them in a cooling oven after you bake a meal. Then crush them into fine bits and mix with your favorite seed.
Mulch
Above: Like oysters, eggshells used as mulch provide a striking accent in the garden. If you gather enough, you can even apply a layer thick enough to deter weeds.
Looking for more recycled garden how-tos? See our guide to Edible Gardens 101 and more posts:
Prefab homes are a great solution when looking to build fast, and now there is another awesome option to do so on the market. The Italian architect Renato Vidal has recently unveiled a prefab foldable home, which can be installed in less than a day. The so-called M.A.Di home comes flat-packed and is built using sustainable materials and means, but designed with durability in mind. It can also withstand earthquakes.
The M.A.Di home is made of CLT (cross laminated timber) and manufactured by wood specialist Area Legno in Italy. It is available in several sizes, namely a 290-sq ft (27-sq m) tiny home, a slightly larger 495-sq ft (46-sq m) home, a 603-sq ft (56-sq m) home, a family sized 753-sq ft (70-sq m) home, or an even larger family home of 904-sq ft (84-sq m). All the models have two levels and have a kitchen, dining area and bathroom located on the ground level, and bedrooms on the upper level. The homes feature an A frame structure, which makes it easy to fold them for flat-packing and easy transport to the build site.
The home features a steel profile and steel hinges, meaning that each module can be opened and closed with ease. When closed and folded, the height of the package is just 4.9 ft (1.5 m), while opened, it measures 21.3 ft (6.5 ft) in height. All of the M.A.Di modules have galvanized steel frames which are designed to support the home’s opening and closing movement. The homes are waterproofed using Polyurethane foam, which also provides the thermal insulation. In addition to this, the walls are insulated using high-density rockwool, while the windows can either be PVC or aluminum.
The actual installation is very simple, since each module just unfolds up. The home doesn’t need a foundation, since it can be anchored in place with a specially-designed screw pile system, which has virtually no impact so this home has a very tiny footprint. The home can also be built on a reinforced concrete foundation, if so desired.
Large Module Plan
Single Module Plan
The home can be easily packed away, while it is possible to extend the existing home by adding new modules. It can also be designed according to passive house standards, while there is also the option of taking it off-the-grid by installing a solar power array, composting toilet, water tanks and a gray water system.
The price of this home is $933 (€800) per square meter, so the smallest home will cost about $25,195 (€21,600) and the largest $73,385 (€67,200).
For millennials looking to buy their first home, the hunt feels like a race against the clock. In the seven years since the housing crash ended, home values in more than three-quarters of U.S. metro areas have climbed faster than incomes, according to an Associated Press analysis of real estate industry data provided by CoreLogic. That gap is driving some first-timers out of the most expensive cities as well as pressuring them to buy something before they are completely priced out of the market. The high cost of home ownership is also putting extreme pressure on 20- and 30-somethings as they try to balance mortgage payments, student loans, child care and their careers. “They do want all the same things that previous generations want,” said Daryl Fairweather, chief economist for the brokerage Redfin. “They just have more roadblocks, and they’re going to have to come up with more creative solutions to get the homes that they want.” A Redfin analysis found these buyers are leaving too-hot-to-touch big-city markets — among them, San Francisco and Seattle, where the tech boom has sent housing prices into the stratosphere. The brokerage found that many millennials are instead buying in more reasonably priced neighborhoods around places like Salt Lake City, Oklahoma City and Raleigh, North Carolina. That, in turn, is driving up housing prices in those communities.
Jake and Heather Rice, both 35, moved to Utah last year from Mountain View, California, where the biggest employers are tech giants such as Google, Symantec and Intuit and the median home price is a dizzying $1.4 million or so. The couple and their three children settled into a 4,500-square-foot house in fast-growing Farmington, just far enough away from Salt Lake City to feel rural but minutes from a major shopping center and Heather’s sister. They did not disclose the purchase price for the sake of privacy, but they said their monthly mortgage payments will be $3,000, roughly the same as the rent for their former two-bedroom, 1,000 square-foot apartment in Mountain View. “We didn’t expect to stay in California because of how ludicrous the prices had become,” said Jake, a mechanical engineer who works in the medical device sector. Nationally, home prices since 2000 have climbed at an annual average rate of 3.8%, according to the data firm CoreLogic, while average incomes have grown at an annual rate of 2.7%. And in the metro areas with the strongest income growth — for example, parts of Silicon Valley — home prices have risen even faster.
Do you know how to properly plant shrubs? Planting trees and is a great and natural way to update your landscape and the look of your home. Every season presents a fresh, new look from blooming shrubs to lush green foliage. For your gardening success, we have some tips on properly planting shrubs.
Check out this step by step video outlining the process for growing your newly planted shrubs!
Preparing the Ground for Planting Shrubs
First, it is very important to properly prep the native soil before planting. To start, always be safe! Have the city come label where gas and water lines are in your garden, and check for rocks and debris in your planting area.
Next, start tilling to gently loosen the surrounding soil. This will help break up the clay in the soil and create air pockets for healthy root growth. Then, add the proper soil amendments like Calloway’s Tree & Shrub Mix. Repeat the tilling process and begin planting!
For more information on properly prepping your soil, check out our video here!
After you finish prepping the soil, it is time to dig a hole for the tree or shrub. Digging enough space so the planting hole is twice the size of the root ball and same depth.
Mix in equal parts of the Calloway’s Tree & Shrub Mix with the native soil. Remove the shrub from its container and gently loosen up the root ball. Place the plant in the planting hole and press the soil around the plant to secure your plant.
Cover everything to the top of the root with a layer of mulch and water in thoroughly, saturating the root ball and surrounding soil. Keep your newly planted shrubs well-watered.
Spacing Your Shrubs When Planting
When you are planting shrubs, whether new or established, proper spacing is vital. The shrubs need room to grow and if placed too close together, your landscape could look wildly overgrown.
Shrubs grow well when spaced about one half the spread of the mature size of the neighboring shrub. Shrubs that have a wide growth habit naturally need more space around them. For example, if your mature shrub is 4 feet wide, then it is safe to plant it 2 feet from the widest part of another shrub. Take care when planting not to eliminate air pockets in the soil that you formed in your soil preparation.
When Should You Plant Shrubs?
You can start planting from early spring and on; it all depends on your plant selections. A shrub can bloom at many different times of the year, depending on its bloom time. Plant shrubs in your landscape with different bloom times for continual color all year long! This time of year is the best time to plant shrubs, especially summer-blooming shrubs. Planting shrubs that love the heat is ideal for your Texas garden and for the season.
5 Examples of Shrubs to Plant Now
1. Abelia
Abelia is a sun-loving, evergreen shrub that sparkles with small, white flowers. This impressive compact shrub has brilliant yellow gold and deep green variegated foliage and lovely white flowers in summer and fall; it is resistant to leaf fade and scorch. Abelia is a good choice for attracting birds, bees, and butterflies to your yard.
2. Althea
Althea, also known as Rose of Sharon, is a tall, stiffly upright shrub with extremely showy bluish-purple double flowers which appear throughout summer, the flowers are individually beautiful; a very adaptable garden shrub, but does best in full sun. Butterflies and hummingbirds love Althea plants.
3. Buddleia
Buddleia, or Butterfly Bush, a compact garden plant with large, soft flowers with orange eyes on sturdy stems; attracts butterflies; may treat as a perennial and cut it back to the ground each spring as it regrows vigorously and blooms on new wood. Under ideal conditions, this shrub can be expected to live for approximately 20 years.
4. Texas Sage
Texas Sage is a compact, mounded shrub with bright silvery foliage; showy hot pink flowers in summer; a great water conservation plant, good for dry, hot, rocky sites; must have well drained, alkaline soil; prune lightly to maintain fullness; must have full sun. Texas Sage is best pruned in late winter once the threat of extreme cold has passed and it is highly tolerant of urban pollution and will even thrive in inner city environments.
5. Yucca
Yucca is a stately succulent plant has arching grassy looking foliage that is leathery to the touch; the linear olive foliage has fibrous strands along the edge; tall spikes covered with showy rose to pink flowers are long blooming; perfect as a garden accent. This is a great plant for attracting hummingbirds. Plant this shrub in an area of your landscape that receives full sunlight throughout the day.
How Deep Do Shrub Roots Grow?
Root growth in a shrub develops in a more lateral sense. Think of the leafy canopy of a shrub, for example, the ground level area underneath is called the drip line. The roots generally grow parallel to the drip line because it helps the top of the root to properly absorb water and nutrients.
Can Shrubs Damage Your Foundation?
When gardening, it is a good rule of thumb to avoid planting vegetation that will vine or grow on the exterior walls of your house. Always ensure the planting hole is placed appropriately based on its mature size. That will help you determine how much space to account for your planting hole and planting shrubs. Leave a pathway between the plant and your home.
When watering trees and shrubs near your home, keep a fairly uniform moisture level in the surrounding soil. Using a soaker hose and applying a layer of mulch can help.
Tips For Planting Potted Shrubs
Planting shrubs in a container is really no different than any other container creation. The key factor to consider is dry out. Generally, plants in pots or containers require more frequent watering. Calloway’s Premium Potting Soil is ideal due to its water-retaining capabilities. It is important to choose a potting soil that can maintain the moisture levels in the soil for healthy root growth. Select pottery that is large enough for the shrub with room to grow. Think about your pottery selection and placement in your yard.
Check out our blog here for tips and inspiration on your next container garden and creation.
Feed Your Plants
In order for your shrubs to stay vibrant and beautiful, they need proper nourishment. Feed your plants with quality ingredients and do it naturally. Try Calloway’s Natural Garden Food. Our new and improved formula is perfect for lawns, flowerbeds, vegetables, fruits, trees, and shrubs. It is enhanced with Jobe’s Biozome® and Archaea, which is a unique blend of beneficial microorganisms, which breaks down complex minerals to improve long-term soil quality. This highly enriched fertilizer also contains helpful mycorrhiza, a healthy bacteria that stimulates growth above and below the soil. This 10-0-2 formula contains the most nitrogen you will get from a natural fertilizer.
For new plants, mix the food into the soil at the planting location. For established shrubs, mix food into the soil underneath plant, along the drip line. Follow the instructions on the packaging, based on the selection of plants you are feeding and whether or not the plants are new or established and mature, or in a container or raised bed.
Planting a shrub, or many shrubs, will add beauty, texture, color, and character to any landscape. Shrubs help make a home, look like a home that is welcoming and personable. Shrubs provide color all year long, whether the rich green in the leaves or dazzling with blooms. Spend some time outdoors with your family and revel in the warm seasonal breeze. Stop by our store today to pick up quality shrubs and supplies.
Questions? Ask our Texas Certified Nursery Professionals, available at every store location. Don’t feel like planting? Try our Pick & Plant Garden Services, available at every store location. You pick your plants, and we plant them for you!
Recent showers combined with warmer weather will create the perfect habitat for pesky summer bugs. Here are some effective ways to prevent the common bites, stings and nuisances.
To prevent bees from establishing a colony in or around your house, it’s important to remember these three things: food, water and shelter — bees’ keys to life.
As with any other summer bug, stagnant water must be kept to a minimum. Drain pots and repair any faulty irrigation systems. And if you have bird baths or pet bowls outside, mixing in 2 tablespoons of vinegar per gallon of water will discourage any bees from setting up shop near your house.
Plan an exterior inspection and eliminate any potential nesting sites. Cover holes, chimneys and animal burrows. Make sure windows and screens are tightly fitted and sealed. If you have any debris in your yard, such as old tires, cardboard boxes or old appliances, throw them out. Bees seek out such items for nesting sites.
Removing flowers as a source of food is not recommended. In fact, it’s very important for bees to pollinate many plants, including crops. If you have a colorful garden, not to worry. As long as you have their other two resources tamed to a minimum, you’re in tip-top shape for the summer.
Gnats
Although relatively harmless, these small creatures create quite the inconvenience with their constant swarming. Plus, you never know what germs they may be carrying as they travel from place to place.
If you garden, you want to make sure your fruits and veggies are staying fresh outside. If you happen to notice rotting or mold, act fast and pluck them out, then turn your soil or mulch to allow any moldy layers to dry out.
As with mosquitoes, be diligent in draining any standing water and drying out any moisture. With Texas humidity, the drying process may take a while. In this case, sprinkle a bit of sand on top of your soil, something very discouraging to gnats.
Unfortunately, Texas’ No. 1 culprit is here to stay. Aside from the traditional insect repellants and home remedies, it’s best to treat this problem at its source — water.
Turn over empty pottery to prevent from collecting water, drain plant saucers and fix any leaking outdoor faucets. Mosquitoes often lay their eggs in stagnant water, so the less the better.
Like humans, slugs seek out shade on sunny days. And like many other bugs, they love moist areas.
To prevent slugs from damaging your plants and leaving their slimy evidence, get rid of any hiding places. Think cool, dark and moist. Try irrigating your lawn in the morning instead of the evening, allowing plenty of time for plants and soil to dry before the sun sets.
To protect plants, spray surrounding areas with soap and water. You can also create barriers around your plants, such as rocks, wire or anything rough and abrasive to slow them down.
Lastly, slugs have no bones. Therefore, they can fit in any crack or crevice they set their eyes on. Seal any cracks and cover any holes you notice throughout your house. By doing so, you not only eliminate the potential for slugs, but for other bugs as well.
If you’re experiencing bug problems not addressed here, contact your local nursery for expert advice.
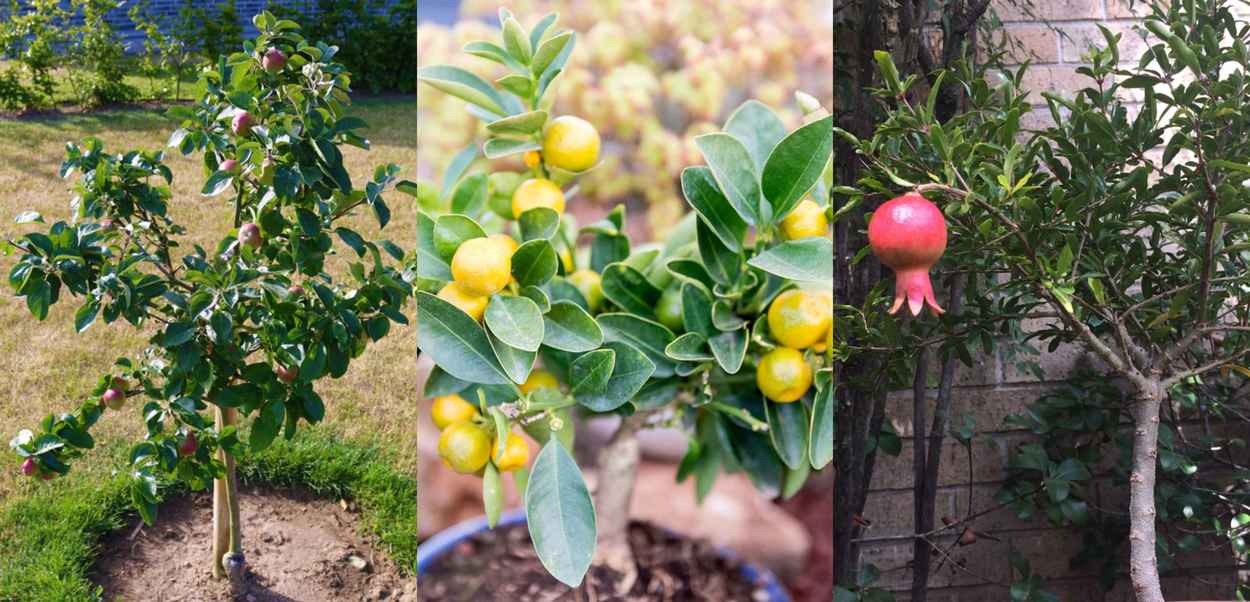
Gardeners can grow their own food, even in the smallest of areas. Dwarf fruit trees offer one wonderful way for gardeners to make the most of the space they have available.
Many small garden owners imagine that it would be completely impossible for them to consider a fruit tree in such a small area. But a fruit tree could be an amazing addition to your small garden, or even simply a patio or balcony. You just have to choose the right one, or ones, for your space. Today, we are fortunate that there are many dwarf fruit tree varieties to choose from.
Why Choose Dwarf Fruit Trees?
If you choose the right dwarf fruit tree for the location and situation where you live, you could be enjoying fresh fruit from your garden for years to come. They can be grown in even the smallest of growing areas. Many can even be grown in large pots or containers.
The fruit can be harvested without ladders or special equipment making it ideal for getting children involved and accessible for older gardeners, too.
Aside from a bountiful harvest of fresh and nutritious fruit, these trees enjoy beautiful blossoms making them an attractive addition to your garden.
Below, dwarf trees are listed according to the climate in which they can be grown. It is worth considering the fact, however, that choosing a tree and growing it in a container could allow you to grow a fruit tree that would not usually thrive in the climate where you live.
It would be possible to grow your fruit trees indoors, or to bring it indoors during the coldest months of the year. It could also allow you to grow your trees in a greenhouse or hoop house, or to move them into an undercover growing area once the weather turns. You might even be able to grow some varieties even if you only have a balcony, or no outside space at all.
Alternatives to Dwarf Fruit Trees
Before you choose a dwarf fruit tree, it is worthwhile considering alternative ways to incorporate fruit trees in small spaces. If you have a small garden, or courtyard space, you could still consider a full-sized fruit tree rather than one on a dwarf rootstock.
Fruit trees do not need to take up a huge amount of space. They can be trained into a fence-like structure or a fan shape, or espaliered and trained to spread out flat against a fence or wall. A full-size espaliered tree could be something to consider.
Horizontal espalier fruit tree trained on stone wall
Dwarf fruit trees can be productive and provide a worthwhile yield, but the yield is likely to be higher from a full-sized specimen trained against a wall. So,this is something to think about before you definitely decide that a dwarf fruit tree is right for you.
Instead of (or in addition to) growing dwarf fruit trees, small space gardeners could also consider growing other fruits. Many other fruits are also ideal for growing in containers, or in small growing areas. Options that you might like to consider include:
Red currants
Black currants
White currants
Golden currants
Gooseberries
Cranberries
Honeyberries
Cape Gooseberries
Of course you can also grow vining plants and canes up against a fence or wall, where they will take up little space. You could include, for example:
Blackberries
Kiwi
Grapes
Fruit growing is something that can be done even in the smallest of spaces.
How To Choose Dwarf Fruit Trees
If you have decided that you would like one or more dwarf fruit trees for your garden, it is time to delve a little deeper and decide which ones to buy. Before you start to look at your options, it is important to consider:
The climate in your area, and microclimate of your particular garden.
Patterns of sunlight, wind and water in the location where you want to place your dwarf fruit trees.
The fruits that you, your family and friends will actually want to eat.
Whether the fruit trees are self fertile and can go it alone, or need to be purchased with another tree with which they can pollinate.
The Best Dwarf Fruit Trees for a Cooler Temperate Climate
First off, let’s take a look at some options for dwarf fruit trees in a temperate climate, where chilly weather and frosts can be expected during the winter months. Within the temperate climate zone, conditions can still vary wildly, and have a huge bearing on which dwarf fruit trees you can grow. However, broadly speaking, these are some of the best options:
1. Apples
Apples are one of the most common garden fruits in temperate climes – and for good reason. An apple a day keeps the doctor away, and there are plenty of delicious varieties to choose from. It is always sensible to opt for an apple tree from a local plant nursery, as these are more likely to be suitable for the conditions where you live.
The size of a dwarf apple tree is determined by its rootstock. There are extreme dwarfing rootstocks (such as M27), dwarfing rootstocks (such as M9 and M26) and semi-dwarfing. It is worthwhile looking at which rootstock has been used for your dwarf apple. This will help you determine whether its eventual size will suit you and your backyard.
2. Pears
Pears are another popular choice for some temperate climate gardens, and can also be placed on a dwarfing rootstock in order to ensure that the tree does not get too big. ‘Concorde’ and ‘Conference’ are two popular pear varieties that can be grown as self-fertile, dwarf trees.
Interestingly, in Europe dwarfing pears are often grafted onto quince rootstock and not a pear one – sometimes with an ‘interstem’ of a pear variety that works well with the rootstock from the quince. The most common rootstock used for dwarfing is ‘Quince C’. In the US, the dwarfing rootstock for pears is often ‘Eline Quince’. Quince rootstocks are also used for dwarfing on a number of other fruiting trees. Pyrodwarf is one option that does use Pyrus rootstock.
3. Quince
Dwarf quinces will usually be supplied in a 4 ltr pot and, depending on the size of the container in which they are grown, reach an eventual height of around 1.5-2m.
Quinces have a high level of pectin which makes them ideal for making a range of jams and jellies and other preserves. The fruits will ripen perfectly when grown in a sunny location and though they have a long growing season, can be grown even in northern areas when positioned against a sunny, south facing wall.
4. Plums
While there are no extreme dwarfing rootstocks for plum trees, there are a number of semi dwarfing rootstock options which help to limit the size of these trees for smaller gardens. These include Pixy, Plumina, and VVA-1.
Dwarf plums in a range of varieties can be grown in pots and will reach an eventual height of no more than 2m, often considerably less, depending on the size of the container. You can also find fruits in the same family, such as gages, damsons and Mirabelles grafted onto the same rootstocks to create small-tree options.
5. Cherries
Cherries come in a range of sweet and sour cherry varieties that are suitable for many temperate climate gardens. Sweet cherries are delicious straight from the tree, while sour cherries are best cooked into jellies or other preserves or cooked into sweetened desserts.
Cherries can be made less vigorous through the use of the Gisela 5 rootstock. If grown in the ground, cherries on this rootstock will tend to grow to around 2.4-3m tall. However, their size can be limited through growing in a container, and through judicious pruning.
6. Medlar
Medlars are not usually eaten raw but are excellent for making jellies or for use in a wide range of desserts. Left to soften (blet) on the tree, the fruit mellows and is a traditional, if unusual treat. These trees will do best in sunny, sheltered sites and thrive in deep, fertile and well-drained soil.
When grafted onto the right rootstock, however, medlars can also be a dwarf or patio tree option. Depending on the size of the container in which they are placed, they will reach an eventual height of around 1.5-2m.
7. Mulberry
Mulberries cannot commonly be bought from the shops, so growing your own is likely to be the best way to source these fruits. The trees are not only a source of food. They can also make for interesting architectural features in gardens, with their gnarled shapes.
Mulberries can be grown against walls if space is limited. But since these trees are more bush-like in shape,size and habit, their growth can also be curtailed by growing them in containers. You can prune the trees for size after the fruits are harvested in the fall.
In addition to growing the above, gardeners in this climate type may also be able to grow some or all of the dwarf fruit trees in the next section. Having access to indoors space, or an undercover growing area in which to place tender trees in winter, will dramatically increase the number of dwarf fruit trees that it is possible to grow in a cold or cool climate.
Dwarf Fruit Trees for a Warmer Temperate Climate
In a warmer temperate climate, varietals of all of the above trees are likely to be available to you. However, the warmer weather (and a longer growing season) can also make it easier to also grow all of the following dwarf fruit tree options:
8. Apricots
Apricots blossom early in the year and so can fall prey to late frosts if grown outside in cooler temperate regions. In warmer temperate regions, however, or when grown under cover or in a sunny, sheltered spot, these trees can thrive, even when grown in containers.
Wavit, a plum rootstock, is sometimes used for apricots, and will create a tree up to 3m tall if grown in the ground. Container apricot trees will always be grown on a suitable rootstock. When restricted in size by a large container, and through careful pruning, they can be an ideal choice for smaller spaces.
9. Peaches
Peaches of a medium to small size are also sometimes grown on a Wavit rootstock. The size of peach trees can also be curtailed if they are grown in containers. Peach trees can also easily be trained to fit into a smaller space,and carefully pruned for shaping and size.
Peaches will be ready to pick when they are fully colored and the flesh close to the stalk feels soft. Cup each fruit in the palm of your hand and then lift gently. You will need to harvest over a long period as not all the fruits will develop at once. Do not leave picked fruits uneaten for too long. Peaches are at their best eaten fresh, straight from the tree.
10. Figs
The size of fig trees will often be determined by the variety rather than by a particular rootstock. Fig trees grow large if planted in the ground in optimal conditions, however, they can be kept much smaller and in check when grown in small spaces in containers. In fact, figs will fruit better if grown in containers to curtail non-fruiting growth. ‘Celestial’ is one popular dwarf fig variety.
Fig trees will produce two crops of figs in a year in a warmer temperate climate. The first crop can be harvested in late spring or early summer and the second, the maincrop, in late summer or early fall. (In cooler climes, usually only one crop of figs will come to fruition.)
11. Persimmons
Dwarf persimmons are much smaller than standard persimmon trees. It should be noted, however, that they can still reach around 3-4m in height if grown in the ground, left unchecked and not pruned. Fortunately, like many of the other fruit trees on this list, persimmons can also be grown in containers, which will curtail their growth.
There are astringent and non-astringent varieties of persimmons. Astringent varieties,such as Hachiya and Eureka, need to be perfectly ripe to be edible. Non astringent types such as Fuya and Jiro can be eaten crisp, like an apple, and are sometimes called ‘sweet persimmons’. There are some smaller varieties to choose from, but even standard trees can easily be kept in check.
12. Pomegranates
Pomegranates are another good choice for warmer temperate climate gardens. The fruits have an edible pulp. When grown in containers, dwarf pomegranates can be found which will grow no more than 2-3ft in height.
Punica granata ‘Nana’ is a dwarf pomegranate variety which will produce ornamental orange flowers followed by edible fruit. If you were planning to grow it indoors, however, you would have to hand pollinate, as insects are usually needed for pollination.
13. Citrus Trees
Citrus trees such as oranges, lemons, limes and grapefruit all lend themselves well to container growing. These trees can all easily be grafted onto a dwarfing rootstock and grown in small garden beds or containers. Nearly every worthwhile variety of edible citrus is now available to home gardeners on a dwarfing rootstock.
As long as they get enough warmth, sunshine and water, and a suitable growing medium, dwarf citrus trees will fruit just as well as larger trees of these types. Careful pruning can allow you to shape your trees and keep them within bounds.
Dwarf Fruit Trees for a Subtropical Climate
In a subtropical climate you will have a different range of growing challenges to those who live in a temperate climate. However, you may still be able to grow a number of the dwarf fruit tree options mentioned above. It will likely be easier to grow those more suited to a warmer climate – though varietals of cooler weather trees are sometimes available for subtropical climes.
However, the different weather patterns mean you can consider a range of subtropical and tropical fruit tree options. Some dwarf fruit tree options for subtropical areas are:
14. Mango
While they may be much trickier to grow in cooler climates with shorter growing seasons, mangos can be a staple in a subtropical climate garden. Dwarf mango trees grow around 2-4m tall if grown in the ground and can also be grown in containers.
Irwin and Nam Doc Mai varieties are said to be the best mango trees for container growing. But you could also try other varieties, such as King Thai, Glenn, Cogshal, Palmer and Carrie. Mangos are delicious eaten straight from the tree and dwarf varieties can fruit just as well as their larger counterparts.
15. Avocado
Avocado trees produce a healthy super fruit full of essential fats and nutrients. You could grow your own at home, even if you only have space for a small avocado tree.
Regular avocados can grow up to 80ft tall, but ‘Little Cado’, the ‘Wurtz’ avocado, is a true dwarf variety, typically reaching no more than 10ft in height. Grafted trees will usually start fruiting within two years of planting.
16. Lychees
There are a range of dwarf and semi-dwarf lychee varieties available. These can be grown in pots, though can sometimes be a little temperamental when not grown in the ground. Lychees are tangy, sweet and juicy, with semi-translucent flesh and rough, scaly skins in pinks or reds.
‘Emperor’ and ‘Wai Chee’ dwarf lychee trees are available,and these can produce abundant crops in a subtropical climate. These trees often take little effort to grow in the ground, but many require a bit more care and attention if grown in containers.
17. Pawpaw
A member of the same family as the standard pawpaw, Asimina triloba, dwarf pawpaw, Asimina parviflora is a much smaller tree or shrub. It is a member of the custard apple family. Native to the Southeastern United States, it also produces an edible fruit, though smaller than the standard pawpaw.
Due to its smaller size, the dwarf pawpaw could be a much better choice for small-space subtropical gardens. It can even be grown in containers. Fresh pawpaw are hard to transport and store, and so rarely found in stores – all the more reason to consider growing it in your own garden.
18. Jaboticaba Fruit
Native to Brazil, Jaboticaba fruit is little known outside of its native range. But this member of the Myrtle family could be a good choice for your subtropical garden. These trees are slow growing and the Myrciaria tenella subspecies grows into shrubby plants around 3 1/2- 4 ½ ft high. Other types of jaboticaba tree can grow around 12-15 ft high outside its native range, and perhaps up to 45 ft in ideal growing conditions.
Weirdly, the grape-like fruits of jaboticaba can be produced in clusters, or singly, all up and down the main trunk and branches. Trees can fruit up to five times each year. The fruits taste a little like certain muscadine grapes and can be eaten fresh or turned into jellies, or wine.
19. Cherry Guava
Psidium cattleanum, known as cherry guava or strawberry guava, is another small tree native to Brazil that could be considered for many subtropical gardens as well as for tropical locations. It is another member of the Myrtle family and since it can be considered as a large shrub rather than a tree, can be ideal as a sort of dwarf fruit tree for smaller spaces.
Fruits can be eaten, and are often used to make jelly or other preserves. The skin is often removed to provide a sweeter flavour. Interestingly, although native to the tropics, this plant can be frost hardy. It can also be grown in containers.
Note – in Hawaii, this tree is a biocontrol hazard and threatens native forest.
20. Loquats
Sweet and juicy, loquats are similar in taste to apricot or plum. Rare in many parts, these could be an interesting choice for a subtropical garden. Dwarf loquat fruit trees are rare but available, and these can be grown in the ground or in containers.
‘Advance’ is a Japanese group loquat that is a natural dwarf, growing to around 5ft in height. However, it is self-infertile and will need to be planted with other loquat varieties. Certain varieties can be grown as container trees.
The options mentioned above should show you that there are plenty of dwarf fruit trees to choose from, wherever you live. So don’t make a lack of space an excuse. Start growing your own food right away – including plenty of fresh fruit!
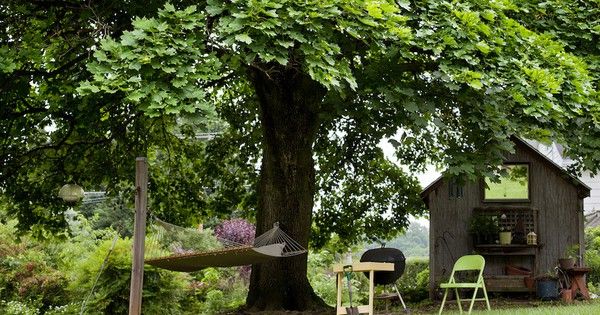
Planting shade trees will help keep your home and yard cooler in the summer heat, saving you both money and energy, while adding wildlife habitat to the neighborhood.
The free solar energy that hits the Earth each day can keep us warm, light our homes, grow our food, and generate clean renewable electricity, so we often invite it into our lives. But when the weather heats up in the summer, the sun can actually cause us to use more energy, because we then need to run air conditioners to cool us back down.
Keeping the sun off of our homes and windows during the summer can end up saving us both money and energy, because we can avoid some of the heating effects and keep our homes cooler to begin with, so less energy is required to keep them comfortable. And one of the best ways to do that is by planting shade trees in the right location around our home, where they can block the sun from streaming in our windows and heating our walls and roofs during certain times of the day.
Trees that can serve to cast shade come in all shapes and sizes, and for many different climates and planting zones, so there are plenty of options to choose from. However, because most of us are very impatient, one of the most common requirements that people have in choosing varieties is that they be fast growing shade trees.
Here are 7 of the most popular fast growing varieties of trees that can add shade to your property:
1. Hybrid Poplar: One of the most recommended fast growing shade trees is the hybrid poplar, which can grow up to 8 feet per year, and mature at about 40′ to 50′ high. There are various types of hybrid poplars, but the Arbor Day Foundation recommends the Populus deltoides x Populus nigra variety, which is a “cottonless hybrid” and a little less messy in the yard than some other varieties.
2. Nuttall Oak: This fast growing shade tree, also called red oak or pin oak, is said to be the fastest growing variety of oak, and can provide not only a leafy canopy, but a steady supply of acorns each year, which are devoured by squirrels, deer, and turkeys.
3. Northern Catalpa: The large showy flowers of the catalpa, also known as the cigar tree or the catawba, are an added attraction to having this fast growing shade tree in your yard (and great for bees), but the real magic comes from its thick canopy of large leaves.
4. Red Maple: Along with casting shade, the red maple also adds a burst of color in the fall, with the leaves turning a vibrant red before dropping. The growth rate of the red maple is about 3 to 5 feet per year, topping out at about 40′ high, and can rapidly create privacy and shade for your home or yard.
5. Weeping Willow: This iconic shade tree also happens to be a fast grower, with growth rates of anywhere from 3 feet to 8 feet per year. While weeping willows will grow especially well near water, there are a variety of hybrids available that can be better suited to drier conditions.
6. Paper Birch: The paper birch, aside from being a fast growing shade tree, also features a white bark that can add to the look of any yard, especially in winter when the leaves have dropped. Birches can also be tapped for their sap, which can be made into birch syrup (although you’d need quite a few trees to make it worth your while).
7. American Sycamore: This fast growing tree, sometimes referred to as the American planetree, also has a whitish mottled bark, and can grow to be quite large. While sycamores are often found near rivers and ponds, they can also be grown in an urban yard, and may grow as much as 6 feet per year and reach heights of 70 feet or more.
Not all of these shade trees will be well suited to your yard, as the length of the growing season, the frost dates, the temperatures, the annual rainfall, and the type of soil in your yard will all vary by location. The best way to find the fast growing shade trees that are best for your specific region is by asking a local expert, such as at a nursery or through a local Cooperative Extension, as they can steer you toward proven varieties and away from nuisance, invasive, or exotic varieties of trees.
This updated article was originally published in 2014.
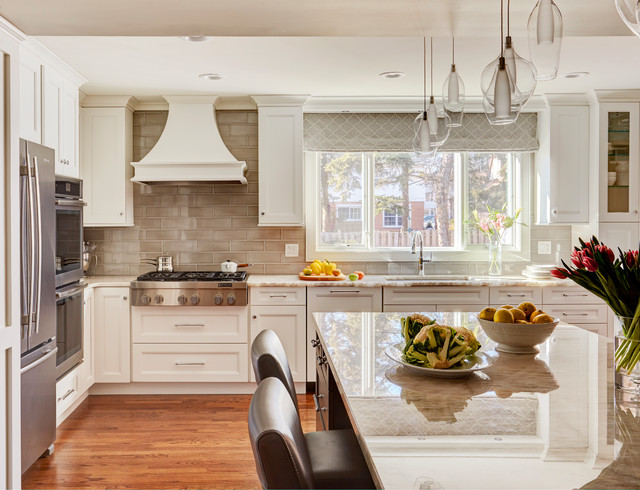
Failing to allow enough circulation space can make a kitchen feel cramped and restrict the number of people who can comfortably use the space at the same time, says Jenefer Gordon, principal at interior design firm Eat Bathe Live. “It causes even more issues when your kitchen doubles as a thoroughfare. A lack of space can also make it difficult to open appliances such as the fridge and dishwasher,” she says.
Solution: To provide adequate circulation, try to have about 4 feet of space between kitchen countertops, Gordon says. Allow a little more room if there is a thoroughfare leading through the kitchen. “In a small kitchen, [39 inches] would be the minimum amount of space between countertops, but aim for more if you can,” she says.
2. Not Planning Around the Workflow
“A good kitchen workflow is essential. If you don’t have one, your kitchen will be inefficient, and you can end up running backwards and forwards between the different parts of your kitchen every time you cook, wash or prep,” Gordon says.
Solution: In the planning stages, carefully consider how you use your kitchen, she says. She suggests increasing functionality by including storage for spices and oils near the cooking zone and storing cutlery and dishes near the dishwasher. “You’ll find many smart solutions on the market, including wide drawers and tailored inserts that facilitate high-functioning storage,” Gordon says.
3. Not Measuring Appliances
Lack of planning when it comes to appliances can lead to excessive protrusion from oversize refrigerators. “This can affect the ability to open cabinets and other appliances in your kitchen, and reduce circulation space,” Gordon says.
Not measuring small appliances like microwaves, blenders and food processors can be an issue too. Without a proper home, they can end up sitting out on the counter and creating clutter, she says.
Solution: Select appliances well in advance, checking the dimensions and the way appliances open to ensure that your kitchen layout can accommodate them in concealed, tailored storage, Gordon says. This also applies to pots and pans.
4. Poor Lighting Placement
If you don’t put the right light fixtures over your countertops, you will end up prepping, cooking and cleaning up in the shadows, says home stager Naomi Findlay.
“Another common lighting mistake is prioritizing aesthetics over functionality. Pretty pendants are beautiful, but if they don’t shine enough light over your work surfaces, they will not be practical,” she says.
Solution: Findlay recommends positioning lighting slightly in front of you rather than directly overhead or behind you. Installing downlights, pendant lights and sconces on separate circuits makes it easier to control your lighting levels and atmosphere, she says. And don’t forget to choose bulbs that emit sufficient light, so you can see what you’re doing when you’re chopping and cooking.
5. Forgetting About Function
When planning your remodel, make sure you put your kitchen’s busiest areas — the sink, stove and fridge — in practical locations that are relevant to one another while allowing enough space for people to use and access them comfortably, Findlay says.
When choosing cabinetry, make sure the doors won’t block your workflow when they’re open, she says. “The last thing you want is your fridge and cupboard doors banging into each other every time you open them!”
Solution: Plan your kitchen layout as far in advance as possible, and choose your appliances before you start looking at cabinetry, Findlay says. “This will allow you to fit your units around your appliances, rather than the other way around, giving you a seamless look that’s both smart and space-efficient.”
Tip: Think about how many people live in your home and will be using the kitchen at one time, she says. If it’s going to get crowded, you may have crammed too many elements into the kitchen layout and may want to consider scaling back
6. Wasted Space on a Kitchen Island
Kitchen islands are great for increasing your prep and storage space but will work only if you have the room, Findlay says. If your kitchen is small, an island can be a waste of space.
“Placing an island in the wrong spot is another recipe for disaster,” she says. “A poorly positioned island can obstruct the flow of traffic to and from the sink, refrigerator, stove and primary workstations, creating a bottleneck in your kitchen.”
Solution: Choose an island only if your kitchen can accommodate it or specify a narrow one. Findlay suggests having about 40 inches on both sides of the island for good traffic flow. “Deciding how big or small your island unit should be will depend on what it needs to house and the proportions of your kitchen,” she says. “I would recommend a minimum width of [about 47 inches] for a kitchen island. But if you don’t plan on installing a sink or a stovetop in it, you could go as narrow as [about 24 inches] in width.”
7. Inadequate Space Between the Sink and the Stove
The area between the sink and the stove is the main food preparation area, so although there are no set guidelines, you’ll want a decent expanse of countertop space there, says Cherie Barber, owner of Renovating for Profit, which offers online instruction in remodeling.
Solution: When planning your kitchen, make sure the layout meets the practical day-to-day needs of the kitchen user, she says.
8. Poorly Positioned Cabinet Doors and Drawers
Cabinet doors and drawers can end up blocking doorways and walkways when they’re opened, Barber warns.
Solution: “Planning is key,” she says. “Before you commit to a layout, think about how and where all the elements in your kitchen will open, including cupboards, drawers, the fridge and dishwasher, and how people will move through the space.”
9. Not Maximizing Vertical Wall Space
In a small kitchen, every bit of space counts, and your walls offer valuable storage real estate, Barber says.
Solution: “Taking your cupboards right up to the ceiling will maximize your storage potential in a compact kitchen,” she says. “If you don’t like the idea of rows of closed-door cupboards, you can always mix it up with open shelving.”
Tip: If your wall cabinets are positioned over a cooktop, minimum clearance rules apply, Barber says. The minimum requirements can vary for electric and gas cooktops, and range from 2 to 3 feet, she says.
10. Assuming You Need a New Layout
“I’d never automatically dismiss the existing layout of a kitchen,” Barber says. “It’s often planned that way for very practical reasons, such as placement of doors and windows and the most logical traffic flow.”
Solution: A tweak to the layout, such as making it open plan or adding a breakfast bar or an island, may be all that’s needed, she says. This can save money because you won’t have to move electrical and plumbing systems.
“If you’re designing a kitchen layout from scratch, address the practical considerations first: How many people will be using the kitchen on a regular basis? Do you do a lot of entertaining?” she says. “This will help you work out the kitchen’s size and function.”
Then consider how the work triangle — cooktop, sink and fridge — will best fit your layout, she says. Allow enough space between the three points of the triangle, so you’re not walking yards between them every time you use your kitchen.
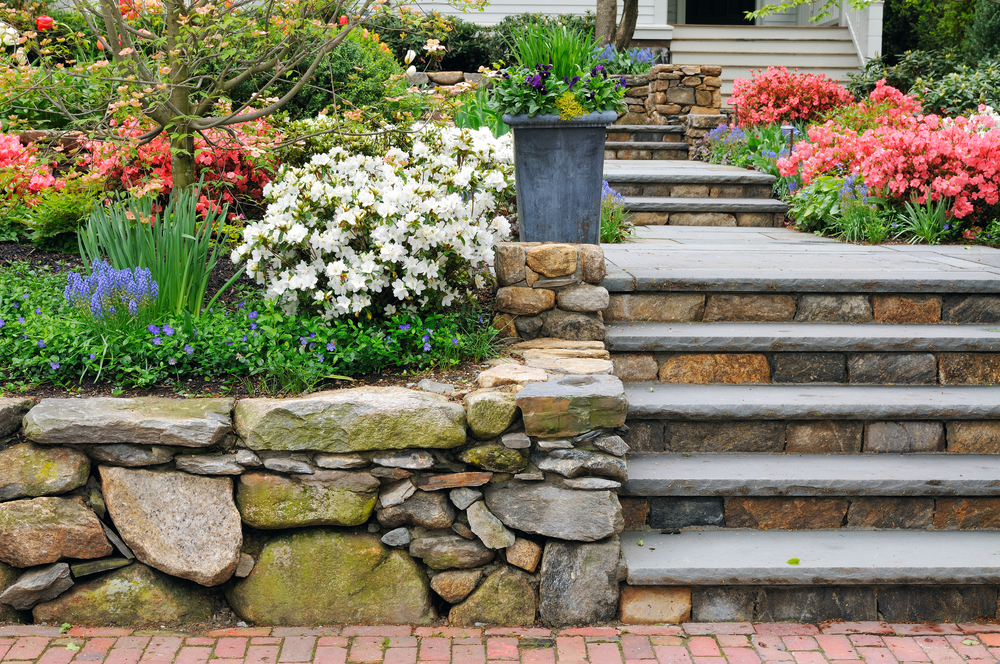
Adding in structures to a space to create a focal point is a common practice for professional landscapers, and a very popular item to create is a retaining wall.
Retaining walls can be used to help customers overcome sloped areas in their yard and often add in visual interest to a landscape while serving a functional purpose. Retaining walls can also be used to increase the amount of usable land available in a yard, and they can even provide environmental benefits such as protecting areas from saturation and soil erosion reduction.
If you find yourself in the midst of a retaining wall installation project in the coming months, take a look at a few tips you can keep in mind when creating this eye-catching piece.
Specifics when building
When working with steeper slopes, some techniques you can utilize are the use of interlocking concrete blocks, riprap (loose rock) areas, wood retaining walls, rock retaining walls and terracing. Keep in mind that if you do choose to use wood, it’s a good idea to treat the wood with a preservative to prevent rotting.
If you know the wall will be higher than 3-4 feet, an engineer will be required to assist with the project because of zoning codes and regulations.
The wall should lean into the hill at a minimum of 1 inch for every 12 inches of height in order to maintain a safe load on the wall. This can also help with the drainage when the soil becomes saturated. It’s also possible to redesign the grade of the slope before installing the wall, as this can help direct water away from the wall and could also decrease the amount of slope needed.
To help keep water build-up at bay in poorly draining soils, consider placing drainage tiles behind the wall, but be sure to construct these tiles with a 12-inch-deep layer of backfill that is freely drained, such as gravel.
The cost, height and function of the wall will all depend on what materials your customer chooses for the project, but if the wall is being used strictly as a decorative piece in the yard, almost any kind of material will do the job.
For walls that will be serving the purpose of supporting larger loads, you will need to use long-lasting, durable materials that will be suited for the conditions of the site.
In areas where the wall’s height will be less than 4 feet tall, wood and solid concrete walls are recommended. Keep in mind that wooded walls will deteriorate faster, and concrete walls will have drainage issues that could cause water saturation conditions to occur above the wall.
Keep an eye out for…
When maintaining your customer’s landscape, look for areas in need of a retaining wall.
One area of concentration to focus on is the slopes present in the yard. If you see an area with a slope greater than 3:1, be sure to consult with an engineer. If the slope is over 2:1, it will require structures or specialization techniques.
Ask yourself and your customer how much freezing or frost will both the wall and soil it’s holding come in contact with, and always check the wall’s drainage to see if it’s functioning properly. If it looks like the water will flow heavily on the wall and soil, you may need to add in some drainage.
Take stock of the type of soil in your customer’s yard, as soil with heavy clay content won’t draw water well, but it is less prone to erosion. Sandy soil, on the other hand, will have opposite characteristics.
Check for other structures near the site where a retaining wall might be needed, and if there are existing structures around, consider how they will be affected if or when a retaining wall is installed.
Also remember that if you’re located in an area where earthquakes are prevalent, talk to an earthquake engineer to analyze the wall and make it more earthquake-resistant.
Types of retaining walls
Once you’ve determined that your customer’s yard does need a retaining wall, the time comes to determine which type of wall your customer needs.
Gravity walls will hold the earth by the weight of the wall’s material. They can be formal pavers or even a stack of large rocks, but they can fall easily and should be used for short slopes of 3 feet or less.
Anchored walls are the strongest type and can be combined with other techniques. An anchor is wrapped around the wall, and a base is placed deeper into the hill, which provides the stabilization.
Piling walls use long piles, or poles, that go deep into the soil and above it. Pilings can be made of metal or treated lumber, and they have a good capacity to hold the soil back.
Cantilever walls are similar to piling walls, however, they get added strength from a sort of “arm” that extends back into the hill. This can increase its capacity to stabilize pressure.
If you’re ready to upgrade to a new lawn mower but aren’t sure you want a traditional gas-powered model, consider going electric. Not only would you be able to bid goodbye to jerking a pull cord, replacing fouled spark plugs, and storing flammable fuel, you’d be doing your part to reduce carbon emissions. But electric mowers do have their downsides when it comes to power, price, and even safety. So read on to understand the pros and cons, figure out what features to look for when shopping, and get the 411 on our three picks for the best electric lawn mower according to all of the reviews.
So read on to understand the pros and cons of electric mowers, to figure out what features to look for when shopping, and to find out why we chose the following five models as the best choices for today’s homeowner:
Photo: istockphoto.com
Why You Might Want an Electric Mower
Electric mowers cut the grass the same way gas-powered mowers do: Spinning rotary blades chop off the top of the grass leaves as you push the mower across the lawn. While gas mowers operate via small combustion engines, electric lawn mowers rely on power from either extension cords or rechargeable batteries. Corded electric mowers have been around for years, and they’re great for mowing small lawns, but with recent advances in battery power storage, cordless electric mowers—the new kids on the block—are carving a niche in residential lawn care.
If you’re accustomed to operating a gas mower, you may be pleasantly surprised by an electric model’s benefits and options. But you’ll find a few drawbacks as well.
+ No engine maintenance, such as changing spark plugs, engine oil, or filters.
+ No flammable gasoline stored in your garage or shed.
+ Whether using a plug-in or battery model, it will cost between $5 and $10 to operate an electric lawn mower for a single four- to six-month growing season. Fuel to operate a similar size gas mower costs between $15 to $25 per season.
+ Environmentally friendly electric mowers do not produce carbon dioxide, hydrocarbons, or other fossil-fuel fumes.
+ Quiet. An electric lawn mower produces 65 to 75 decibels of noise, which is equivalent to a washing machine or a two-person conversation. Gas mowers generate between 95 to 100 decibels of noise, comparable to a loud motorcycle.
– Corded electric mowers are limited to the length of the cord, typically about 100 feet from an exterior power outlet.
– Mowing time for cordless models depends on how long the batteries hold a charge. Typically, you can operate a battery powered mower for between half an hour to an hour before it requires a recharge, and it takes approximately eight to 12 hours to recharge. If your yard is large, you could be charging the battery halfway through.
– Electric lawn mowers, not quite as powerful as gas mowers, can be challenged by thick lawns, where the carpet of grass is so dense you can’t see soil when you separate the top of the blades. Thick grass creates more resistance, causing the mower blades to bog down or leave entire clumps uncut. To compensate, electric mower owners raise the mowing height or mow more often (every two to three days), cutting off only the top quarter, or less, of the grass blades.
– Inadvertently mowing over the cord could cause electric shock.
– Cordless electric mowers tend to be more expensive, on average, than gas mowers. The average push gas mower runs $100 to $350, while the average cordless electric mower runs $200 to $450. Corded electric models are the least expensive, however, ranging from $90 to $150.
Photo: istockphoto.com
Shopping Considerations for the Best Electric Mower
While most models within the category offer similar options, a few features are really worth paying attention to when distinguishing the best electric lawn mowers from the competition.
The Best Electric Mowers
With the help of reviewers who’ve already discovered the benefits of electric mowers, we’ve identified five of the best electric lawn mower models on the market today. Keep reading for tips on where to begin your shopping.
With a 16-inch swath cut and a 40-volt Lithium-ion battery system, the Greenworks 16-inch Cordless Electric Lawn Mower will mow up to 7,000 sq. ft. on a single charge, suiting it perfectly for small- to medium-sized yards. The mower features a push-button start and graduated wheel size (6-inch front wheels and 7-inch back wheels) to make maneuvering the mower a snap; plus, it offers both mulching and rear-bagging. Grass-cut height is adjustable from 1¼- to 3⅜-inch, and its SmartCut technology speeds up the blades when the machine senses thicker-than-average grass. At the end of an afternoon’s work, the handle folds down for easy storage, and its G-MAX battery can be charged to use next time or with other G-MAX yard tools. Amazon buyers rate the Greenworks mower 4.4 out of 5 stars for quality, the ability to cut easily through dense grass, and for quiet operation.
Give away that old gas-guzzling mower, toss out those fuel cans, and throw out that oil-changing pan—you won’t have any need for them when you have the Yard Force 22-inch 3-in-1 Cordless Mower. Designed with a generous 22-inch swath cut, the Yard Force will make quick work of larger yards and will mow up to a half-acre of lawn on a single charge. The mower comes with two 120-volt lithium-ion batteries (to be used at the same time) for superior turf-cutting power. Amazon buyers award this powerful mower an enthusiastic 4.8 stars, citing its self-propulsion (which is rare for electric mowers), high-quality design, and wide swath width. This powerful mower comes with a push-button start, single-lever height adjustment from 1½ to 4 inches, and a folding handle for easy storage. Rear-bagging, side-discharge, and mulching options are available.
Going green—and keeping your yard looking great—is affordable when you choose the Earthwise 14-inch Corded Electric Mower. This budget-friendly corded mower features the option of discharging grass clippings to the side or mulching. Its 14-inch swath cut makes it a good option for small yards; just remember that you’ll be restricted by the length of the extension cord you use. The Earthwise features a push-button start, and it comes with a secure cord retention hook that manages excess cord so it doesn’t get tangled or in the way of the mower. The mower’s handle folds down for compact storage and Amazon buyers, who give the Earthwise mower 4.3 stars, find the machine is lightweight, easy to push, and powerful enough to cut through dense grass.
With enough power to effortlessly cut through tall grass and an ample 18-inch swath width, the Greenworks 18-inch Corded Mower takes top honors in our corded category and earns an enviable 4.6 stars from Amazon buyers. The mower offers seven cutting heights, ranging from 1¾ to 3¾ inches and it comes with oversized 7-inch wheels that make maneuvering a cakewalk. It also features a push-button start and a cord-retention hook. The Greenworks will make fast work of small yards, mowing distance is limited to the length of your extension cord. Side-discharge and mulching options are available, and the mower’s handle folds down for compact storage.
If you’re looking for a powerful cordless electric mower with a generous swath cut, you’ll love the Greenworks 21-inch Cordless Mower. It uses two 80-volt G-MAX lithium-ion batteries (included, and compatible with other G-MAX powered lawn tools) and will power through nearly an acre of lawn on a single charge. This electric mower turns on easily with a push-start button, and it features the brand’s SmartCut technology, which senses when the grass becomes denser and speeds up the blades. Large, 7-inch front wheels and 10-inch rear wheels make it easy to mow and maneuver. More than 500 Amazon buyers endorse the Greenworks mower, giving it a resounding 4.4 stars for its ability to cut through tall grass without bogging down and for maneuverability.


 Adding in structures to a space to create a focal point is a common practice for professional landscapers, and a very popular item to create is a retaining wall.